The Weather Center can be set to alert when a specific weather condition is reached.
The following Weather Alarm settings can be adjusted in the ALARM setting mode.
•High outdoor temperature alarm
•Low outdoor temperature alarm
•High outdoor humidity alarm
•Low outdoor humidity alarm
•High wind speed alarm
Default alarm values:
Temperature | Low | 32°F | |
High | 104°F | ||
| |||
Relative | Low | 45% | |
Humidity | High | 70% | |
Wind speed | High | 62.0mph |
HIGH AND LOW OUTDOOR TEMPERATURE ALARM SETTING
Note:
The High and Low outdoor temperature alarm can be set On/Off independently, according to your needs.
Set the Outdoor temperature alarm value (High or Low alarm value) :
1.In the normal display mode, press the ALARM key twice. The High Outdoor Temperature alarm display will be shown.
High alarm icon ![]()
![]()
![]()
![]()
![]()
![]()
![]()
![]()
![]()
![]()
![]()
2.Press and hold the SET key for about 2 seconds. The temperature digit will start flashing. Press the + or MIN/MAX key to set the high outdoor temp alarm value. (Keep holding the key will allow the value to increase faster.)
3.Press the ALARM key to confirm the setting. The digit will stop flashing. Press the SET key to switch on or off the alarm. (The showing of the icon (((y))) means that the alarm is switched on.)
4.Press the ALARM key once. The Low Outdoor Temperature alarm display will be shown.
5.Press and hold the SET key for about 2 seconds. The temperature digit will start flashing. Press the + or MIN/MAX key
17
In case the humidity value meets the condition for high alarm or low alarm, the value will be blinking, along with the corresponding icon ("HI AL"/ "LO AL"). And the buzzer will ring for 2 minutes. User may press any key to stop the sound.
WIND SPEED ALARM SETTING
The High wind speed alarm can be set by following the steps below.
1.In the normal display mode, press the ALARM key six times. The High
2.Press and hold the SET key for about 2 seconds. The wind speed digit will start flashing. Press the + or MIN/MAX key to set the high wind speed alarm value.
3.Press the ALARM key to confirm the setting. The digit will stop flashing. Press the SET key to switch on or off the alarm. (The showing of the icon (((y))) means that the alarm is switched on.)
4.Press the ALARM key once to return to the normal display mode.
In case the wind speed exceeds the condition for high wind speed alarm, the value will be flashing, along with the corresponding high alarm icon ("HI AL"). And the buzzer will ring for 2 minutes. User may press any key to stop the sound.
HYSTERESIS
To compensate for fluctuation of the measured data, which may cause the weather alarm to sound constantly if the measured reading is close to your set level, a hysteresis function has been implemented for each weather alarm. For example, if the high temperature alarm is set to +77°F and the current value moves to +77°F, the alarm will be activated (if it has been enabled). Now when the temperature drops to +76.8°F or below and thereafter again increases to beyond +77°F, the data will be blinking, but no alarm will be activated. It has to drop to below +75.2°F (with a
Weather data | Hysteresis |
Temperature | 1.8°F |
Humidity | 3% RH |
Wind speed | 3.1 mph |
Note:
The temperature or humidity data will keep on flashing even after a key has been pressed to stop the alarm or buzzer has been switched off, to
19
to set the low outdoor temp alarm value. (Keep holding the key will allow the value to increase faster.)
6.Press the ALARM key to confirm the setting. The digit will stop flashing. Press the SET key to switch on or off the alarm. (The showing of the icon (((y))) means that the alarm is switched on.)
7.Press the HISTORY key or wait for about 30 seconds and the display will return to normal display mode automatically.
In case the temperature value meets the condition for high alarm or low alarm, the value will be blinking, along with the corresponding icon ("HI AL"/ "LO AL").
And the buzzer will ring for 2 minutes. User then may press any key to stop the ring.
User may quit the alarm setting and return to the normal display mode by pressing the HISTORY key.
HIGH AND LOW OUTDOOR HUMIDITY ALARM SETTING
Note:
The High and Low outdoor humidity alarm can be set On/Off independently according to your needs.
Set the Outdoor temperature alarm value (High or Low alarm value):
1.In the normal display mode, press the ALARM key 4 times. The High Outdoor Humidity alarm display will be shown.
2.Press and hold the SET key for about 2 seconds. The humidity digit will start flashing. Press the + or MIN/MAX key to set the high outdoor humidity alarm value.
3.Press the ALARM key to confirm the setting. The digit will stop flashing. Press the SET key to switch on or off the alarm. (The showing of the icon (((y))) means that the alarm is switched on.)
4.Press the ALARM key once. The Low Outdoor humidity alarm display will be shown.
5.Press and hold the SET key for about 2 seconds. The humidity digit will start flashing. Press the + or MIN/MAX key to set the low outdoor humidity alarm value.
6.Press the ALARM key to confirm the setting. The digit will stop flashing. Press the SET key to switch on or off the alarm. (The showing of the icon (((y))) means that the alarm is switched on.)
7.Press the HISTORY key or wait for about 30 seconds and the display will return to normal display mode automatically.
18
indicate that the current weather condition is out of the
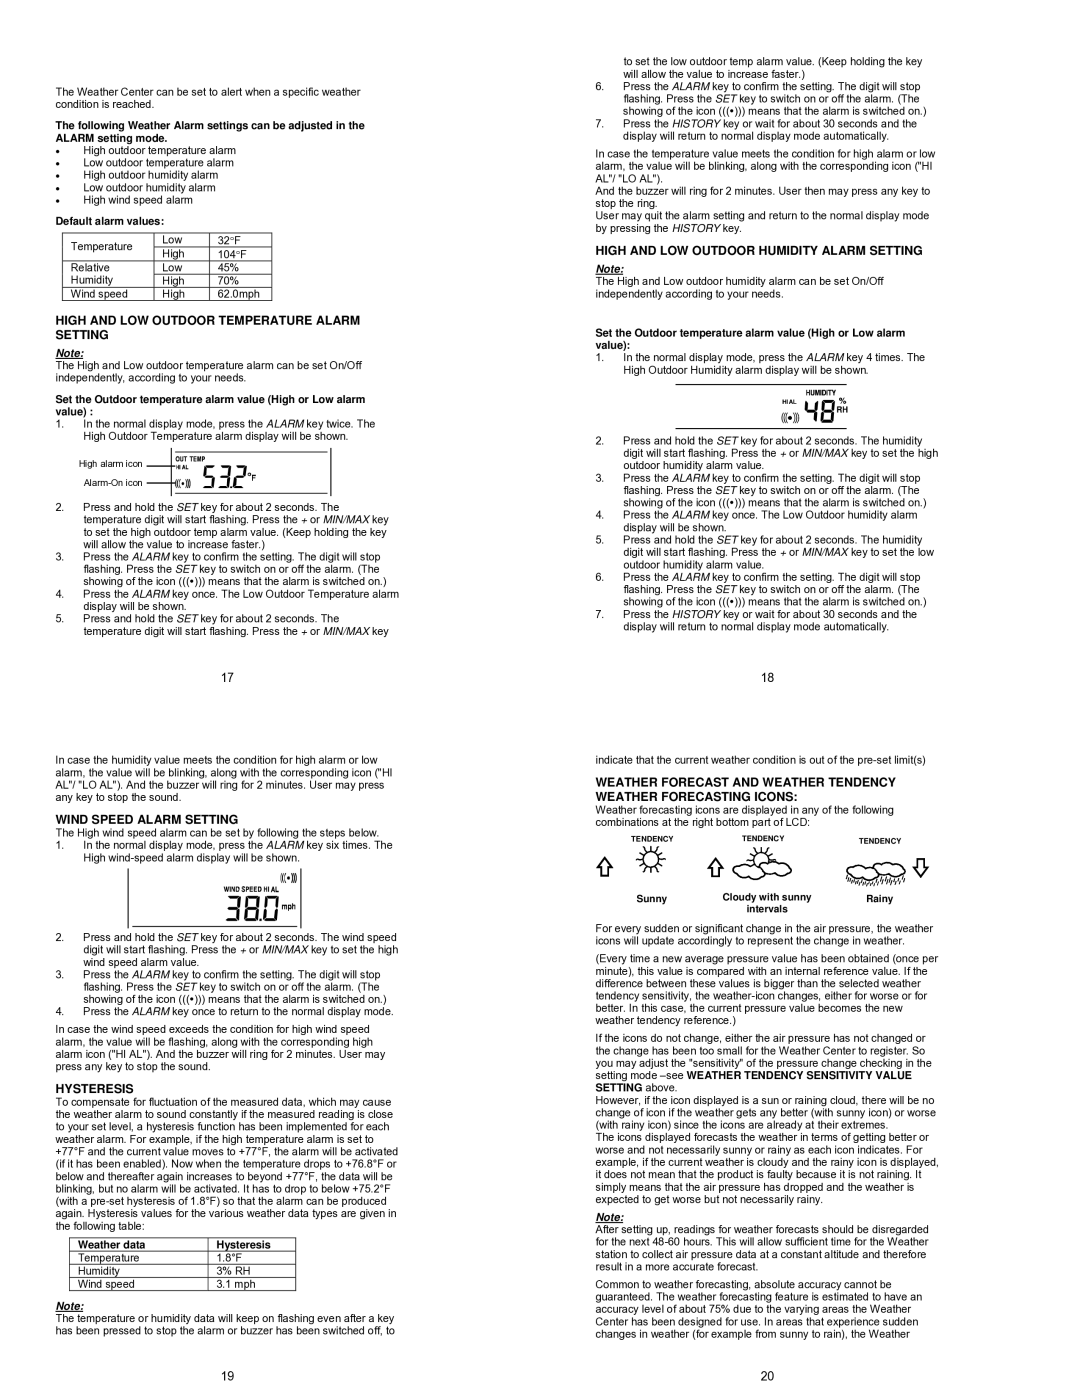
WEATHER FORECAST AND WEATHER TENDENCY WEATHER FORECASTING ICONS:
Weather forecasting icons are displayed in any of the following combinations at the right bottom part of LCD:
TENDENCYTENDENCYTENDENCY
Sunny | Cloudy with sunny | Rainy |
| intervals |
|
For every sudden or significant change in the air pressure, the weather icons will update accordingly to represent the change in weather.
(Every time a new average pressure value has been obtained (once per minute), this value is compared with an internal reference value. If the difference between these values is bigger than the selected weather tendency sensitivity, the
If the icons do not change, either the air pressure has not changed or the change has been too small for the Weather Center to register. So you may adjust the "sensitivity" of the pressure change checking in the setting mode
However, if the icon displayed is a sun or raining cloud, there will be no change of icon if the weather gets any better (with sunny icon) or worse (with rainy icon) since the icons are already at their extremes.
The icons displayed forecasts the weather in terms of getting better or worse and not necessarily sunny or rainy as each icon indicates. For example, if the current weather is cloudy and the rainy icon is displayed, it does not mean that the product is faulty because it is not raining. It simply means that the air pressure has dropped and the weather is expected to get worse but not necessarily rainy.
Note:
After setting up, readings for weather forecasts should be disregarded for the next
Common to weather forecasting, absolute accuracy cannot be guaranteed. The weather forecasting feature is estimated to have an accuracy level of about 75% due to the varying areas the Weather Center has been designed for use. In areas that experience sudden changes in weather (for example from sunny to rain), the Weather
20