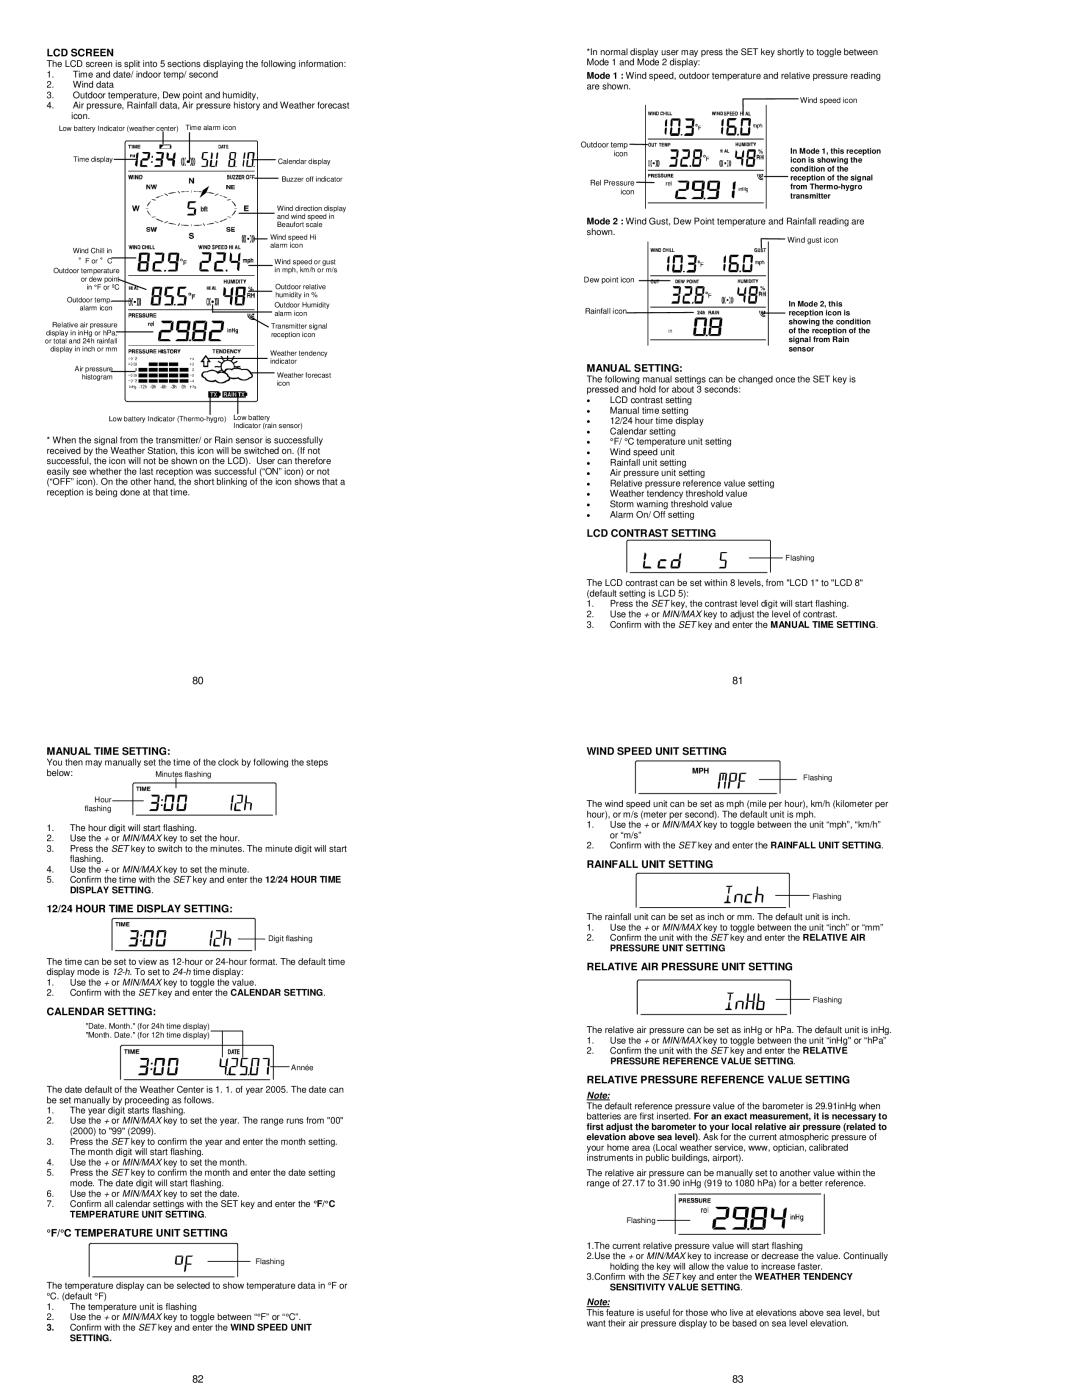
LCD SCREEN
The LCD screen is split into 5 sections displaying the following information:
1.Time and date/ indoor temp/ second
2.Wind data
3.Outdoor temperature, Dew point and humidity,
4.Air pressure, Rainfall data, Air pressure history and Weather forecast icon.
Low battery Indicator (weather center) Time alarm icon
*In normal display user may press the SET key shortly to toggle between Mode 1 and Mode 2 display:
Mode 1 : Wind speed, outdoor temperature and relative pressure reading are shown.
Wind speed icon |
Time display |
Wind Chill in |
°F or °C |
Outdoor temperature |
or dew point |
in °F or ºC |
Outdoor temp. |
alarm icon |
Relative air pressure |
display in inHg or hPa, |
or total and 24h rainfall |
display in inch or mm |
Air pressure |
histogram |
Calendar display
![]()
![]()
![]()
![]()
![]() Buzzer off indicator
Buzzer off indicator
Wind direction display and wind speed in Beaufort scale
Wind speed Hi alarm icon
Wind speed or gust in mph, km/h or m/s
Outdoor relative
![]() humidity in %
humidity in %
Outdoor Humidity
alarm icon
![]() Transmitter signal reception icon
Transmitter signal reception icon
Weather tendency indicator
![]()
![]()
![]()
![]() Weather forecast icon
Weather forecast icon
Outdoor temp |
|
| In Mode 1, this reception |
icon |
|
| |
|
|
| icon is showing the |
|
|
| condition of the |
|
| ||
Rel Pressure |
|
| reception of the signal |
|
| ||
|
| from | |
icon |
|
| |
|
| transmitter | |
|
|
|
Mode 2 : Wind Gust, Dew Point temperature and Rainfall reading are shown.
Dew point icon |
|
|
|
| Wind gust icon |
|
|
|
| In Mode 2, this | |
|
|
| |||
|
|
|
| ||
Rainfall icon |
|
|
| ||
|
|
| reception icon is | ||
|
|
|
|
| showing the condition |
|
|
|
|
| of the reception of the |
|
|
|
|
| signal from Rain |
|
|
|
| ||
|
|
|
|
| sensor |
MANUAL SETTING:
The following manual settings can be changed once the SET key is pressed and hold for about 3 seconds:
• | LCD contrast setting |
• | Manual time setting |
Low battery Indicator
Indicator (rain sensor)
*When the signal from the transmitter/ or Rain sensor is successfully received by the Weather Station, this icon will be switched on. (If not successful, the icon will not be shown on the LCD). User can therefore easily see whether the last reception was successful (“ON” icon) or not (“OFF” icon). On the other hand, the short blinking of the icon shows that a reception is being done at that time.
80
MANUAL TIME SETTING:
You then may manually set the time of the clock by following the steps
below: | Minutes flashing | |
|
|
|
|
|
|
Hour flashing
1.The hour digit will start flashing.
2.Use the + or MIN/MAX key to set the hour.
3.Press the SET key to switch to the minutes. The minute digit will start flashing.
4.Use the + or MIN/MAX key to set the minute.
5.Confirm the time with the SET key and enter the 12/24 HOUR TIME DISPLAY SETTING.
12/24 HOUR TIME DISPLAY SETTING:
Digit flashing
The time can be set to view as
1.Use the + or MIN/MAX key to toggle the value.
2.Confirm with the SET key and enter the CALENDAR SETTING.
CALENDAR SETTING:
"Date. Month." (for 24h time display) "Month. Date." (for 12h time display)
![]()
![]()
![]()
![]()
![]()
![]()
![]()
![]()
![]()
![]()
![]()
![]() Année
Année
The date default of the Weather Center is 1. 1. of year 2005. The date can be set manually by proceeding as follows.
1.The year digit starts flashing.
2.Use the + or MIN/MAX key to set the year. The range runs from "00" (2000) to "99" (2099).
3.Press the SET key to confirm the year and enter the month setting. The month digit will start flashing.
4.Use the + or MIN/MAX key to set the month.
5.Press the SET key to confirm the month and enter the date setting mode. The date digit will start flashing.
6.Use the + or MIN/MAX key to set the date.
7.Confirm all calendar settings with the SET key and enter the °F/°C
TEMPERATURE UNIT SETTING.
°F/°C TEMPERATURE UNIT SETTING
Flashing
The temperature display can be selected to show temperature data in °F or °C. (default °F)
1.The temperature unit is flashing
2.Use the + or MIN/MAX key to toggle between “°F” or “°C”.
3.Confirm with the SET key and enter the WIND SPEED UNIT
SETTING.
82
• | 12/24 hour time display |
• | Calendar setting |
• | °F/ °C temperature unit setting |
• | Wind speed unit |
• | Rainfall unit setting |
• | Air pressure unit setting |
• | Relative pressure reference value setting |
• | Weather tendency threshold value |
• | Storm warning threshold value |
• | Alarm On/ Off setting |
LCD CONTRAST SETTING
Flashing
The LCD contrast can be set within 8 levels, from "LCD 1" to "LCD 8" (default setting is LCD 5):
1.Press the SET key, the contrast level digit will start flashing.
2.Use the + or MIN/MAX key to adjust the level of contrast.
3.Confirm with the SET key and enter the MANUAL TIME SETTING.
81
WIND SPEED UNIT SETTING
MPH
Flashing
The wind speed unit can be set as mph (mile per hour), km/h (kilometer per hour), or m/s (meter per second). The default unit is mph.
1.Use the + or MIN/MAX key to toggle between the unit “mph”, “km/h” or “m/s”
2.Confirm with the SET key and enter the RAINFALL UNIT SETTING.
RAINFALL UNIT SETTING
Flashing
The rainfall unit can be set as inch or mm. The default unit is inch.
1.Use the + or MIN/MAX key to toggle between the unit “inch” or “mm”
2.Confirm the unit with the SET key and enter the RELATIVE AIR
PRESSURE UNIT SETTING
RELATIVE AIR PRESSURE UNIT SETTING
Flashing
The relative air pressure can be set as inHg or hPa. The default unit is inHg.
1.Use the + or MIN/MAX key to toggle between the unit “inHg" or “hPa”
2.Confirm the unit with the SET key and enter the RELATIVE PRESSURE REFERENCE VALUE SETTING.
RELATIVE PRESSURE REFERENCE VALUE SETTING
Note:
The default reference pressure value of the barometer is 29.91inHg when batteries are first inserted. For an exact measurement, it is necessary to first adjust the barometer to your local relative air pressure (related to elevation above sea level). Ask for the current atmospheric pressure of your home area (Local weather service, www, optician, calibrated instruments in public buildings, airport).
The relative air pressure can be manually set to another value within the range of 27.17 to 31.90 inHg (919 to 1080 hPa) for a better reference.
Flashing
1.The current relative pressure value will start flashing
2.Use the + or MIN/MAX key to increase or decrease the value. Continually holding the key will allow the value to increase faster.
3.Confirm with the SET key and enter the WEATHER TENDENCY SENSITIVITY VALUE SETTING.
Note:
This feature is useful for those who live at elevations above sea level, but want their air pressure display to be based on sea level elevation.
83