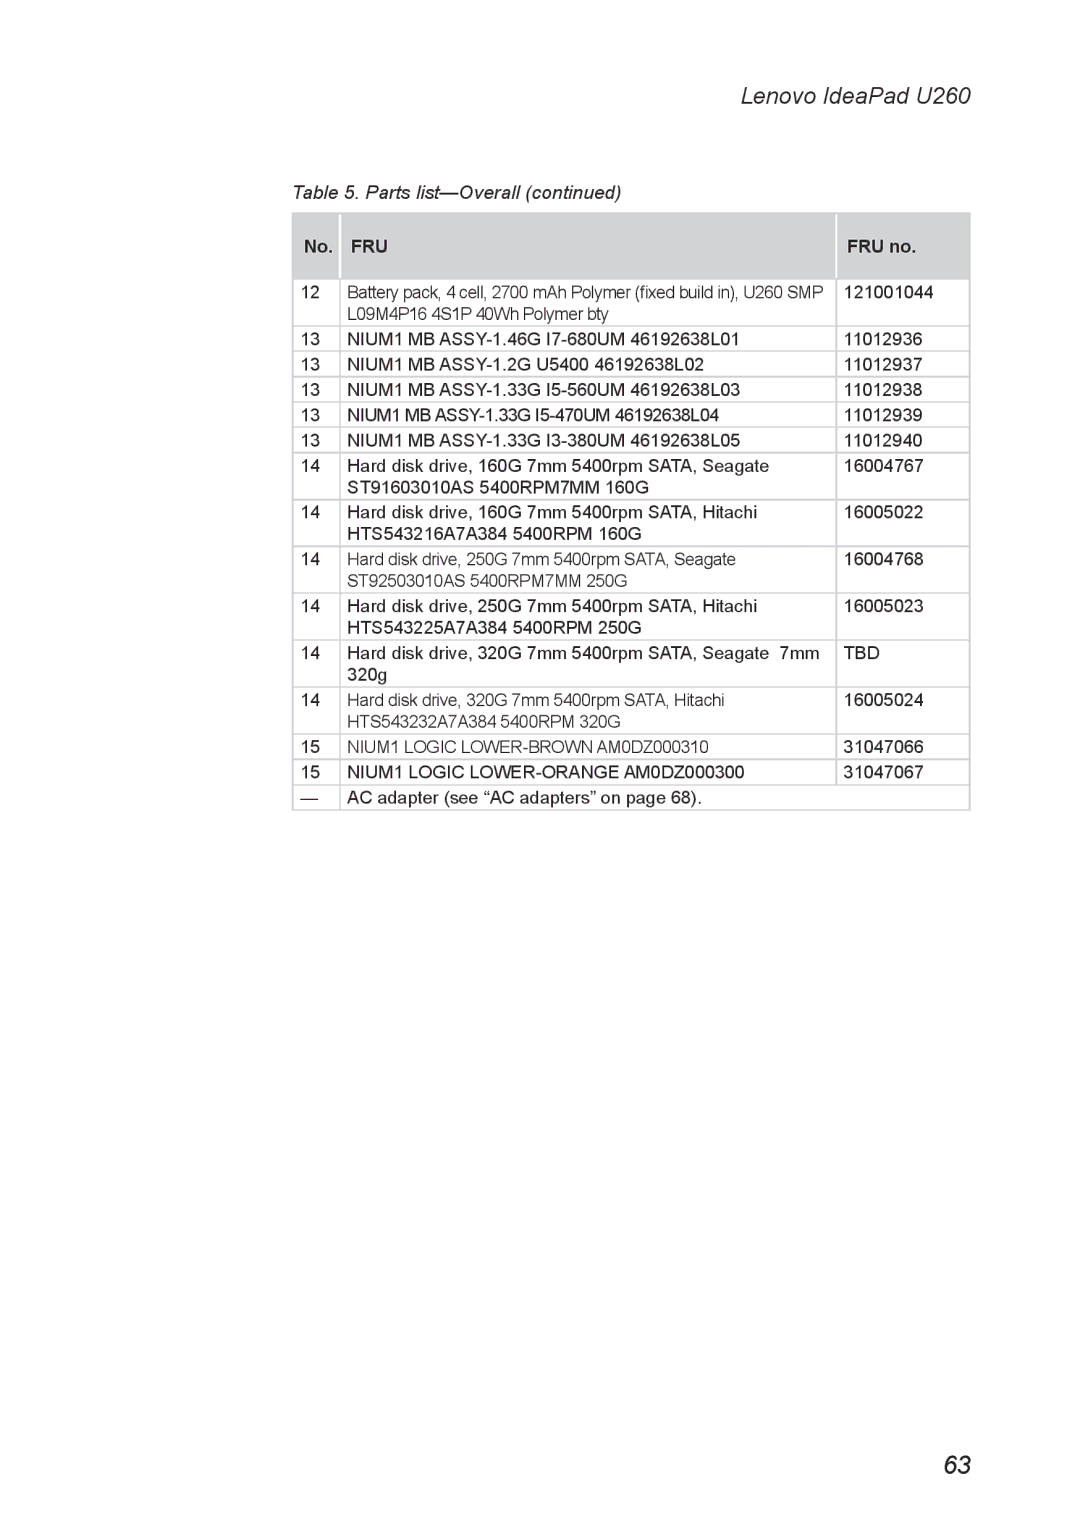
IdeaPad U260
Hardware Maintenance Manual
First Edition Aug Copyright Lenovo 2010. All rights reserved
Safety information
Contents
Important service information
Related service information
Lenovo IdeaPad U260
About this manual
Safety information
Safety information
General safety
IdeaPad U260 Hardware Maintenance Manual
Safety information
Electrical safety
Power supply units Pumps Blowers and fans Motor generators
IdeaPad U260 Hardware Maintenance Manual
Safety information
Safety inspection guide
Grounding requirements
Handling devices that are sensitive to electrostatic discharge
IdeaPad U260 Hardware Maintenance Manual
Safety notice
Safety notices multilingual translations
Safety information
IdeaPad U260 Hardware Maintenance Manual
Safety notice DANGER
Safety information
The battery pack contains small amounts of nickel. Do not disassemble it, throw it into fire or water, or short-circuit it. Dispose of the battery pack as required by local ordinances or regulations. Use only the battery in the appropriate parts listing when replacing the battery pack. Use of an incorrect battery can result in ignition or explosion of the battery
Safety notice DANGER
IdeaPad U260 Hardware Maintenance Manual
The lithium battery can cause a fire, an explosion, or a severe burn. Do not recharge it, remove its polarized connector, disassemble it, heat it above 100C 212F, incinerate it, or expose its cell contents to water. Dispose of the battery as required by local ordinances or regulations. Use only the battery in the appropriate parts listing. Use of an incorrect battery can result in ignition or explosion of the battery
Safety notice
Safety information
If the LCD breaks and the fluid from inside the LCD gets into your eyes or on your hands, immediately wash the affected areas with water at least for 15 minutes. Seek medical care if any symptoms caused by the fluid are present after washing
To avoid shock, do not remove the plastic cover that protects the lower part of the inverter card
IdeaPad U260 Hardware Maintenance Manual
Safety notice DANGER
Safety information
Before removing any FRU, turn off the computer, unplug all power cords from electrical outlets, remove the battery pack, and then disconnect any interconnecting cables
IdeaPad U260 Hardware Maintenance Manual
Laser compliance statement
Safety information
DANGER
IdeaPad U260 Hardware Maintenance Manual
Important service information
Before replacing parts
Strategy for replacing FRUs
Strategy for replacing a hard disk drive
Important service information
Important notice for replacing a system board
IdeaPad U260 Hardware Maintenance Manual
Important information about replacing RoHS compliant FRUs
Replacement FRU
General checkout
General checkout
Important notes
What to do first
The following are not covered under warranty
IdeaPad U260 Hardware Maintenance Manual
General checkout
Power system checkout
Checking the AC adapter
Checking operational charging
IdeaPad U260 Hardware Maintenance Manual
Checking the battery pack
Using recovery discs
Related service information
Restoring the factory contents by using OneKey Recovery
Restore of factory default
IdeaPad U260 Hardware Maintenance Manual
Passwords
Power-on password
Supervisor password
Related service information
Power management
Screen blank mode
Sleep standby mode
IdeaPad U260 Hardware Maintenance Manual
Hibernation mode
Lenovo IdeaPad U260
Specifications
Table 1. Specifications
Lenovo IdeaPad U260
Description
Table 1. Specifications continued
IdeaPad U260 Hardware Maintenance Manual
Feature
Lenovo IdeaPad U260
Status indicators
Table 2. Status indicators
Indicator
Meaning
Table 2. Status indicators continued
IdeaPad U260 Hardware Maintenance Manual
Indicator
Key combination
Fn key combinations
Table 4. Fn key combinations
Lenovo IdeaPad U260
Logic card to plastic
FRU replacement notices
Screw notices
Plastic to plastic
Lenovo IdeaPad U260
Removing and replacing an FRU
DANGER
Step
1010 Keyboard
Figure 1. Removal steps of keyboard
IdeaPad U260 Hardware Maintenance Manual
Step
1020 Keyboard bezel
Figure 2. Removal steps of keyboard bezel
Lenovo IdeaPad U260
IdeaPad U260 Hardware Maintenance Manual
Figure 2. Removal steps of keyboard bezel continued
When installing Make sure that all the connectors are attached firmly
Screw quantity
Lenovo IdeaPad U260
Figure 2. Removal steps of keyboard bezel continued
Step
Figure 2. Removal steps of keyboard bezel continued
IdeaPad U260 Hardware Maintenance Manual
DANGER
1030 Battery pack
Figure 3. Removal steps of battery pack
Lenovo IdeaPad U260
Figure 4. Removal steps of PCI Express Mini Card for wireless LAN
1040 PCI Express Mini Card for wireless LAN
IdeaPad U260 Hardware Maintenance Manual
Lenovo IdeaPad U260
When installing
When installing
1050 LCD unit
Figure 5. Removal steps of LCD unit
IdeaPad U260 Hardware Maintenance Manual
Lenovo IdeaPad U260
Figure 5. Removal steps of LCD unit continued
Remove the LCD unit in the direction shown by arrows
Figure 6. Removal steps of hard disk drive
1060 Hard disk drive
IdeaPad U260 Hardware Maintenance Manual
Figure 7. Removal steps of DIMM
1070 DIMM
Lenovo IdeaPad U260
Figure 8. Removal steps of fan assembly and heat sink assembly
1080 Fan assembly and Heat Sink assembly
IdeaPad U260 Hardware Maintenance Manual
Lenovo IdeaPad U260
When installing
c a b
Figure 9. Removal steps of speakers
1090 Speakers
IdeaPad U260 Hardware Maintenance Manual
Important notices for handling the system board
1100 System board
Lenovo IdeaPad U260
Screw quantity
Figure 10. Removal steps of system board
IdeaPad U260 Hardware Maintenance Manual
Step
Figure 11. Removal steps of base cover
1110 base cover
Lenovo IdeaPad U260
IdeaPad U260 Hardware Maintenance Manual
Note Applying labels to the base cover
Figure 12. Removal steps of LCD front bezel
1120 LCD front bezel
Lenovo IdeaPad U260
Figure 13. Removal steps of LCD panel, LCD cable and hinges
1130 LCD panel, LCD cable and hinges
IdeaPad U260 Hardware Maintenance Manual
Note The LCD cables are attached to the LCD panel by a metal connector
Figure 13. Removal steps of LCD panel, LCD cable and hinges continued
Lenovo IdeaPad U260
Figure 14. Removal steps of integrated camera
1140 Integrated camera
IdeaPad U260 Hardware Maintenance Manual
Figure 15. Removal steps of antenna assembly and LCD cover
1150 Antenna assembly and LCD cover
Lenovo IdeaPad U260
Front view
Locations
IdeaPad U260 Hardware Maintenance Manual
1 Integrated wireless device switch Select models only
Right-side view
Bottom and Left-side view
5 AC power adapter jack
“AC adapters” on page “Power cords” on page
Parts list
IdeaPad U260 Hardware Maintenance Manual
This section presents the following service parts “Overall” on page
Lenovo IdeaPad U260
Overall
FRU no
Table 5. Parts list-Overall
IdeaPad U260 Hardware Maintenance Manual
No. FRU
FRU no
Table 5. Parts list-Overall continued
Lenovo IdeaPad U260
No. FRU
“12.5-in. HD TFT”
LCD FRUs
IdeaPad U260 Hardware Maintenance Manual
In Lenovo IdeaPad U260, there are following types of LCDs
No. FRU
Table 6. Parts list-12.5-in. HD TFT
12.5-in. HD TFT
Lenovo IdeaPad U260
Keyboard
Table 7. Parts list-Keyboard
IdeaPad U260 Hardware Maintenance Manual
Miscellaneous parts
Table 8. Parts list-Miscellaneous parts
Lenovo IdeaPad U260
AC adapters
Table 9. Parts list-3-pin AC adapters
IdeaPad U260 Hardware Maintenance Manual
Region
Power cords
Table 10. Parts list-3-pin power cords
Lenovo IdeaPad U260
IdeaPad U260 Hardware Maintenance Manual
Table 10. Parts list-3-pin power cords continued
Region
Lenovo IdeaPad U260
Table 10. Parts list-3-pin power cords continued
Region
IdeaPad U260 Hardware Maintenance Manual
Notices
Notices
Trademarks