LCD TV Plasma TV
Page
9U0569A-1 Rev05-ING 06/8/23 327 PM
Contents
Contents
Picture-in-Picture feature allows you to view your PC
Where in the room
Light weight and thin size makes it easy to install
Plasma TV is an array of cells, known as pixels, which
Introduction
Accessories
Controls
Volume
Here shown may be somewhat different from your TV
Input Menu
Connection Options
Programme
Volume F, G
Digital Audio OUT
Connects the video signal from a video device
PC, HDMI/DVI
Remote control effective range
Installing Batteries
Installation
Stand Installation for 32LC2D
Place the hook of the stand in the back Product as shown
Product
Stand Installation for 42PC1D
Arrange the cable as shown
Wire Arrangement
Bundle the cables using the supplied twister holder
How to remove the Cable Management
Ensure the eye-bolts or brackets are tightened securely
Attaching the TV to a Wall
Swivel Stand
Desktop Pedestal Installation
Antenna Connection
Connections & Setup
Antenna Loop Through Socket
How to connect
When connecting Component cable
Hdstb Setup
How to use
Setup
When connecting Hdmi cable
When connecting D-sub 15pin cable
Connect the audio outputs of the set-top box to
AUDIORGB/DVI jack on the set
When connecting Hdmi to DVI cable
When connecting with an antenna
VCR Setup
When connecting with an S-Video cable
When connecting with a RCA cable
Connect the S-VIDEO output of the VCR to the S-VIDEO
Insert a video tape into the VCR and press Play on the VCR
AV OUT Setup
Connect the second TV or monitor to the TV’s AV OUT jacks
We recommend to use the AV OUT jacks for VCR recording
Audio Optical Output port
Digital Audio Output
External A/V Source Setup
Component in VIDEO1 jacks on the set
DVD Setup
Antenna OUT HDMI/DVI
PC Setup
HDMI/DVI
50.00
RGB-PC mode only
640x480
60.00
Initializing Reset to original factory values
Screen Setup for PC mode
To initialize the adjusted values
Overview
Initializing Setup
Turning the TV on
Basic
Volume Adjustment
Programme Selection
Basic Operation
Watching PIP/POP/Twin Picture
Special Functions
TV Program selection for PIP
Selecting an Input Signal Source for PIP/Twin Picture
Moving the PIP sub picture
AV1-2, Component1-2, RGB, HDMI/DVI
Swapping the PIP/Twin Picture
Adjusting Main and Sub Picture Sizes for Twin Picture
POP Picture-out-of-Picture Programme Scan
Teletext
Switch On/Off
Simple Text
TOP Text
Special Teletext Functions
Fastext
Select a programme
Switch on/off EPG
RED
Green
On Screen Menus Selection and Adjustment
Auto Programme Tuning
Press Exit button to return to normal TV viewing
Digital Mode
Analogue Mode
Manual Programme Tuning
Fine Tuning In Analogue Mode only
Assigning a Station Name In Analogue Mode only
Programme Edit
Number turns to blue
G button
Press the Blue button again to release
Skipped programme
Calling UP the Programme Table
Digital Signal Strength In Digital Mode only
Booster In Digital Mode only
TV Menu Picture Adjustment
Press the button Adjust the desired screen brightness
Brightness Adjustment
Manual Picture Control PSM-User option
TV Menu / Picture Adjustment
Colour Temperature Control
Auto Colour Temperature Control
Select either Warm, Medium, Cool, or User
Adjustment range of Red, Green, or Blue is -20~+20
Manual Colour Temperature Control
Select User
Select Red, Green, or Blue
Select On or Off
ADVANCED-CINEMA
ADVANCED-BLACK Level
To original values
Video Preset
To select the Audio menu
Sound Status Memory SSM
Select SSM
Select Standard, Music, Movie, Sports, or User
Adjust the sound to suit your taste and room situations
Select the desired sound option Treble, Bass, or
Front surround
TV Menu / Audio Adjustment
Select Off or On
Auto Volume Leveller AVL
Balance
Audio Adjustment
TV Speakers ON/OFF Setup
Mono
Sound Output Selection
Select On
Auto Clock Setup
To select the Time menu
Manual Clock Setup
To cancel the On/Off time function, select Off
ON/OFF Time Setup
Select Off Time or On Time
Set the hour
You can also set up the Sleep timer in the Time menu
Sleep Timer
Auto Sleep
To select the Special menu
Main Picture Source Selection
Select Off or O n
Select Subtitle
Child Lock
Auto
Picture Format
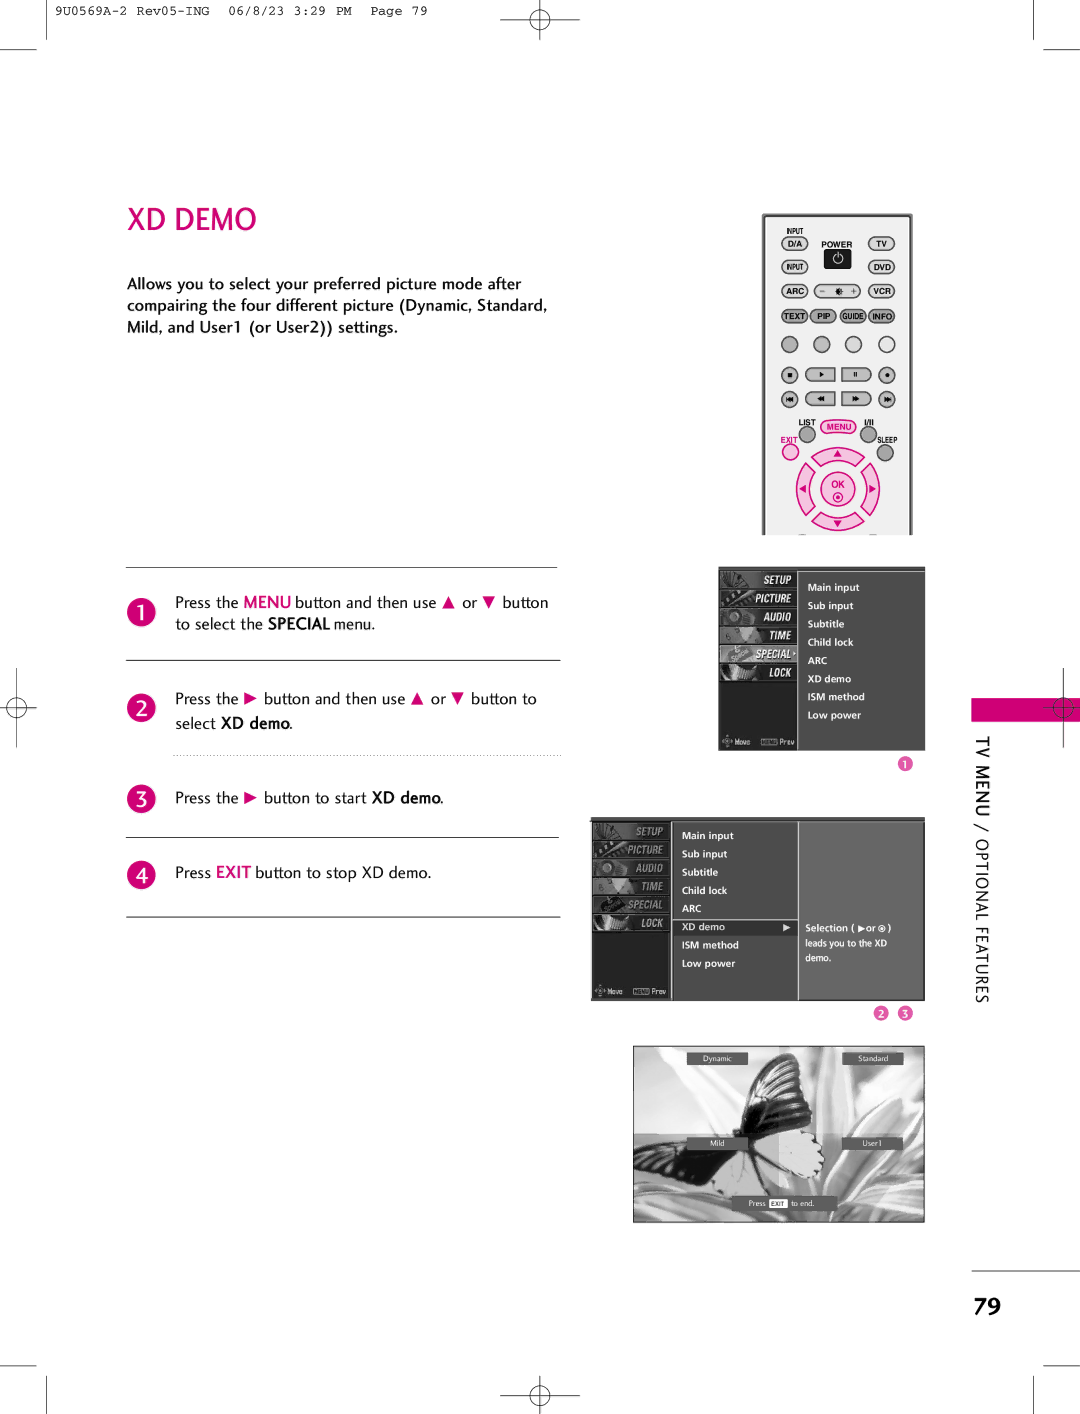
Press Exit button to stop XD demo
XD Demo
TV Menu
Low power reduces the plasma display power consumption
LOW Power 42PC1D*, 50PC1D* , 60PC1D*only
Lock System
Setting UP Your Password
Change the password by inputting a new password twice
SET Password
To choose Set password
Your new password next to New
Select a channel number that you wish to block
Block Programme
Or E button
To choose Block programme
To choose Parental guidance
AUX. Block
RS-232C Setup
External Control Device Setup
Type of Connector D-Sub 9-Pin Male
Appendix
Set ID
RS-232C Configurations
Communication Parameters
RXD TXD GND DTR DSR RTS CTS
Transmission / Receiving Protocol
Command Reference List
Transmission ka Set ID DataCr
Transmission kj Set ID DataCr
Transmission kw Set IDDataCr
Transmission mc Set ID DataCr
IR Codes
Remote Control IR Codes
Code Function
Programming a code into a remote mode
Programming the Remote Control
VCRs
Programming Codes
DVD
Remote control Doesn’t work Power is suddenly Turned off
Troubleshooting Checklist
Vertical bar or stripe on Background
Audio function does not work
100
Product Specifications
9U0569A-2 Rev05-ING 06/8/23 329 PM

