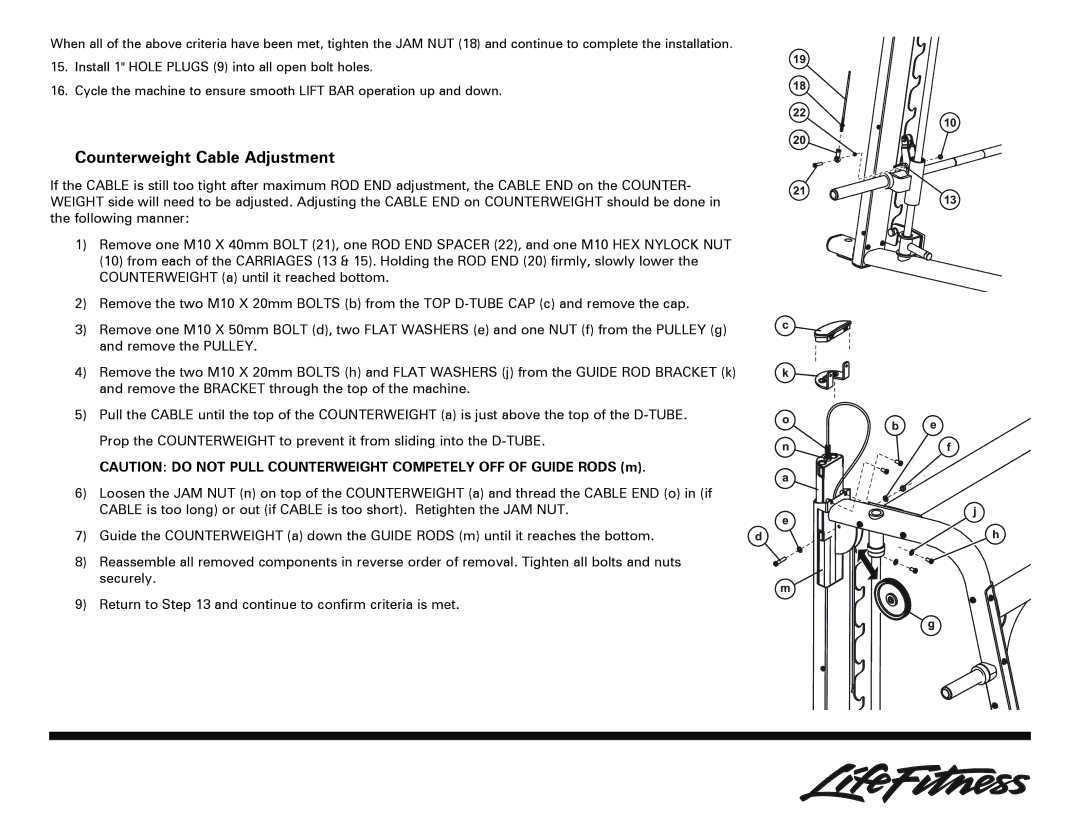
When all of the above criteria have been met, tighten the JAM NUT (18) and continue to complete the installation.
15. Install 1" HOLE PLUGS (9) into all open bolt holes. | 19 | |
| ||
16. Cycle the machine to ensure smooth LIFT BAR operation up and down. | 18 | |
| ||
| 22 | |
| 20 | |
Counterweight Cable Adjustment |
| |
If the CABLE is still too tight after maximum ROD END adjustment, the CABLE END on the COUNTER- | 21 | |
WEIGHT side will need to be adjusted. Adjusting the CABLE END on COUNTERWEIGHT should be done in | ||
| ||
the following manner: |
|
1)Remove one M10 X 40mm BOLT (21), one ROD END SPACER (22), and one M10 HEX NYLOCK NUT (10) from each of the CARRIAGES (13 & 15). Holding the ROD END (20) firmly, slowly lower the COUNTERWEIGHT (a) until it reached bottom.
2)Remove the two M10 X 20mm BOLTS (b) from the TOP
3) | Remove one M10 X 50mm BOLT (d), two FLAT WASHERS (e) and one NUT (f) from the PULLEY (g) | c |
| ||
| and remove the PULLEY. |
|
4) | Remove the two M10 X 20mm BOLTS (h) and FLAT WASHERS (j) from the GUIDE ROD BRACKET (k) | k |
| and remove the BRACKET through the top of the machine. |
|
5) | Pull the CABLE until the top of the COUNTERWEIGHT (a) is just above the top of the | o |
|
|
Prop the COUNTERWEIGHT to prevent it from sliding into the | n |
| |
CAUTION: DO NOT PULL COUNTERWEIGHT COMPETELY OFF OF GUIDE RODS (m). | a |
|
6)Loosen the JAM NUT (n) on top of the COUNTERWEIGHT (a) and thread the CABLE END (o) in (if CABLE is too long) or out (if CABLE is too short). Retighten the JAM NUT.
e
7) Guide the COUNTERWEIGHT (a) down the GUIDE RODS (m) until it reaches the bottom. | d |
8)Reassemble all removed components in reverse order of removal. Tighten all bolts and nuts securely.
m
9) Return to Step 13 and continue to confirm criteria is met.
10
13
b e
f
j |
h
g