IMPORTANT!
DO NOT DISCARD THE SHIP KIT LOCATED ON TOP OF THE DECK AND BELT. ALL NECESSARY COMPONENTS NEEDED TO
COMPLETE THE INSTALLATION ARE LOCATED IN THE SHIP KIT.
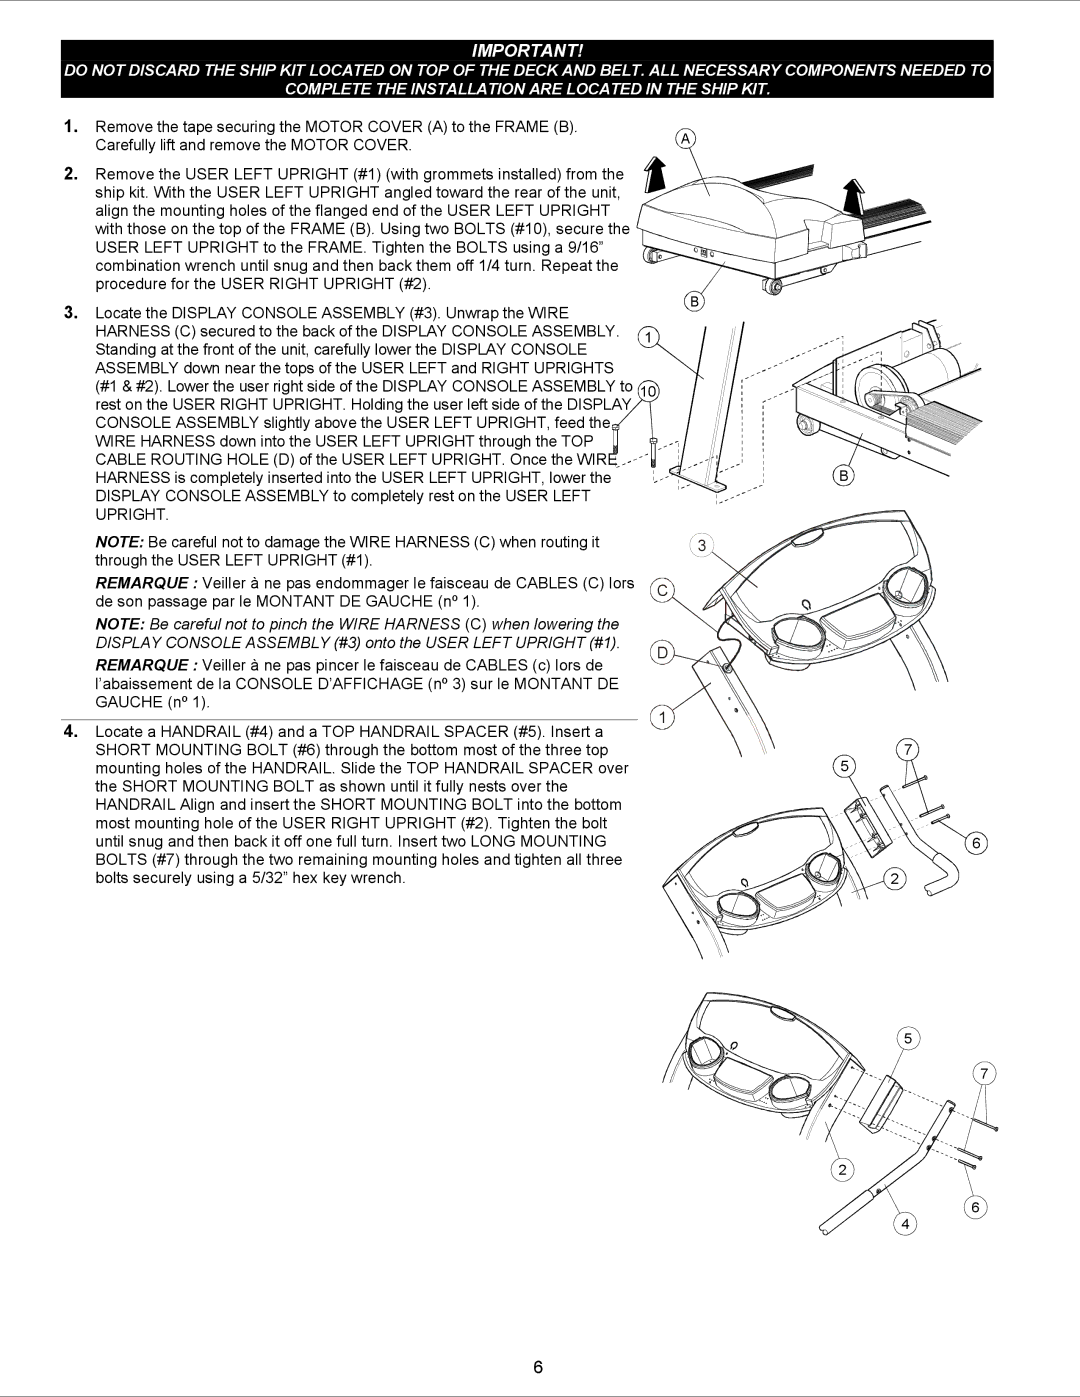
1. | Remove the tape securing the MOTOR COVER (A) to the FRAME (B). |
|
|
| A | |
| Carefully lift and remove the MOTOR COVER. |
|
|
| ||
|
|
|
|
| ||
2. Remove the USER LEFT UPRIGHT (#1) (with grommets installed) from the |
|
|
|
| ||
| ship kit. With the USER LEFT UPRIGHT angled toward the rear of the unit, |
|
|
|
| |
| align the mounting holes of the flanged end of the USER LEFT UPRIGHT |
|
|
|
| |
| with those on the top of the FRAME (B). Using two BOLTS (#10), secure the |
|
|
|
| |
|
|
|
|
| ||
| USER LEFT UPRIGHT to the FRAME. Tighten the BOLTS using a 9/16” |
|
|
|
| |
|
|
|
|
| ||
| combination wrench until snug and then back them off 1/4 turn. Repeat the |
|
|
|
| |
| procedure for the USER RIGHT UPRIGHT (#2). |
|
|
| B | |
3. Locate the DISPLAY CONSOLE ASSEMBLY (#3). Unwrap the WIRE |
|
|
| |||
|
|
|
| |||
| HARNESS (C) secured to the back of the DISPLAY CONSOLE ASSEMBLY. | 1 | ||||
| Standing at the front of the unit, carefully lower the DISPLAY CONSOLE | |||||
|
|
|
|
| ||
| ASSEMBLY down near the tops of the USER LEFT and RIGHT UPRIGHTS |
|
|
|
| |
| (#1 & #2). Lower the user right side of the DISPLAY CONSOLE ASSEMBLY to | 10 | ||||
| rest on the USER RIGHT UPRIGHT. Holding the user left side of the DISPLAY |
|
|
|
| |
| CONSOLE ASSEMBLY slightly above the USER LEFT UPRIGHT, feed the |
|
|
|
| |
| WIRE HARNESS down into the USER LEFT UPRIGHT through the TOP |
|
|
|
| |
| CABLE ROUTING HOLE (D) of the USER LEFT UPRIGHT. Once the WIRE |
|
|
|
| |
| HARNESS is completely inserted into the USER LEFT UPRIGHT, lower the |
|
|
|
| |
| DISPLAY CONSOLE ASSEMBLY to completely rest on the USER LEFT |
|
|
|
| |
| UPRIGHT. |
|
|
|
| |
| NOTE: Be careful not to damage the WIRE HARNESS (C) when routing it | 3 | ||||
| through the USER LEFT UPRIGHT (#1). |
|
|
|
| |
| REMARQUE : Veiller à ne pas endommager le faisceau de CABLES (C) lors |
|
|
| C | |
| de son passage par le MONTANT DE GAUCHE (nº 1). |
|
|
| ||
|
|
|
|
| ||
| NOTE: Be careful not to pinch the WIRE HARNESS (C) when lowering the |
|
|
|
| |
| DISPLAY CONSOLE ASSEMBLY (#3) onto the USER LEFT UPRIGHT (#1). |
|
|
| D | |
| REMARQUE : Veiller à ne pas pincer le faisceau de CABLES (c) lors de |
|
|
| ||
|
|
|
|
| ||
| l’abaissement de la CONSOLE D’AFFICHAGE (nº 3) sur le MONTANT DE |
|
|
|
| |
| GAUCHE (nº 1). | 1 | ||||
|
| |||||
4. | Locate a HANDRAIL (#4) and a TOP HANDRAIL SPACER (#5). Insert a | |||||
|
|
|
| |||
SHORT MOUNTING BOLT (#6) through the bottom most of the three top mounting holes of the HANDRAIL. Slide the TOP HANDRAIL SPACER over the SHORT MOUNTING BOLT as shown until it fully nests over the HANDRAIL Align and insert the SHORT MOUNTING BOLT into the bottom most mounting hole of the USER RIGHT UPRIGHT (#2). Tighten the bolt until snug and then back it off one full turn. Insert two LONG MOUNTING BOLTS (#7) through the two remaining mounting holes and tighten all three bolts securely using a 5/32” hex key wrench.
B
7
5
6
2
5
7
2
6
4
6
