IMPORTANT!
DO NOT DISCARD THE SHIP KIT LOCATED ON TOP OF THE DECK AND BELT. ALL NECESSARY COMPONENTS NEEDED TO COMPLETE THE INSTALLATION ARE LOCATED IN THE SHIP KIT.
NE JETEZ PAS LE KIT D'EXPÉDITION PLACÉ SUR LE DESSUS DU PLATEAU ET SUR LE TAPIS. IL CONTIENT TOUS LES ÉLÉMENTS NÉCESSAIRES POUR L'INSTALLATION.
IMPORTANT!
CHECK THE BELT EDGE UNDER THE TREADMILL TO VERIFY THE BELT DOES NOT INTERFERE WITH LIFE- SPRING BRACKETS AND THE BELT IS PROPERLY SET WITHIN THE BELT GUIDES.
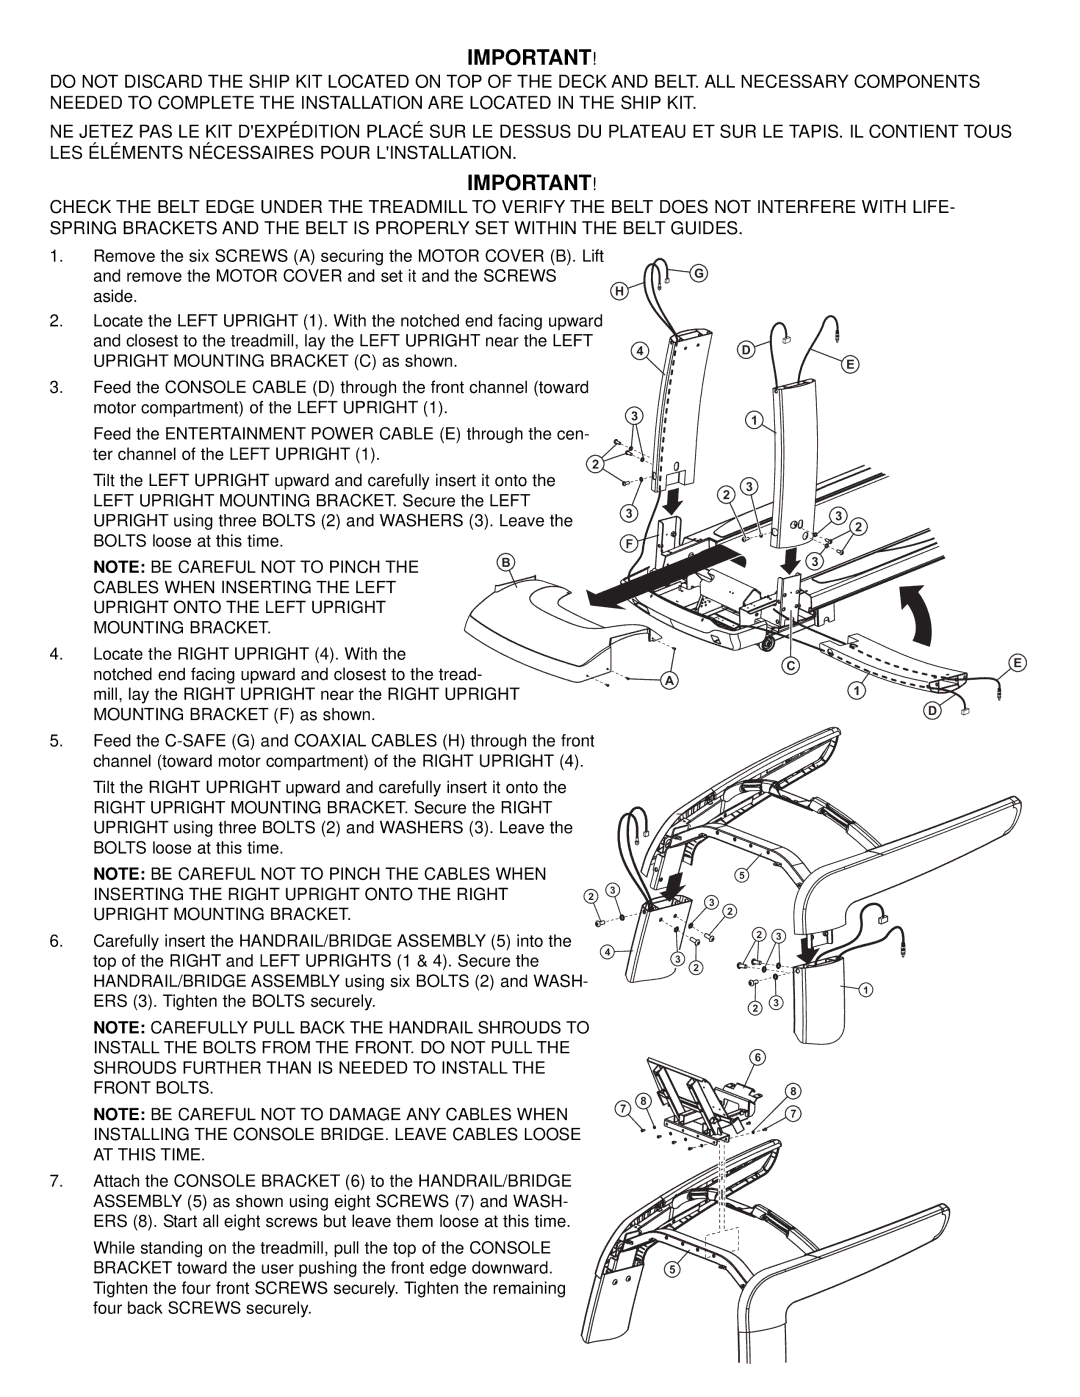
1.Remove the six SCREWS (A) securing the MOTOR COVER (B). Lift and remove the MOTOR COVER and set it and the SCREWS
aside. | H | |
2. Locate the LEFT UPRIGHT (1). With the notched end facing upward |
| |
and closest to the treadmill, lay the LEFT UPRIGHT near the LEFT | 4 | |
UPRIGHT MOUNTING BRACKET (C) as shown. | ||
|
3. Feed the CONSOLE CABLE (D) through the front channel (toward motor compartment) of the LEFT UPRIGHT (1).
3
G
D
E
1
Feed the ENTERTAINMENT POWER CABLE (E) through the cen- ter channel of the LEFT UPRIGHT (1).
Tilt the LEFT UPRIGHT upward and carefully insert it onto the LEFT UPRIGHT MOUNTING BRACKET. Secure the LEFT
2
2 | 3 |
UPRIGHT using three BOLTS (2) and WASHERS (3). Leave the | 3 |
| |
BOLTS loose at this time. | F |
NOTE: BE CAREFUL NOT TO PINCH THE | B |
| |
CABLES WHEN INSERTING THE LEFT |
|
UPRIGHT ONTO THE LEFT UPRIGHT |
|
MOUNTING BRACKET. |
|
4.Locate the RIGHT UPRIGHT (4). With the
notched end facing upward and closest to the tread- mill, lay the RIGHT UPRIGHT near the RIGHT UPRIGHT MOUNTING BRACKET (F) as shown.
3
2
3
C | E |
| |
A |
|
| 1 |
| D |
5.Feed the
Tilt the RIGHT UPRIGHT upward and carefully insert it onto the RIGHT UPRIGHT MOUNTING BRACKET. Secure the RIGHT UPRIGHT using three BOLTS (2) and WASHERS (3). Leave the BOLTS loose at this time.
NOTE: BE CAREFUL NOT TO PINCH THE CABLES WHEN
INSERTING THE RIGHT UPRIGHT ONTO THE RIGHT 2
5
3
UPRIGHT MOUNTING BRACKET.
6. Carefully insert the HANDRAIL/BRIDGE ASSEMBLY (5) into the |
top of the RIGHT and LEFT UPRIGHTS (1 & 4). Secure the |
HANDRAIL/BRIDGE ASSEMBLY using six BOLTS (2) and WASH- |
ERS (3). Tighten the BOLTS securely. |
NOTE: CAREFULLY PULL BACK THE HANDRAIL SHROUDS TO |
INSTALL THE BOLTS FROM THE FRONT. DO NOT PULL THE |
4
3
2
2 | 3 |
3
2
1
2 | 3 |
|
SHROUDS FURTHER THAN IS NEEDED TO INSTALL THE |
FRONT BOLTS. |
NOTE: BE CAREFUL NOT TO DAMAGE ANY CABLES WHEN |
INSTALLING THE CONSOLE BRIDGE. LEAVE CABLES LOOSE |
AT THIS TIME. |
7. Attach the CONSOLE BRACKET (6) to the HANDRAIL/BRIDGE |
ASSEMBLY (5) as shown using eight SCREWS (7) and WASH- |
ERS (8). Start all eight screws but leave them loose at this time. |
While standing on the treadmill, pull the top of the CONSOLE |
BRACKET toward the user pushing the front edge downward. |
Tighten the four front SCREWS securely. Tighten the remaining |
four back SCREWS securely. |
| 6 |
| 8 |
7 | 8 |
| 7 |
5