Modem/ISDN port

The LINDY KVM IP provides a serial port specifically for you to connect either a modem or ISDN terminal adapter. This can be used as a primary, secondary or backup access port for remote systems, as best suits your overall configuration.

IMPORTANT: When the LINDY KVM IP is accessible from the public Internet or dial up connection, you must ensure that sufficient security measures are employed.

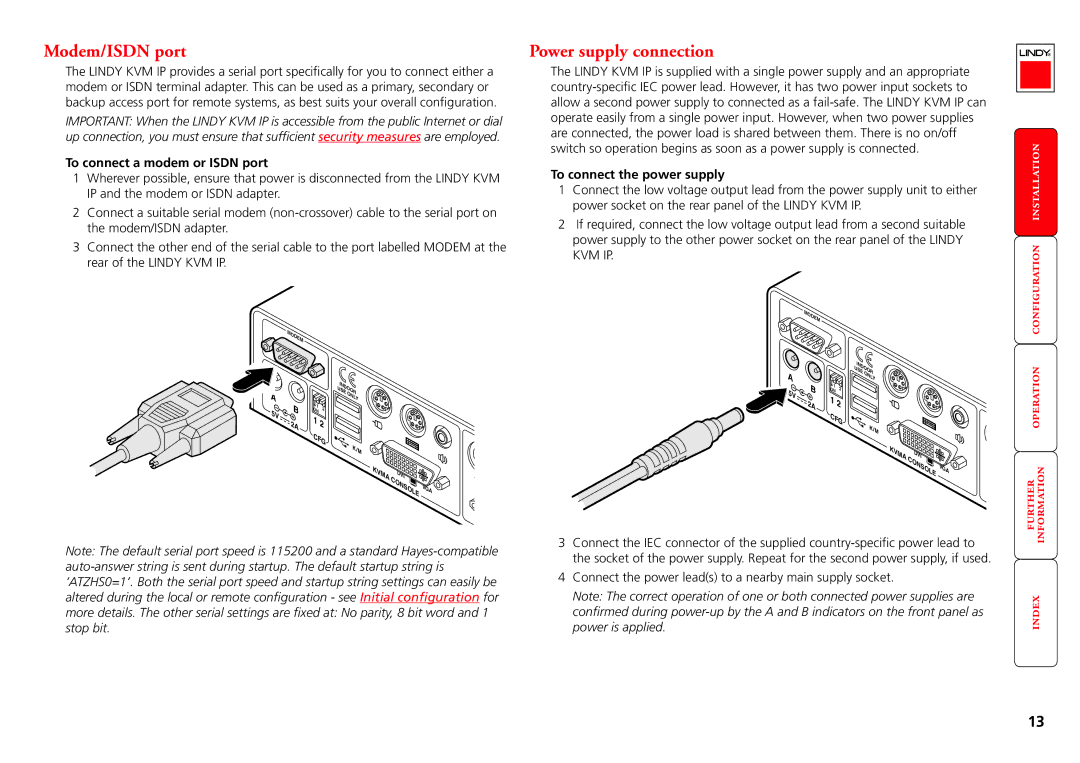
To connect a modem or ISDN port

1Wherever possible, ensure that power is disconnected from the LINDY KVM IP and the modem or ISDN adapter.

2Connect a suitable serial modem (non-crossover) cable to the serial port on the modem/ISDN adapter.

3Connect the other end of the serial cable to the port labelled MODEM at the rear of the LINDY KVM IP.


M


O


D


E


M


IN


U

D


O


S


O


EO R


NL


Y


B

1


5V

ON

2


1


2A


2


C


F


G


K/M


KVMA

DVI


CONSOLE


VG


A

Note: The default serial port speed is 115200 and a standard Hayes-compatible auto-answer string is sent during startup. The default startup string is ‘ATZHS0=1’. Both the serial port speed and startup string settings can easily be altered during the local or remote configuration - see Initial configuration for more details. The other serial settings are fixed at: No parity, 8 bit word and 1 stop bit.

Power supply connection

The LINDY KVM IP is supplied with a single power supply and an appropriate country-specific IEC power lead. However, it has two power input sockets to allow a second power supply to connected as a fail-safe. The LINDY KVM IP can operate easily from a single power input. However, when two power supplies are connected, the power load is shared between them. There is no on/off switch so operation begins as soon as a power supply is connected.

To connect the power supply

1Connect the low voltage output lead from the power supply unit to either power socket on the rear panel of the LINDY KVM IP.

2If required, connect the low voltage output lead from a second suitable power supply to the other power socket on the rear panel of the LINDY KVM IP.


M


O


D


E


M


IN


U

D


O


S


O

A


EO R


Y


NL


B

1


5V

ON

2


1


2A


2


C


F


G


K/M


KVMA

DVI


CONSOLE


VG


A

3Connect the IEC connector of the supplied country-specific power lead to the socket of the power supply. Repeat for the second power supply, if used.

4Connect the power lead(s) to a nearby main supply socket.

Note: The correct operation of one or both connected power supplies are confirmed during power-up by the A and B indicators on the front panel as power is applied.

   



13

Page 14
Image 14
Lindy Switch manual Modem/ISDN port, Power supply connection, To connect a modem or Isdn port, To connect the power supply

Switch specifications

Lindy Switch is a pivotal innovation in the realm of audio-visual and data transmission technologies, designed to facilitate seamless switching between multiple signal sources. This device serves numerous applications, from broadcasting and live events to professional AV setups and corporate environments. One of its standout features is the ability to handle multiple input and output formats, enabling users to switch between HDMI, DisplayPort, USB, and more, depending on their specific needs.

The technology behind Lindy Switch is built to ensure high-definition signal integrity, with support for resolutions up to 4K at 60Hz. This makes it an ideal choice for environments that demand high-quality video output, such as home theaters and conference rooms. Furthermore, the device is engineered for low latency, ensuring that signal switching occurs in real-time without discernible lag, crucial for live performances and presentations.

Lindy Switch incorporates advanced features such as automatic switching, which detects the active input source and seamlessly transitions to it, making it user-friendly even for those who are not tech-savvy. Additionally, the device often includes remote control capabilities, allowing users to manage inputs from a distance, enhancing convenience in larger spaces.

Another characteristic that sets Lindy Switch apart is its robust build quality. Designed for reliability, it features durable connectors and housing, safeguarding against wear and tear from frequent use. This reliability extends to its compatibility with a wide range of operating systems and devices, including Windows, macOS, and various gaming consoles.

In summary, Lindy Switch exemplifies cutting-edge technology in signal management, boasting features such as high-definition support, low latency, automatic switching, and versatile compatibility. Its solid construction and user-friendly interface make it a vital tool for professionals and enthusiasts alike, ensuring optimal performance in diverse audio-visually demanding environments. Whether for a home cinema or a corporate setting, Lindy Switch meets the needs of modern users who rely on efficient and high-quality signal switching solutions.