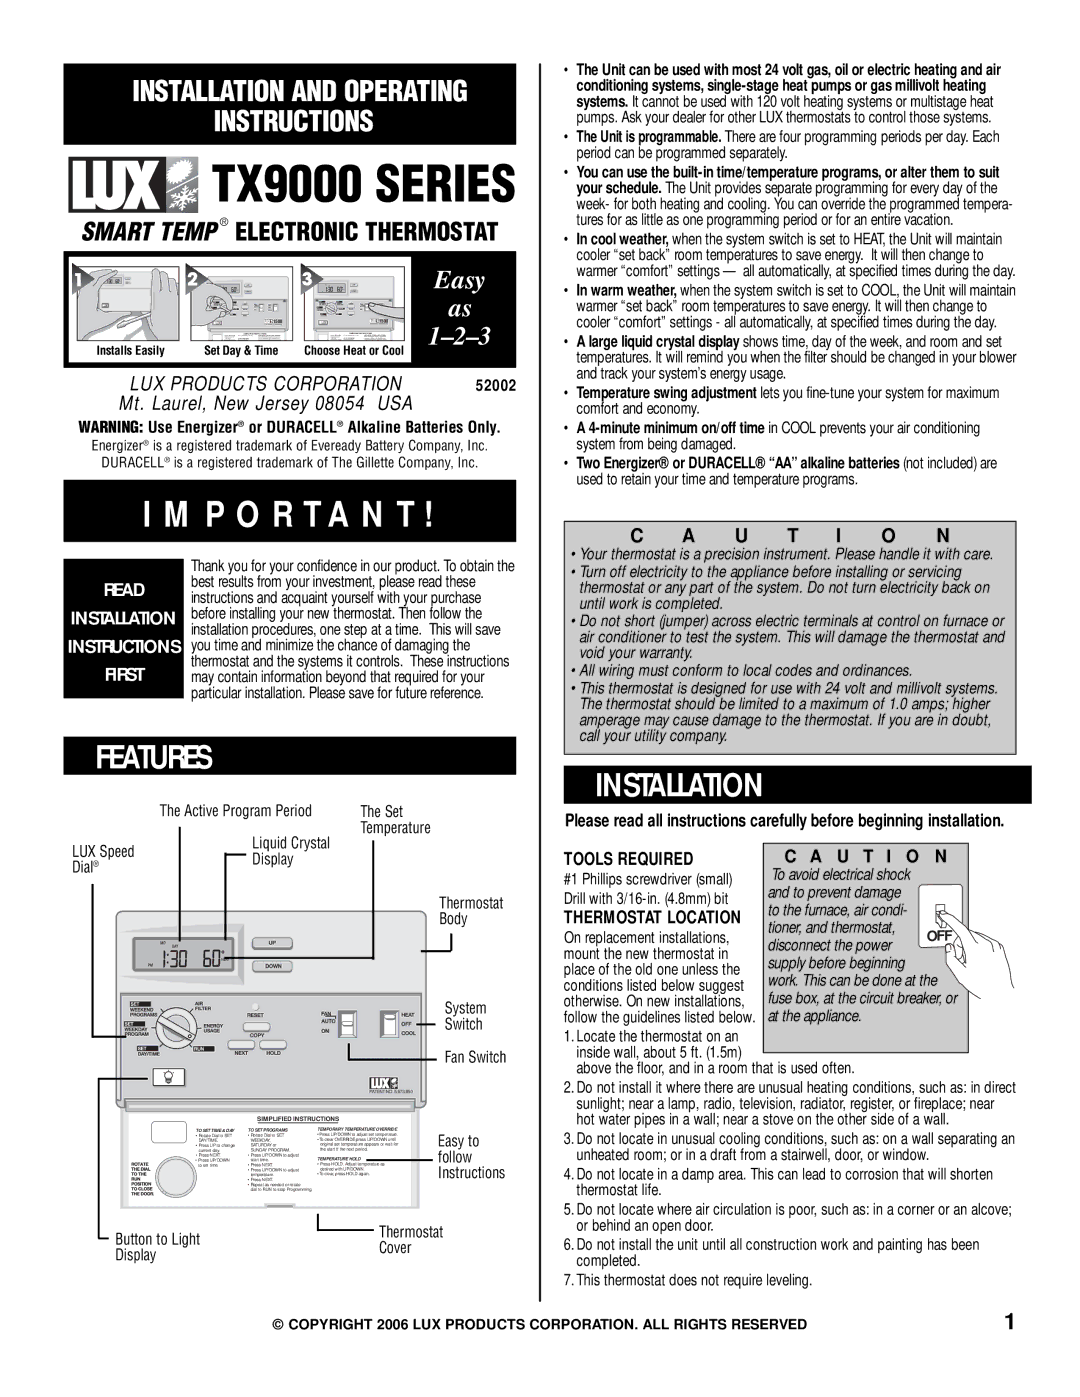
![](/images/new-backgrounds/1010412/104121x1.webp)
INSTALLATION AND OPERATING
INSTRUCTIONS
![](/images/new-backgrounds/1010412/104121xi2.webp)
TX9000 SERIES
SMART TEMP ® ELECTRONIC THERMOSTAT
|
|
| Easy |
| 1500 | 1500 | as |
Installs Easily | Set Day & Time | Choose Heat or Cool | |
|
LUX PRODUCTS CORPORATION | 52002 |
Mt. Laurel, New Jersey 08054 USA
WARNING: Use Energizer® or DURACELL® Alkaline Batteries Only.
Energizer® is a registered trademark of Eveready Battery Company, Inc. DURACELL® is a registered trademark of The Gillette Company, Inc.
I M P O R T A N T !
•The Unit can be used with most 24 volt gas, oil or electric heating and air conditioning systems,
•The Unit is programmable. There are four programming periods per day. Each period can be programmed separately.
•You can use the
•In cool weather, when the system switch is set to HEAT, the Unit will maintain cooler “set back” room temperatures to save energy. It will then change to warmer “comfort” settings — all automatically, at specified times during the day.
•In warm weather, when the system switch is set to COOL, the Unit will maintain warmer “set back” room temperatures to save energy. It will then change to cooler “comfort” settings - all automatically, at specified times during the day.
•A large liquid crystal display shows time, day of the week, and room and set temperatures. It will remind you when the filter should be changed in your blower and track your system’s energy usage.
•Temperature swing adjustment lets you
•A
•Two Energizer® or DURACELL® “AA” alkaline batteries (not included) are used to retain your time and temperature programs.
C A U T I O N
•Your thermostat is a precision instrument. Please handle it with care.
READ
INSTALLATION INSTRUCTIONS FIRST
Thank you for your confidence in our product. To obtain the best results from your investment, please read these instructions and acquaint yourself with your purchase before installing your new thermostat. Then follow the installation procedures, one step at a time. This will save you time and minimize the chance of damaging the thermostat and the systems it controls. These instructions may contain information beyond that required for your particular installation. Please save for future reference.
•Turn off electricity to the appliance before installing or servicing thermostat or any part of the system. Do not turn electricity back on until work is completed.
•Do not short (jumper) across electric terminals at control on furnace or air conditioner to test the system. This will damage the thermostat and void your warranty.
•All wiring must conform to local codes and ordinances.
•This thermostat is designed for use with 24 volt and millivolt systems. The thermostat should be limited to a maximum of 1.0 amps; higher amperage may cause damage to the thermostat. If you are in doubt, call your utility company.
FEATURES
The Active Program Period | The Set |
Liquid Crystal | Temperature |
|
INSTALLATION
Please read all instructions carefully before beginning installation.
LUX Speed | Display |
Dial® |
Thermostat
Body
System
Switch
Fan Switch
TOOLS REQUIRED
#1 Phillips screwdriver (small) Drill with
THERMOSTAT LOCATION
On replacement installations, mount the new thermostat in place of the old one unless the conditions listed below suggest otherwise. On new installations, follow the guidelines listed below.
1.Locate the thermostat on an inside wall, about 5 ft. (1.5m)
C A U T I O N
To avoid electrical shock and to prevent damage
to the furnace, air condi- tioner, and thermostat, disconnect the power
supply before beginning work. This can be done at the fuse box, at the circuit breaker, or at the appliance.
PATENT NO. 5,673,850
SIMPLIFIED INSTRUCTIONS
TO SET TIME & DAY | TO SET PROGRAMS | TEMPORARY TEMPERATURE OVERRIDE | Easy to | |
• Rotate Dial to SET | • Rotate Dial to SET | •Press UP/DOWN to adjust set temperature. | ||
DAY/TIME. | WEEKDAY, | •To clear OVERRIDE press UP/DOWN until | ||
• Press UP to change | SATURDAY or | original set temperature appears or wait for | ||
current day. | SUNDAY PROGRAM. | the start tf the next period. | follow | |
to set time. | • Press NEXT. | • Press HOLD. Adjust temperature as | ||
• Press NEXT. | • Press UP/DOWN to adjust | TEMPERATURE HOLD |
|
|
• Press UP/DOWN | start time. |
| Instructions | |
| • Press NEXT. | desired with UP/DOWN. | ||
| • Press UP/DOWN to adjust |
| ||
| temperature. | •To clear, press HOLD again. |
|
• Repeat as needed or rotate
dial to RUN to stop Programming.
Button to Light |
| Thermostat |
| ||
| Cover | |
Display |
| |
|
|
above the floor, and in a room that is used often.
2.Do not install it where there are unusual heating conditions, such as: in direct sunlight; near a lamp, radio, television, radiator, register, or fireplace; near hot water pipes in a wall; near a stove on the other side of a wall.
3.Do not locate in unusual cooling conditions, such as: on a wall separating an unheated room; or in a draft from a stairwell, door, or window.
4.Do not locate in a damp area. This can lead to corrosion that will shorten thermostat life.
5.Do not locate where air circulation is poor, such as: in a corner or an alcove; or behind an open door.
6.Do not install the unit until all construction work and painting has been completed.
7.This thermostat does not require leveling.
© COPYRIGHT 2006 LUX PRODUCTS CORPORATION. ALL RIGHTS RESERVED | 1 |