Owner’s Manual
Return your Warranty Registration Card within 10 days. See why inside
CCB193AT
Color TV with built-in VCR
For Customer Use
Congratulations on your purchase, and welcome to the “family!”
Dear PHILIPS product owner
Warranty Verification
Introduction
Features
Safety Precautions
Welcome to your TV/VCR owner’s manual
Additional Features
4 Table of Contents
Setting Up Your TV/VCR
Description of Controls
TV/VCR Maintenance
Putting Batteries in the Remote Control
Using the Remote Control
Recording Prevention
Hooking Up Your TV/VCR With a Cable Signal or Outdoor Antenna
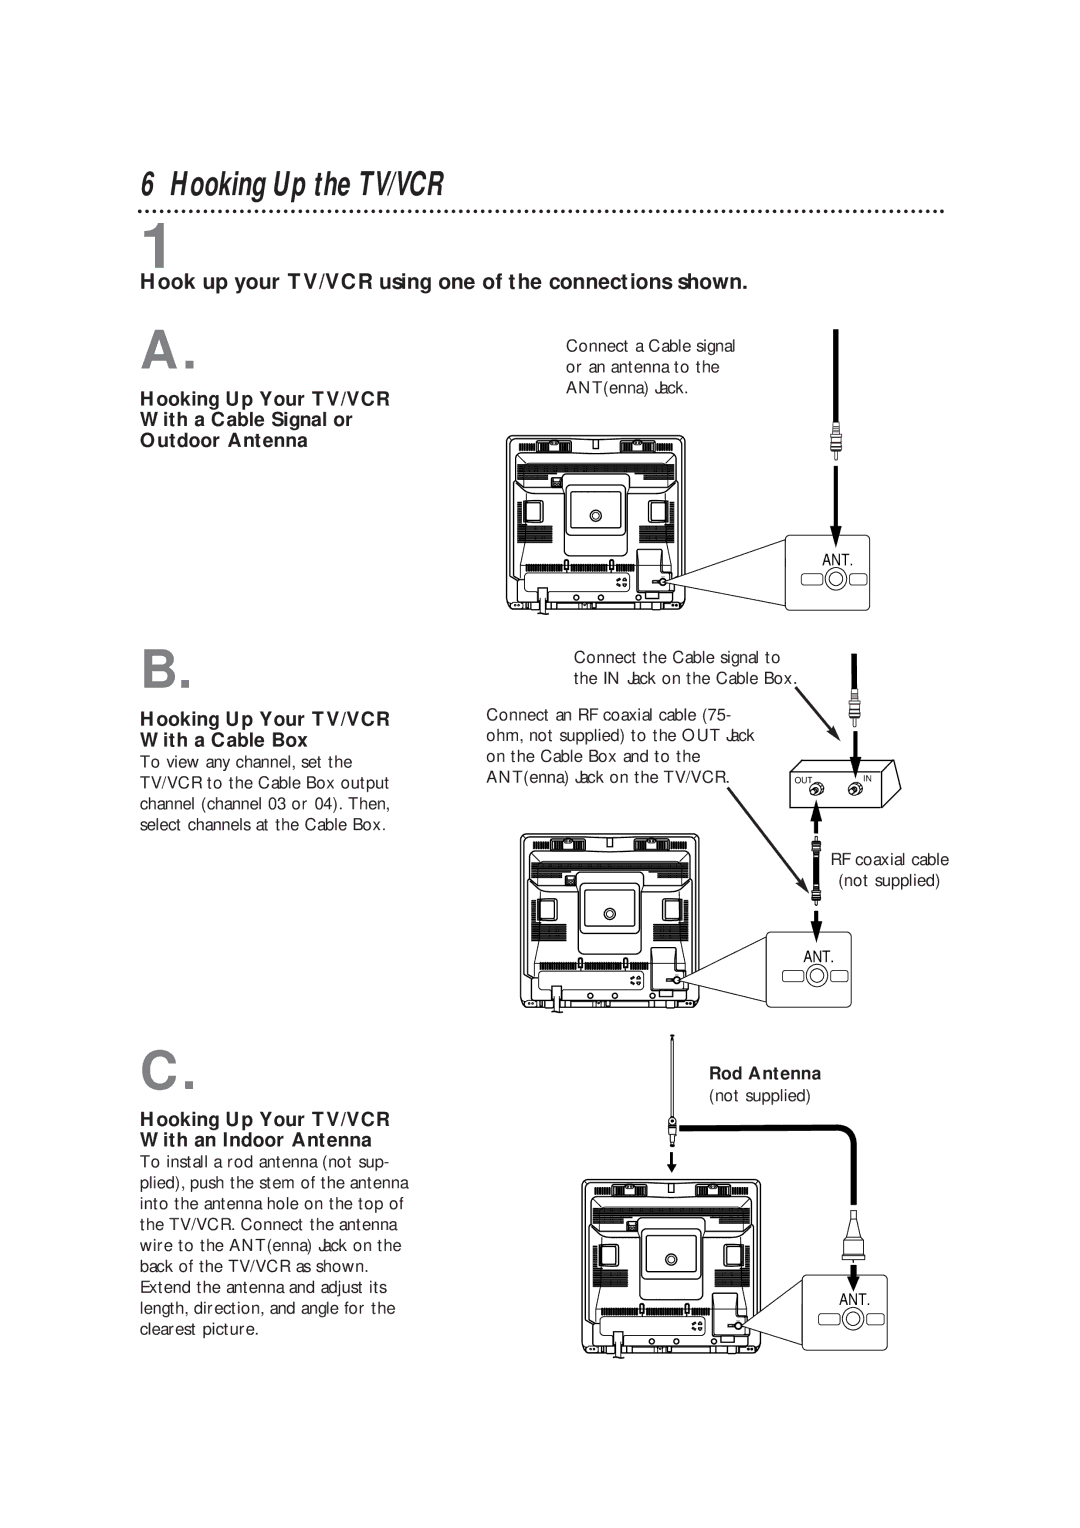
Hook up your TV/VCR using one of the connections shown
6 Hooking Up the TV/VCR
Hooking Up Your TV/VCR With a Cable Box
Before you turn on the TV/VCR, go to page eight
Plug in the TV/VCR’s power cord
Hooking Up the TV/VCR cont’d
Helpful Hints
Helpful Hints
8 Turning On the TV/VCR
You cannot set up channels if you are using a Cable Box
Press the PLAY/K button or the STOP/L button to select
1 Press the MENU button
Language Selection
Helpful Hint
5 Press the STATUS/EXIT button
Helpful Hints
10 Automatic Channel Setup
Wait for the TV/VCR to set up
ARE SET will appear on the screen. Then the programming of the
Helpful Hint
Adding/Deleting Channels
Automatic Channel Setup cont’d
1 Press the MENU button
12 Setting the Clock
Manual Clock Setting
Helpful Hints
Setting the Clock cont’d
14 Setting the Clock cont’d
Automatic PBS Channel Selection
Wait for the TV/VCR to find
Setting the Clock cont’d
Helpful Hints
the time
16 Setting the Clock cont’d
Manual PBS Channel Selection
Setting the Clock cont’d
Helpful Hints
18 Daylight-Savings Time
To turn Daylight-Savings Time ON or OFF, follow the steps below
Helpful Hints
Time Zone
When you set the clock using AUTO CLOCK, specify your time zone
The TV/VCR will maintain the clock according to your time zone
camcorder or a VCR. Details are on page
20 Front Panel
camcorder or a VCR. Details are on page
Press to play a tape. Details are on page
ANTenna Jack
Rear Panel
AC Power Cord
Details are on page six
22 Remote Control Buttons
Helpful Hint
Remote Control Buttons cont’d
Helpful Hint
POWER
24 Adjusting the Picture Controls
The original settings will probably give you the best picture quality
Helpful Hints
Increase
Adjusting the Picture Controls cont’d
Decrease
BRIGHTNESS
Current
26 On-Screen Status Displays
Helpful Hints
Tape
Reminder
Set REMINDER to ON or OFF by following the steps below
Helpful Hints
28 Playing
Playback features and options are on pages
S-VHS Quasi Play Back SQPB
Recording options are on pages
Recording
Helpful Hints
distortion may appear on the tape
Helpful Hints
30 One-Touch Recording
Before you begin, make sure Channels are set up
There is a tape in the TV/VCR. The record tab must be intact
Different brands of equipment may operate differently
Rerecording Tape Duplication
Helpful Hints
Audio and video cables are not included
32 Timer Recording
Helpful Hints
Recording example
Helpful Hints
Timer Recording cont’d
Instructions continue on page
information
Leave the Cable Box/DBS on if applicable
34 Timer Recording cont’d
Turn off the TV/VCR for the recording Insert a tape in the TV/VCR
Helpful Hints
ings are programmed, nothing will happen when you select PRO
Checking or Clearing Timer Recordings
Timer Recording cont’d
Helpful Hint
36 Defeat Recording
Helpful Hints
Follow the steps below to prevent accidental recording
Repeat Play
Helpful Hints
ON-SCREEN MODE DEFEAT RECORDING OFF BLUE BACKGROUND ON
The end position B must be later on
38 A-B Repeat Play
Helpful Hints
the tape than the start position A
Press the STATUS/EXIT button to remove the menu. A-B
A-B Repeat Play cont’d
Helpful Hints
Play, fast forward, or rewind the tape to the position at
40 Real-Time Counter Memory
Helpful Hints
Super High Speed Searching LP/SLP
Playback Options
Forward and Reverse Searching SP/LP/SLP
Viewing a Still Picture
To block ratings, follow the steps below
42 SmartLock
Helpful Hints
The SMARTLOCK menu will appear
Helpful Hints
SmartLock cont’d
Ratings will remain blocked even after a power failure
Ratings are defined on page
Helpful Hints
44 SmartLock cont’d
To change the access code, follow these steps
After you enter the code, the SMARTLOCK menu will appear
RATING EXPLANATIONS
SmartLock cont’d
46 Blue Background
Helpful Hint
To set BLUE BACKGROUND to ON or OFF, follow the steps below
Sleep Timer
the Sleep Timer
Helpful Hints
48 Wake Up Timer
Helpful Hint
Volume Bar
50 Closed Caption
Helpful Hint
Standard Closed Captions
Closed Caption cont’d
Helpful Hints
Half-screen text
Automatic Tracking Adjustment
52 Automatic Operation Features
Memory Rewind, Power Off
Automatic Playback
General
Specifications
Electrical Specifications
Tuner Broadcast Channels
Set up the channels. Details are on page
54 Helpful Hints
TV/VCR will not perform a timer recording
TV/VCR has no power
Helpful Hints cont’d
Adjust the antenna. Details are on page six
Adjust the tracking. Details are on page
56 Glossary
Limited Warranty
TV/VCR COMBINATION
This product must be carried in for repair
58 Index
sharpness, adjusting
language selection
Page
SUPPLIED ACCESSORIES
Philips Parts & Accessories Marketing Department
401 East Old Andrew Johnson Highway P.O. Box Jefferson City, TN
OPTIONAL ACCESSORIES