TV SECTION

TV OPERATION AND SETTINGS

INITIAL SET UP

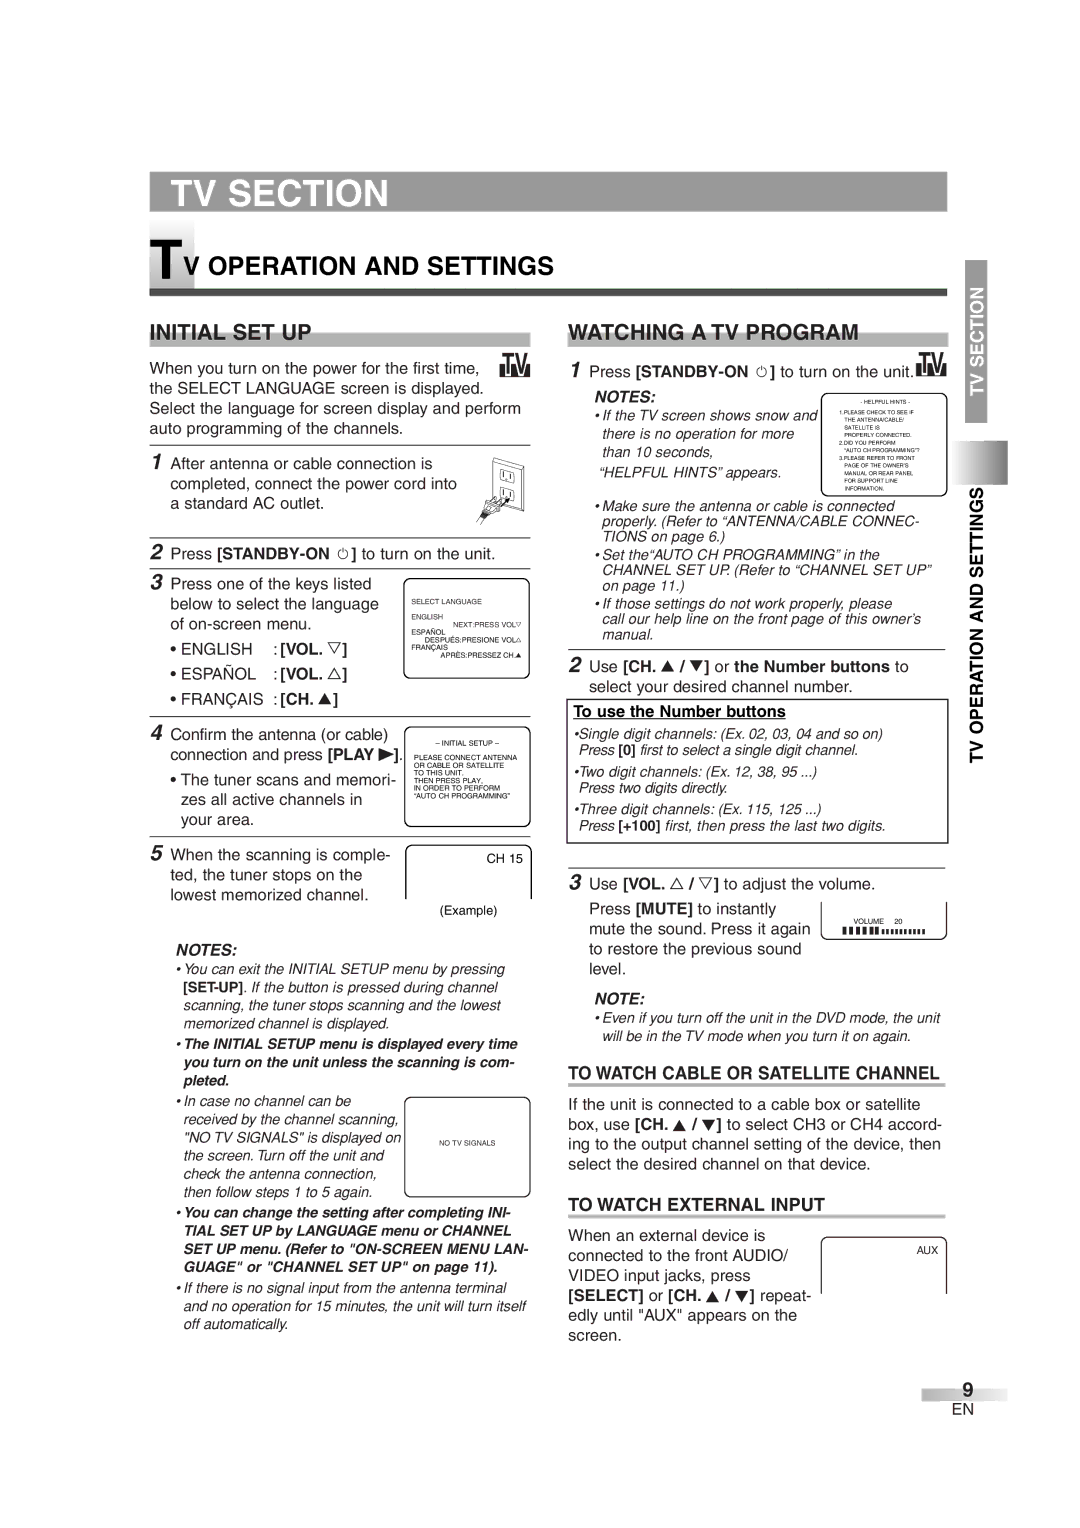
When you turn on the power for the first time, TV the SELECT LANGUAGE screen is displayed. Select the language for screen display and perform auto programming of the channels.

1After antenna or cable connection is completed, connect the power cord into

a standard AC outlet.

2Press [STANDBY-ONy] to turn on the unit.

WATCHING A TV PROGRAM

1Press [STANDBY-ONy] to turn on the unit. TV

NOTES:

- HELPFUL HINTS -

• If the TV screen shows snow and

THE ANTENNA/CABLE/


1.PLEASE CHECK TO SEE IF

there is no operation for more

SATELLITE IS

PROPERLY CONNECTED.

than 10 seconds,

2.DID YOU PERFORM

3.PLEASE REFER TO FRONT


“AUTO CH PROGRAMMING”?

“HELPFUL HINTS” appears.

PAGE OF THE OWNER’S

MANUAL OR REAR PANEL


FOR SUPPORT LINE


INFORMATION.

• Make sure the antenna or cable is connected

properly. (Refer to “ANTENNA/CABLE CONNEC-

TIONS on page 6.)

• Set the“AUTO CH PROGRAMMING” in the

CHANNEL SET UP. (Refer to “CHANNEL SET UP”

TV SECTION

SETTINGS

3Press one of the keys listed below to select the language of on-screen menu.

• ENGLISH : [VOL. Y]

ESPAÑOL : [VOL. X]

FRANÇAIS : [CH. K]

SELECT LANGUAGE

ENGLISH

NEXT:PRESS VOLYH

ESPAÑOL DESPUÉS:PRESIONE VOLXH

FRANÇAIS APRÈS:PRESSEZ CH.KH

on page 11.)

• If those settings do not work properly, please

call our help line on the front page of this owner’s

manual.

2Use [CH. K / L] or the Number buttons to select your desired channel number.

To use the Number buttons

OPERATION AND

4Confirm the antenna (or cable)

– INITIAL SETUP –

connection and press [PLAY B]. PLEASE CONNECT ANTENNA


OR CABLE OR SATELLITE

• The tuner scans and memori-

TO THIS UNIT.

THEN PRESS PLAY,

zes all active channels in

IN ORDER TO PERFORM

“AUTO CH PROGRAMMING”


your area.


5 When the scanning is comple-

CH 15

ted, the tuner stops on the


lowest memorized channel.

(Example)


NOTES:

You can exit the INITIAL SETUP menu by pressing [SET-UP]. If the button is pressed during channel scanning, the tuner stops scanning and the lowest memorized channel is displayed.

The INITIAL SETUP menu is displayed every time you turn on the unit unless the scanning is com- pleted.

In case no channel can be received by the channel scanning,

"NO TV SIGNALS" is displayed on

NO TV SIGNALS

the screen. Turn off the unit and


check the antenna connection,


then follow steps 1 to 5 again.


You can change the setting after completing INI- TIAL SET UP by LANGUAGE menu or CHANNEL SET UP menu. (Refer to "ON-SCREEN MENU LAN- GUAGE" or "CHANNEL SET UP" on page 11).

If there is no signal input from the antenna terminal and no operation for 15 minutes, the unit will turn itself off automatically.

•Single digit channels: (Ex. 02, 03, 04 and so on) Press [0] first to select a single digit channel.

•Two digit channels: (Ex. 12, 38, 95 ...) Press two digits directly.

•Three digit channels: (Ex. 115, 125 ...)

Press [+100] first, then press the last two digits.

3Use [VOL. X / Y] to adjust the volume. Press [MUTE] to instantly

mute the sound. Press it again

VOLUME 20

C C C C C C C C C C C C C C C C

to restore the previous sound


level.


NOTE:

Even if you turn off the unit in the DVD mode, the unit will be in the TV mode when you turn it on again.

TO WATCH CABLE OR SATELLITE CHANNEL

If the unit is connected to a cable box or satellite box, use [CH. K / L] to select CH3 or CH4 accord- ing to the output channel setting of the device, then select the desired channel on that device.

TO WATCH EXTERNAL INPUT

When an external device is

connected to the front AUDIO/AUX VIDEO input jacks, press

[SELECT] or [CH. K / L] repeat- edly until "AUX" appears on the screen.

TV

9

EN

Page 9
Image 9
Magnavox MWC20D6 owner manual TV Operation and Settings, Initial SET UP, Watching a TV Program

MWC20D6 specifications

The Magnavox MWC20D6 is a versatile and compact microwave oven that combines stylish design with modern technology. Designed for the needs of today’s busy households, this appliance offers a range of features that facilitate efficient cooking and reheating.

One of the standout characteristics of the MWC20D6 is its 1.3 cubic feet capacity, providing ample space for cooking various dishes. Its 900-watt power output ensures quick and even heating, making it an efficient choice for both reheating leftovers and preparing meals from scratch. This microwave is equipped with a turntable, which helps distribute heat evenly, ensuring that food is cooked thoroughly without cold spots.

The MWC20D6 comes with multiple power levels, allowing users to tailor the cooking process to their specific needs. This flexibility is ideal for different types of food, enabling gentle defrosting or rapid cooking with ease. Additionally, it features a variety of pre-programmed cooking settings for popular items such as popcorn, pizza, and beverages, simplifying the user experience.

User-friendliness is a key component of the MWC20D6. The control panel is intuitive, featuring a digital display and clearly marked buttons that make it easy to select cooking times and power levels. The included timer and clock function further enhance usability, making it easy for users to keep track of cooking times.

In terms of design, the Magnavox MWC20D6 boasts a modern aesthetic with a sleek black and stainless-steel finish, making it a stylish addition to any kitchen. Its compact size allows for placement on countertops without taking up excessive space, making it suitable for smaller kitchens or apartments.

Safety is another priority for the MWC20D6, which includes a child safety lock feature, ensuring peace of mind in households with young children. The microwave also contains a removable filter for easy cleaning, promoting hygiene and maintenance without hassle.

Overall, the Magnavox MWC20D6 stands out as an efficient, stylish, and user-friendly microwave oven. With its range of features, modern technology, and consideration for safety and convenience, it caters perfectly to the diverse cooking needs of contemporary kitchens. Whether reheating a quick meal or preparing a family feast, the MWC20D6 is equipped to handle it all with ease.