ZV427MG9
Connect, then press OK
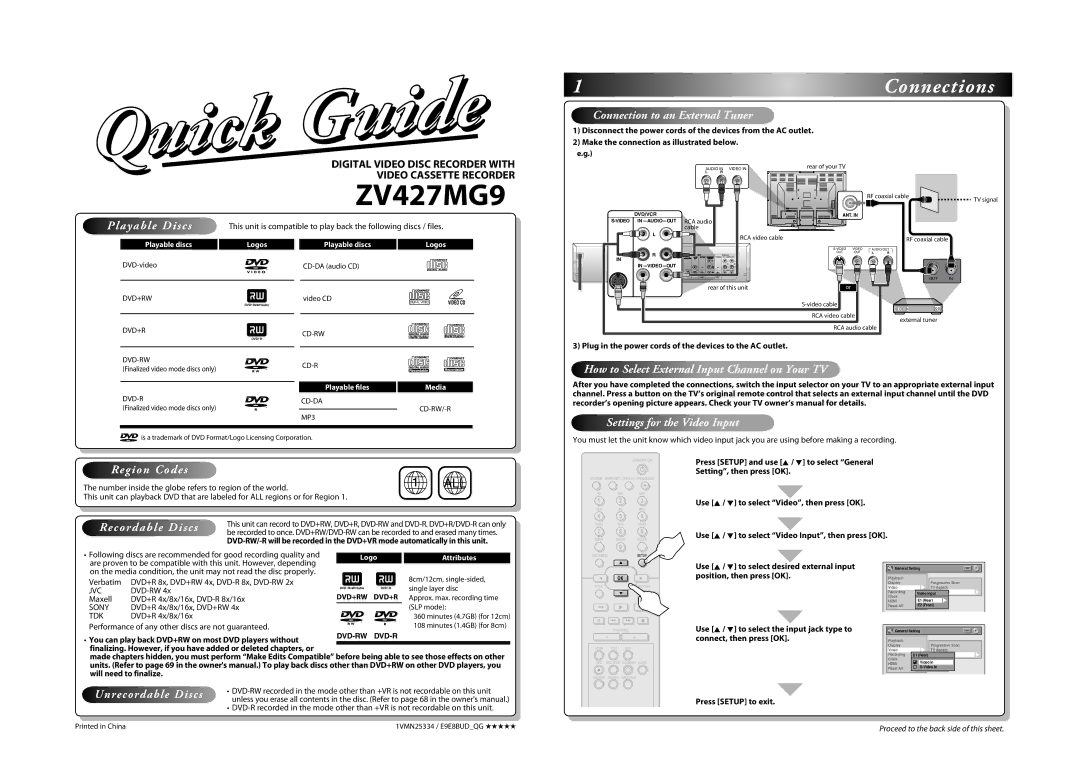
Plug in the power cords of the devices to the AC outlet
Press Setup to exit
3Press REC Mode to select a recording mode
6Press Stop C to stop recording
Make your contribution to the environment
Precautions
Laser Safety
Important Safeguards
Precautions
Avoid the Hazards of Electrical Shock and Fire
Installation Location
Supplied Accessories
Moisture Condensation Warning
Cleaning discs
Maintenance Servicing
Cleaning the cabinet
Cleaning the disc lens Disc handling
Contents
Features
212019181716 14 13 121110 9 8
Functional Overview
Front Panel
Functional Overview
Rear Panel
Using a Remote Control
Remote Control
Installing the Batteries in the Remote Control
Open the cover Insert batteries
REW E button DVD/VCR DVD mode
Timer SET button DVD/VCR
Timer button DVD/VCR
VCR mode
Current status of the unit
Front Panel Display
Display Message
Displays the following
Connection to AN External Tuner
Plug in the power cords of the devices to the AC outlet
Disconnect the power cords of the de
Om the AC outlet
14 EN
Settings for the Video Input
Press Setup to exit
Connection to a TV
This unit
Actual Output Modes by Media
Hdmi Mode and Actual Output Signals
Connections Basic Setup
Cables not included
Dolby Digital decoder
Connection to AN Audio System
Channel Analog Audio Connection Digital Audio Connection
Audio
DVD /VCR Recorder Switching
File Name Information
VCR mode
On-Screen Display / Menu
Hdmi Information
Guide to ON-SCREEN Displays and Menus
Main Menu
Initial Setting
Proceed to in Clock Setting on
Press OK
Setting the Clock
Clock Setting
Use K / L to select Clock, then
Recordable Discs
Recording Mode
Information on DVD Recording
Unrecordable Discs
Make Recording Compatible
Setting for Auto Chapter
Before Recording
Press OPEN/CLOSE a to close the disc tray
Press REC Mode to select a recording mode
Press STANDBY-ON y
It may take a while to load Disc completely
Basic Recording & ONE-TOUCH Timer Recording
Press Stop C to exit the title list
Guide to Timer Programming Display
Timer Recording
Press Timer Use K / L to select New Program, then press OK
Use K / L to enter the date, then
Use K / L to select a recording
Timer Recording
Press OK when all items are entered
Mode
Press Timer Check the information on the list you will need
To stop the timer recording in progress
Press Timer SET
Will disappear on the front panel display
Hints for Timer Recording
Priority of Overlapped Settings
Use K / L to set the desired starting time, then press B
Satellite Link
Then press OK
Use K / L to select Satellite Link
Satellite Link
To Standby Mode is highlighted
Press Timer SET to turn on the unit
Press OK again.Satellite Link
Title
Overwriting Unnecessary Title
Overwriting from the Beginning
Overwriting in the Middle of the Title
Overwrite recording a Existing title B After overwriting
Overwriting Unnecessary Title
Hints for Overwriting
Overwrite recording a Existing title B Existing title C
It takes a while to load Disc
External Device Recording
Recording from an External Device
Use K / L to select Yes, then press OK
Setting a Disc to Protect
To cancel the disc protect
OFF ON, then press OK. e.g. DVD+RW
Use K / L to select Finalize, then press OK
Press Setup Use K / L to select Disc Edit, then press OK
Finalizing a Disc
Finalizing is completed
Use K / L to select ON, then press OK
Playing the Discs in Other DVD Players
Auto Finalizing
Use K / L to select Dubbing Mode, then press OK
Dubbing Mode
Use K / L to select Recording, then press OK
Make sure
Press D.DUBBING
Dubbing Mode
Press DVD
Press Stop C to stop the recording
Information on Playback
Press Play B to start playback
Basic Playback
Direct Playback
Press Stop C once to stop playback temporarily
Use K / L to select a desired title
Basic Playback
Playback from the Title List
To exit the title list, press Stop C
Use K / L to select Play, then Press OK
Disc name Default No Disc Name Disc type
Making edits compatible/finalize When DVD+RW is inserted
Total time of recorded disc space
Follow steps 1 to 2 in Direct Playback on
When selecting the folder Not available for audio CD
Playing Back an Audio CD and a CD-RW/-R with MP3 Files
Hints for audio CD tracks and MP3 files
Press DVD first During playback, press Pause F
Using the Title / Disc Menu
Pause
Playback will be paused and sound will be muted
Fast Forward / Fast Reverse Playback
Special Playback
Resume Playback
Skipping TV Commercials During Playback
Step by Step Playback
Special Playback
Rapid Playback
Slow Forward / Slow Reverse Playback
Press DVD first During playback, press Display
Marker Setting
Zoom
Menu
Search
Using Prev H / Next G
Using Display
Title / Chapter Search
Audio CD
Search
Time Search
Repeat Playback
Random Playback
You can program the disc to play back in your desired order
Repeat / Random / Program Playback
Program Playback
Repeat this step until you program all the desired tracks
Switching Audio Soundtrack
Special Setting
Switching Subtitles
Press DVD first During playback, press Display or Audio
Switching Camera Angles
Special Setting
Switching Virtual Surround System
Reducing Block Noise
Editing Discs
Information on Disc Editing
Guide to a Title List
Press Title
Use K / L to select Edit, then
Editing Discs
Deleting Titles
Use K / L to select Title Delete
Use K / L to select Edit Title
Editing Discs
Putting Names on Titles
After this operation is completed, press Return to exit
Press Return twice to exit
Setting Chapter Marks
Use K / L to select Add, then press OK
Submenu will appear
Clearing Chapter Marks
All chapter marks will be deleted
Clearing Chapter Marks cont’d
To delete all chapter marks
Hiding Chapters
Picture for thumbnail will be set
Setting Pictures for Thumbnails
Press Return to exit
Title will be divided into 2 new titles
Dividing a Title
You can divide one title into 2 new titles
You can put a name on the disc and change it from this menu
When you finish entering a title name, press
Putting Name on Disc
Name, then press OK. e.g. DVD+RW
Setting or Releasing Disc Protect
Erasing Disc
You can erase all titles on a disc
Making Edits Compatible
Use K / L to select Yes, then press
List of Settings
Contents
List of Settings
VCR DVD
Playback
Setups
Parental Lock Default OFF
Use K / L to select a desired item, then press OK
Disc Audio
Setups
Playback cont’d
Subtitle Language Default OFF
Disc Menu Language Default English
Audio Language Default Original
Angle Icon Default on
FL Dimmer Default Bright
OSD Language Default English
Screen Saver Default 10 minutes
Display
Video
Progressive Scan Default OFF
TV Aspect Default 43 Letter Box
Selected item
Hdmi Audio Default on
When you finish with the setting, press Setup to exit
Format Default RGB
RGB Range Default Normal
Your setting in recording will be initialized
Reset All
Reset the setting to default
VCR Functions
Recording
Other Operations
VCR Functions
Index Search
Troubleshooting
Symptom Remedy
Repairing process MAY not work
Troubleshooting
OPEN/CLOSE a to take out the disc. The disc canceled during
Press OPEN/CLOSE a
Frequently Asked Questions
84 EN
Language Code
Language Code
Glossary
Recording
Specifications
General
Terminals
Códigos de Región
Español
Discos Reproducibles
Disco Grabable
Utilice K / L para seleccionar la
Presione Setup y utilice K / L
Español
Posición de la entrada externa Deseada, y luego presione OK
Presione REC I para iniciar la grabación
Presione STANDBY-ON y
Presione OK para activar Ajste Manual de Reloj
Para de tener la grabación presione Stop C
Abra la bandeja
Presione Timer
Configure una programación del temporizador Presione OK
Detenga la
1VMN25333
Customer Service
Tel