P 5/ 10
Repair
[3]ASSEMBLING/ DISASSEMBLING
[3]-2. Driver, Cylinder stay, Valve seat
DISASSEMBLING
(1)Remove Top cap complete in accordance with mentioned in previous page.
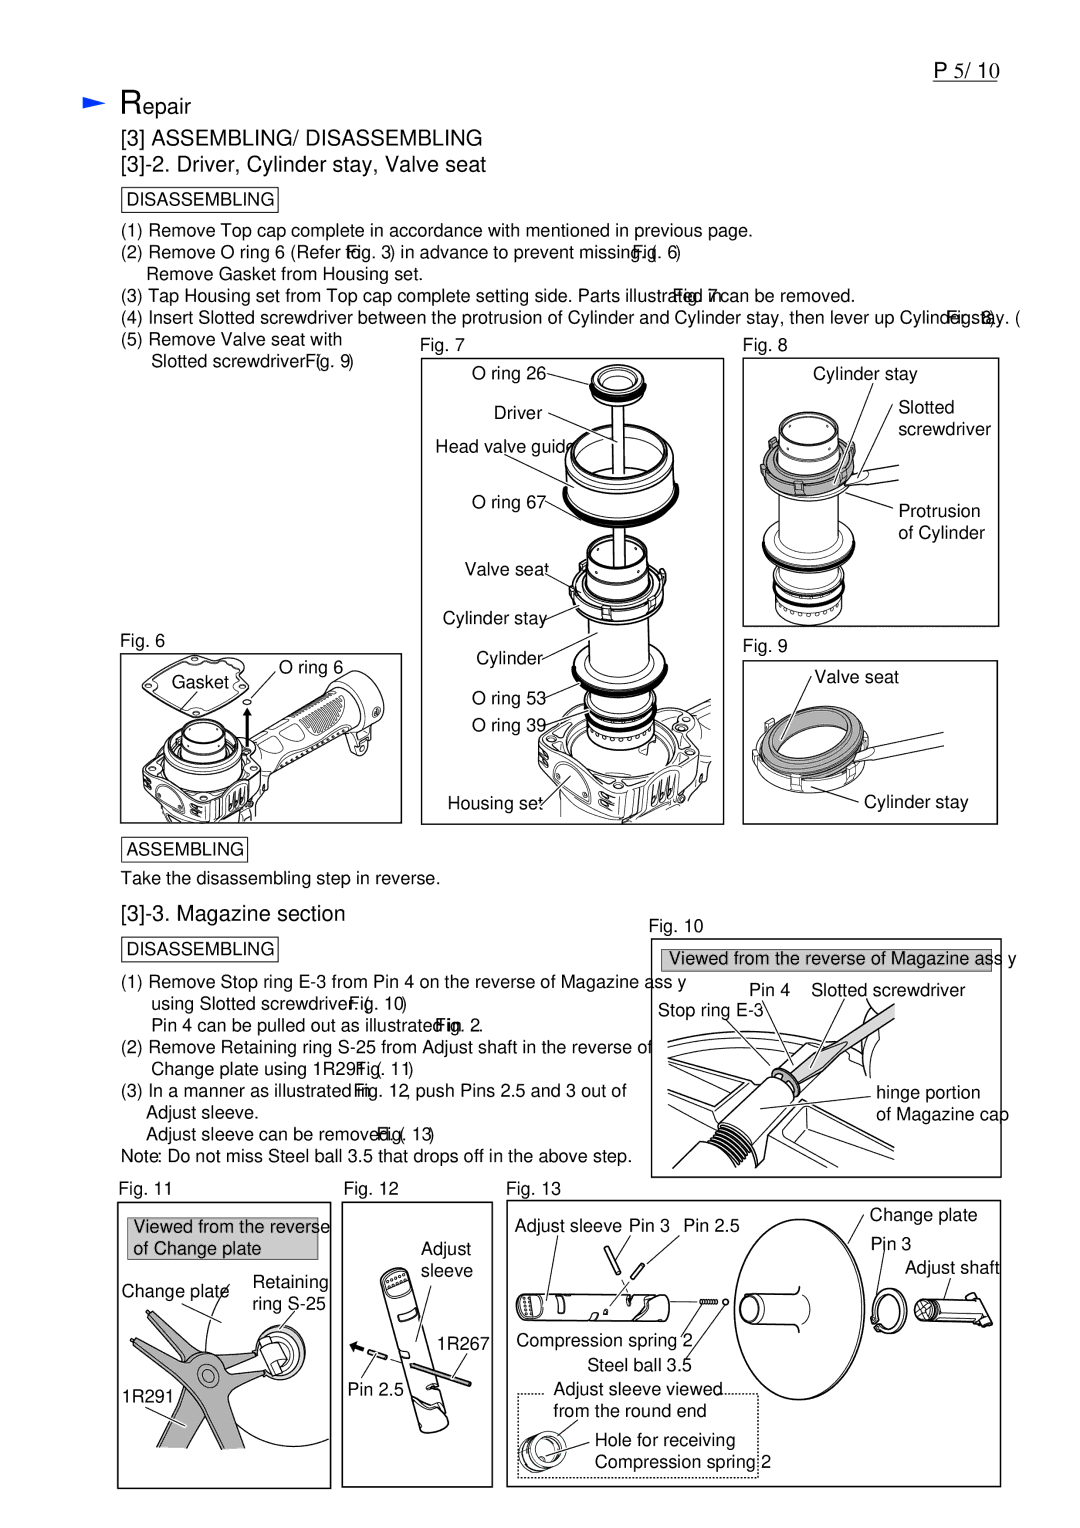
(2)Remove O ring 6 (Refer to Fig. 3) in advance to prevent missing. (Fig. 6) Remove Gasket from Housing set.
(3)Tap Housing set from Top cap complete setting side. Parts illustrated in Fig. 7 can be removed.
(4)Insert Slotted screwdriver between the protrusion of Cylinder and Cylinder stay, then lever up Cylinder stay. (Fig. 8)
(5) Remove Valve seat with | Fig. 7 | Fig. 8 | |
Slotted screwdriver. (Fig. 9) | O ring 26 | Cylinder stay | |
|
| ||
|
| Driver | Slotted |
|
| screwdriver | |
|
| Head valve guide | |
|
|
| |
|
| O ring 67 | Protrusion |
|
|
| |
|
|
| of Cylinder |
|
| Valve seat |
|
|
| Cylinder stay |
|
Fig. 6 |
| Cylinder | Fig. 9 |
|
| ||
| O ring 6 | Valve seat | |
Gasket |
| ||
|
| ||
| O ring 53 |
| |
|
|
| |
|
| O ring 39 |
|
|
| Housing set | Cylinder stay |
ASSEMBLING
Take the disassembling step in reverse.
[3]-3. Magazine section
DISASSEMBLING
(1)Remove Stop ring
Pin 4 can be pulled out as illustrated in Fig. 2.
(2)Remove Retaining ring
(3)In a manner as illustrated in Fig. 12, push Pins 2.5 and 3 out of Adjust sleeve.
Adjust sleeve can be removed. (Fig. 13)
Note: Do not miss Steel ball 3.5 that drops off in the above step.
Fig. 11 | Fig. 12 | Fig. 13 |
Fig. 10
Viewed from the reverse of Magazine ass’y
Pin 4 Slotted screwdriver Stop ring ![]()
hinge portion of Magazine cap
Viewed from the reverse | ||
of Change plate |
| |
Change plate | Retaining | |
ring | ||
| ||
1R291 |
| |
Adjust |
sleeve |
1R267 |
Pin 2.5 |
Adjust sleeve | Pin 3 | Pin 2.5 | Change plate | |
Pin 3 | ||||
|
|
| ||
|
|
| Adjust shaft | |
Compression spring 2 |
|
| ||
Steel ball 3.5 |
|
| ||
Adjust sleeve viewed |
| |||
from the round end |
| |||
Hole for receiving |
| |||
Compression spring 2 |
| |||
