Playback
Adjusting the Picture
BD-V 
 DVD-V
DVD-V
 DVD-VR
 AVCHD
AVCHD

You can adjust the picture quality and store the setting you have adjusted on memory
1)During playback, press [MODE] repeatedly until the picture adjustment menu appears.
• Picture adjustment menu:
Memory 1 ![]()
2)Use [U / V] to select a memory from “Memory 1” to “Memory 5” to store your setting, then press [ENTER].
3)Use [U / V] to select an item to be adjusted, then use [Y / Z] to adjust the setting.
|
| 2.Brightness | 0 |
| |
|
| 1.Contrast | 0 |
| |
|
| 6.Black Level | 7.5 IRE |
| |
|
|
|
|
|
|
| Item | Description |
| Adjustment range | |
|
| (* : Default setting) | |||
|
|
|
| ||
|
|
|
|
|
|
|
| Adjusts the difference |
|
|
|
Contrast | between the bright and |
| |||
|
| dark parts of the picture. |
|
|
|
Brightness | Adjusts the brightness of |
| 0 to +15 (0*) | ||
the picture. |
| ||||
|
|
|
|
| |
Sharpness | Adjusts the sharpness of |
| |||
the picture. |
| ||||
|
|
|
|
| |
|
|
|
|
|
|
|
| Changes the amount of |
|
|
|
|
| gamma correction to |
|
|
|
Gamma | adjust overall brightness |
| 0 to +5 (0*) | ||
Correction | of a picture. Make dark/ |
| |||
|
|
| |||
|
| bright section easier to |
|
|
|
|
| see. |
|
|
|
Color | Adjusts the balance |
| |||
between green and red. |
| ||||
|
|
|
|
| |
Black Level *1 | Adjusts the black level. |
| 0 IRE or 7.5 IRE | ||
|
|
|
| (7.5 IRE*) | |
*1 Not effective for the video signal of COMPONENT VIDEO OUT (480p/720p/1080i) and HDMI OUT jacks.
Item | Description | Adjustment range | |
(* : Default setting) | |||
|
| ||
|
|
| |
|
| Off* | |
|
| +1: Execute MPEG | |
|
| noise reduction | |
|
| which reduce the | |
|
| block noise and | |
Noise |
| mosquito noise on | |
| the subtitle on movie. | ||
Reduction |
| ||
Reduces the noise of the |
| ||
+2: Execute 3D noise | |||
(Not | |||
playback picture. | reduction which | ||
available for | |||
BD/AVCHD) |
| detect and delete the | |
| noise by comparing | ||
|
| ||
|
| each picture frames. | |
|
|
| |
|
| +3: Execute both | |
|
| MPEG noise reduction | |
|
| and 3D noise | |
|
| reduction. | |
|
|
|
[BLU]
[YEL]
[U / V / Y / Z]
[ENTER]
B
ENGLISH |
Playback
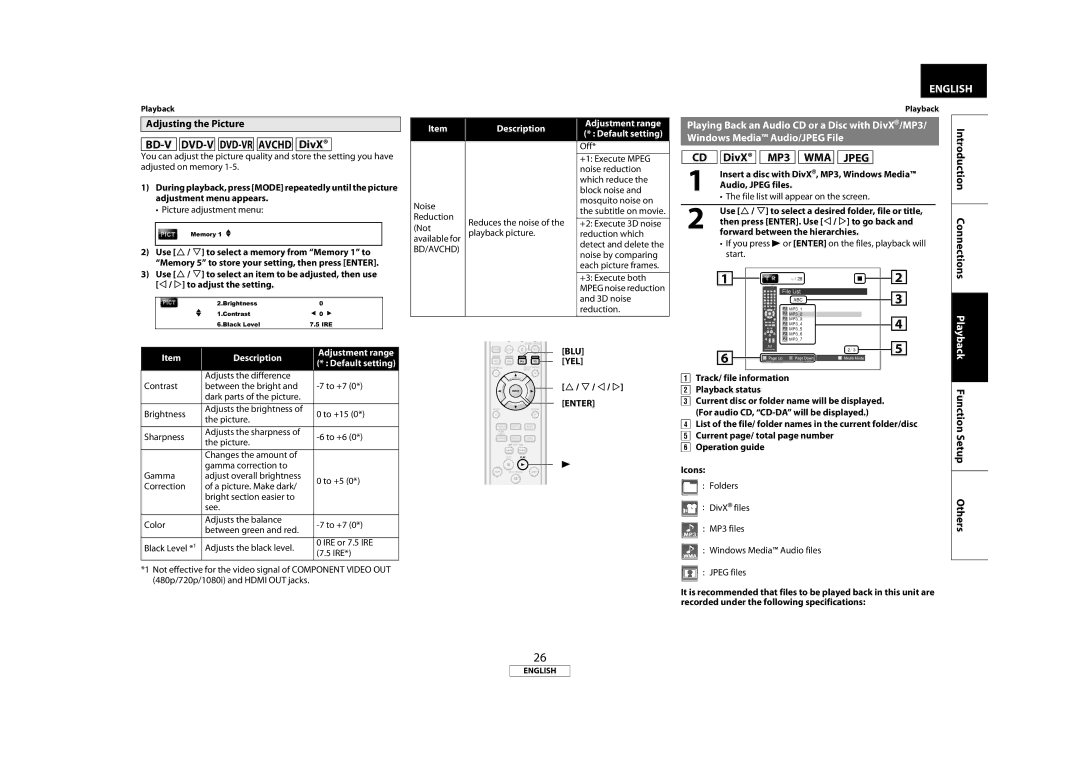
| Playing Back an Audio CD or a Disc with DivX®/MP3/ |
| Introduction | ||||||||||||||||||||||||
1 |
| Audio, JPEG files. |
|
|
|
|
|
|
|
|
| ||||||||||||||||
| Windows Media™ Audio/JPEG File |
|
|
|
|
|
|
|
|
|
| ||||||||||||||||
| CD |
| DivX® |
| MP3 |
|
| WMA |
| JPEG |
|
|
|
|
|
| |||||||||||
|
|
| Insert a disc with DivX®, MP3, Windows Media™ |
| |||||||||||||||||||||||
|
|
| • The file list will appear on the screen. |
|
|
|
| ||||||||||||||||||||
|
|
|
|
|
|
|
|
|
|
|
|
|
|
|
|
|
|
|
|
|
|
|
|
|
| ||
|
|
| Use [U / V] to select a desired folder, file or title, |
| Connections | ||||||||||||||||||||||
|
|
| then press [ENTER]. Use [Y / Z] to go back and | ||||||||||||||||||||||||
| 2 forward between the hierarchies. |
|
|
| |||||||||||||||||||||||
|
|
|
|
| |||||||||||||||||||||||
|
|
| • If you press B or [ENTER] on the files, playback will |
| |||||||||||||||||||||||
|
|
|
| start. |
|
|
|
|
|
|
|
|
|
|
|
|
|
|
|
|
|
|
| ||||
|
| 1 |
|
|
|
|
|
|
|
|
|
|
|
|
|
|
|
|
|
|
| 2 |
|
|
| ||
|
|
|
|
|
|
|
|
|
|
|
|
|
|
|
|
|
|
|
|
| |||||||
|
|
|
|
|
|
|
|
|
|
|
|
|
|
|
|
|
|
|
|
|
|
| |||||
|
|
|
|
|
|
|
|
|
| File List |
|
|
|
|
|
| 3 |
|
|
| |||||||
|
|
|
|
|
|
|
|
|
|
|
|
| ABC |
|
|
|
|
|
|
|
|
|
|
|
| ||
|
|
|
|
|
|
|
|
|
|
|
|
|
|
|
|
|
|
|
|
|
|
|
|
| |||
|
|
|
|
|
|
|
|
|
|
| MP3_1 |
|
|
|
|
|
|
|
|
|
| ||||||
|
|
|
|
|
|
|
|
|
|
| MP3_2 |
|
|
|
|
|
|
|
|
| Playback | ||||||
|
|
|
|
|
|
|
|
| Page Up |
| Page Down | Media Mode |
| 5 |
|
| |||||||||||
|
|
|
|
|
|
|
|
|
|
| MP3_3 |
|
|
|
|
|
| 4 |
|
|
| ||||||
|
|
|
|
|
|
|
|
|
|
| MP3_4 |
|
|
|
|
|
|
|
|
|
| ||||||
|
|
|
|
|
|
|
|
|
|
| MP3_5 |
|
|
|
|
|
|
|
|
| |||||||
|
|
|
|
|
|
|
|
|
|
| MP3_6 |
|
|
|
|
|
|
|
|
|
| ||||||
|
|
|
|
|
|
|
|
|
|
| MP3_7 |
|
|
|
|
|
|
|
|
|
| ||||||
|
| 6 |
|
|
|
|
|
|
|
|
|
|
|
|
| 2/ 3 |
|
|
|
|
|
|
|
|
| ||
|
|
|
|
|
|
|
|
|
|
|
|
|
|
|
|
|
|
|
|
|
|
|
| ||||
|
|
|
|
|
|
|
|
|
|
|
|
|
|
|
|
|
|
|
|
|
|
|
|
| |||
|
|
|
|
|
|
|
|
|
|
|
|
|
|
|
|
|
|
|
|
|
|
|
|
| |||
|
|
|
|
|
|
|
|
|
|
|
|
|
|
|
|
|
|
|
|
|
|
|
| ||||
|
|
|
|
|
|
|
|
|
|
|
|
|
|
|
|
|
|
|
|
| |||||||
A Track/ file information |
|
|
|
|
|
|
|
|
|
|
|
|
|
|
|
| |||||||||||
B Playback status |
|
|
|
|
|
|
|
|
|
|
|
|
|
|
|
|
|
| Function | ||||||||
C Current disc or folder name will be displayed. |
|
|
| ||||||||||||||||||||||||
|
|
|
| ||||||||||||||||||||||||
| (For audio CD, |
|
|
|
| ||||||||||||||||||||||
D List of the file/ folder names in the current folder/disc |
| ||||||||||||||||||||||||||
E Current page/ total page number |
|
|
|
|
|
|
|
|
| Setup | |||||||||||||||||
F Operation guide |
|
|
|
|
|
|
|
|
|
|
|
|
|
|
|
|
|
| |||||||||
|
|
|
|
|
|
|
|
|
|
|
|
|
|
|
|
|
|
| |||||||||
Icons: |
|
|
|
|
|
|
|
|
|
|
|
|
|
|
|
|
|
|
|
|
|
|
|
|
|
| |
|
|
|
|
|
|
|
|
|
|
|
|
|
|
|
|
|
|
|
|
|
|
|
|
|
| ||
| : Folders |
|
|
|
|
|
|
|
|
|
|
|
|
|
|
|
|
|
| Others | |||||||
| : MP3 files |
|
|
|
|
|
|
|
|
|
|
|
|
|
|
|
|
|
| ||||||||
: | DivX® files |
|
|
|
|
|
|
|
|
|
|
|
|
|
|
|
|
|
|
| |||||||
: Windows Media™ Audio files
: JPEG files
It is recommended that files to be played back in this unit are recorded under the following specifications:
26
ENGLISH