OPERATION
DANGER
For safe operation, the tine drive must disengage immediately when clutch lever is released. If it does not, adjust belt and cable tension as de- scribed in “ADJUSTMENT” section of this manual.
Never leave the tiller unattended with the engine running because chil- dren might be attracted to a running tiller and could be injured if struck by the rotating tines.
ADJUSTMENTS and MAINTENANCE
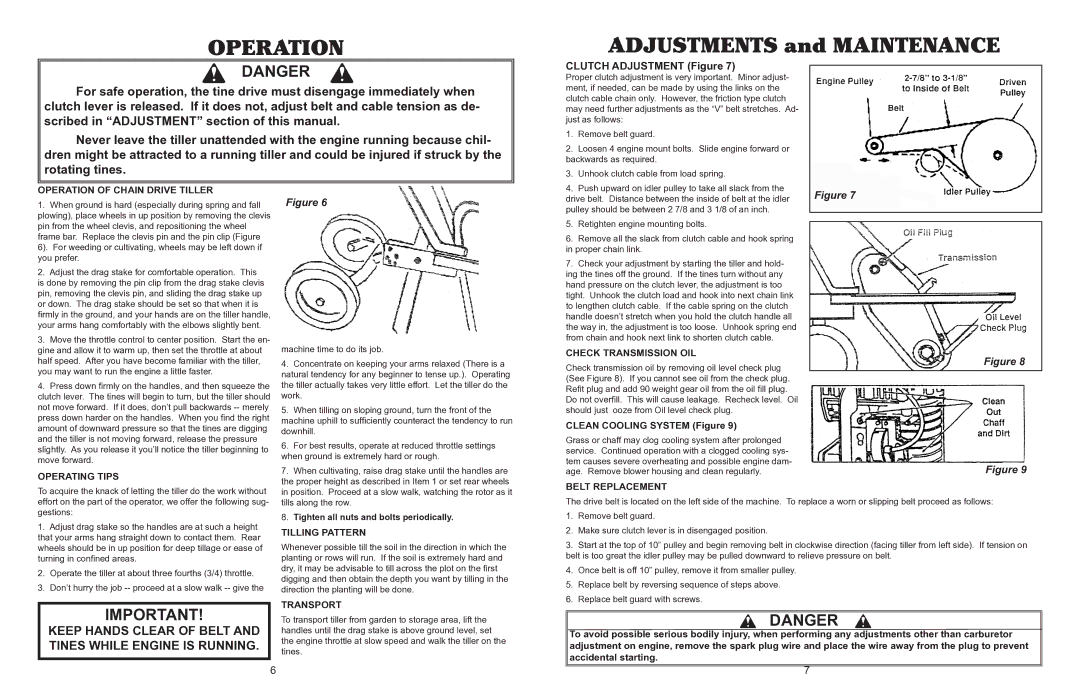
CLUTCH ADJUSTMENT (Figure 7)
Proper clutch adjustment is very important. Minor adjust- ment, if needed, can be made by using the links on the clutch cable chain only. However, the friction type clutch may need further adjustments as the “V” belt stretches. Ad- just as follows:
1. | Remove belt guard. |
2. | Loosen 4 engine mount bolts. Slide engine forward or |
backwards as required. | |
3. | Unhook clutch cable from load spring. |
OPERATION OF CHAIN DRIVE TILLER
1.When ground is hard (especially during spring and fall plowing), place wheels in up position by removing the clevis pin from the wheel clevis, and repositioning the wheel frame bar. Replace the clevis pin and the pin clip (Figure
6). For weeding or cultivating, wheels may be left down if you prefer.
2.Adjust the drag stake for comfortable operation. This
is done by removing the pin clip from the drag stake clevis pin, removing the clevis pin, and sliding the drag stake up or down. The drag stake should be set so that when it is firmly in the ground, and your hands are on the tiller handle, your arms hang comfortably with the elbows slightly bent.
3.Move the throttle control to center position. Start the en- gine and allow it to warm up, then set the throttle at about half speed. After you have become familiar with the tiller, you may want to run the engine a little faster.
4.Press down firmly on the handles, and then squeeze the clutch lever. The tines will begin to turn, but the tiller should not move forward. If it does, don’t pull backwards
OPERATING TIPS
To acquire the knack of letting the tiller do the work without
Figure 6
machine time to do its job.
4. | Concentrate on keeping your arms relaxed (There is a |
natural tendency for any beginner to tense up.). Operating | |
the tiller actually takes very little effort. Let the tiller do the | |
work. | |
5. | When tilling on sloping ground, turn the front of the |
machine uphill to sufficiently counteract the tendency to run | |
downhill. | |
6. | For best results, operate at reduced throttle settings |
when ground is extremely hard or rough. | |
7. | When cultivating, raise drag stake until the handles are |
the proper height as described in Item 1 or set rear wheels | |
in position. Proceed at a slow walk, watching the rotor as it | |
4. | Push upward on idler pulley to take all slack from the |
drive belt. Distance between the inside of belt at the idler | |
pulley should be between 2 7/8 and 3 1/8 of an inch. | |
5. | Retighten engine mounting bolts. |
6. | Remove all the slack from clutch cable and hook spring |
in proper chain link. | |
7. | Check your adjustment by starting the tiller and hold- |
ing the tines off the ground. If the tines turn without any | |
hand pressure on the clutch lever, the adjustment is too | |
tight. Unhook the clutch load and hook into next chain link | |
to lengthen clutch cable. If the cable spring on the clutch | |
handle doesn’t stretch when you hold the clutch handle all | |
the way in, the adjustment is too loose. Unhook spring end | |
from chain and hook next link to shorten clutch cable. | |
CHECK TRANSMISSION OIL
Check transmission oil by removing oil level check plug (See Figure 8). If you cannot see oil from the check plug. Refit plug and add 90 weight gear oil from the oil fill plug. Do not overfill. This will cause leakage. Recheck level. Oil should just ooze from Oil level check plug.
CLEAN COOLING SYSTEM (Figure 9)
Grass or chaff may clog cooling system after prolonged service. Continued operation with a clogged cooling sys- tem causes severe overheating and possible engine dam- age. Remove blower housing and clean regularly.
BELT REPLACEMENT
Figure 7
Figure 8
Figure 9
effort on the part of the operator, we offer the following sug- gestions:
1.Adjust drag stake so the handles are at such a height that your arms hang straight down to contact them. Rear wheels should be in up position for deep tillage or ease of turning in confined areas.
2.Operate the tiller at about three fourths (3/4) throttle.
3.Don’t hurry the job
tills along the row. |
8. Tighten all nuts and bolts periodically. |
TILLING PATTERN
Whenever possible till the soil in the direction in which the planting or rows will run. If the soil is extremely hard and dry, it may be advisable to till across the plot on the first digging and then obtain the depth you want by tilling in the direction the planting will be done.
The drive belt is located on the left side of the machine. To replace a worn or slipping belt proceed as follows:
1. | Remove belt guard. |
2. | Make sure clutch lever is in disengaged position. |
3. | Start at the top of 10” pulley and begin removing belt in clockwise direction (facing tiller from left side). If tension on |
belt is too great the idler pulley may be pulled downward to relieve pressure on belt. | |
4. | Once belt is off 10” pulley, remove it from smaller pulley. |
5. | Replace belt by reversing sequence of steps above. |
6. | Replace belt guard with screws. |
IMPORTANT!
KEEP HANDS CLEAR OF BELT AND TINES WHILE ENGINE IS RUNNING.
TRANSPORT
To transport tiller from garden to storage area, lift the handles until the drag stake is above ground level, set the engine throttle at slow speed and walk the tiller on the tines.
6
DANGER
To avoid possible serious bodily injury, when performing any adjustments other than carburetor adjustment on engine, remove the spark plug wire and place the wire away from the plug to prevent accidental starting.
7