Service and Maintenance (cont’d)

Draining

The water heater should be drained if being shut down during freezing temperatures. Also periodic draining and cleaning of sediment from the tank may be necessary.

1.Before beginning turn “OFF” the electric power supply to the water heater.

WARNING

HAZARD OF ELECTRICAL SHOCK! Before removing any access panels or servicing the water heater, make sure the electrical supply to the water heater is turned “OFF”. Failure to do this could result in

DEATH, SERIOUS BODILY INJURY, OR PROPERTY DAMAGE.

2.CLOSE the cold water inlet valve to the water heater.

3.OPEN a nearby hot water faucet and leave open to allow for draining.

4.Connect a hose to the drain valve and terminate to an ade- quate drain or outdoors.

5.OPEN the water heater drain valve to allow for tank draining.

NOTE: If the water heater is going to be shut down and drained for an extended period, the drain valve should be left open with hose connected allowing water to termi- nate to an adequate drain.

6.Close the drain valve.

7.Follow “Filling the Water Heater” instructions in the “Instructions for Installation” section.

Thermostat Removal/Replacement

1.Turn “OFF” the electrical power to the water heater at the junction box.

WARNING

HAZARD OF ELECTRICAL SHOCK! Before removing any access panels or servicing the water heater, make sure the electrical supply to the water heater is turned “OFF”. Failure to do this could result in

DEATH, SERIOUS BODILY INJURY, OR PROPERTY DAMAGE.

2.Remove the access panel and the insulation block and pad.

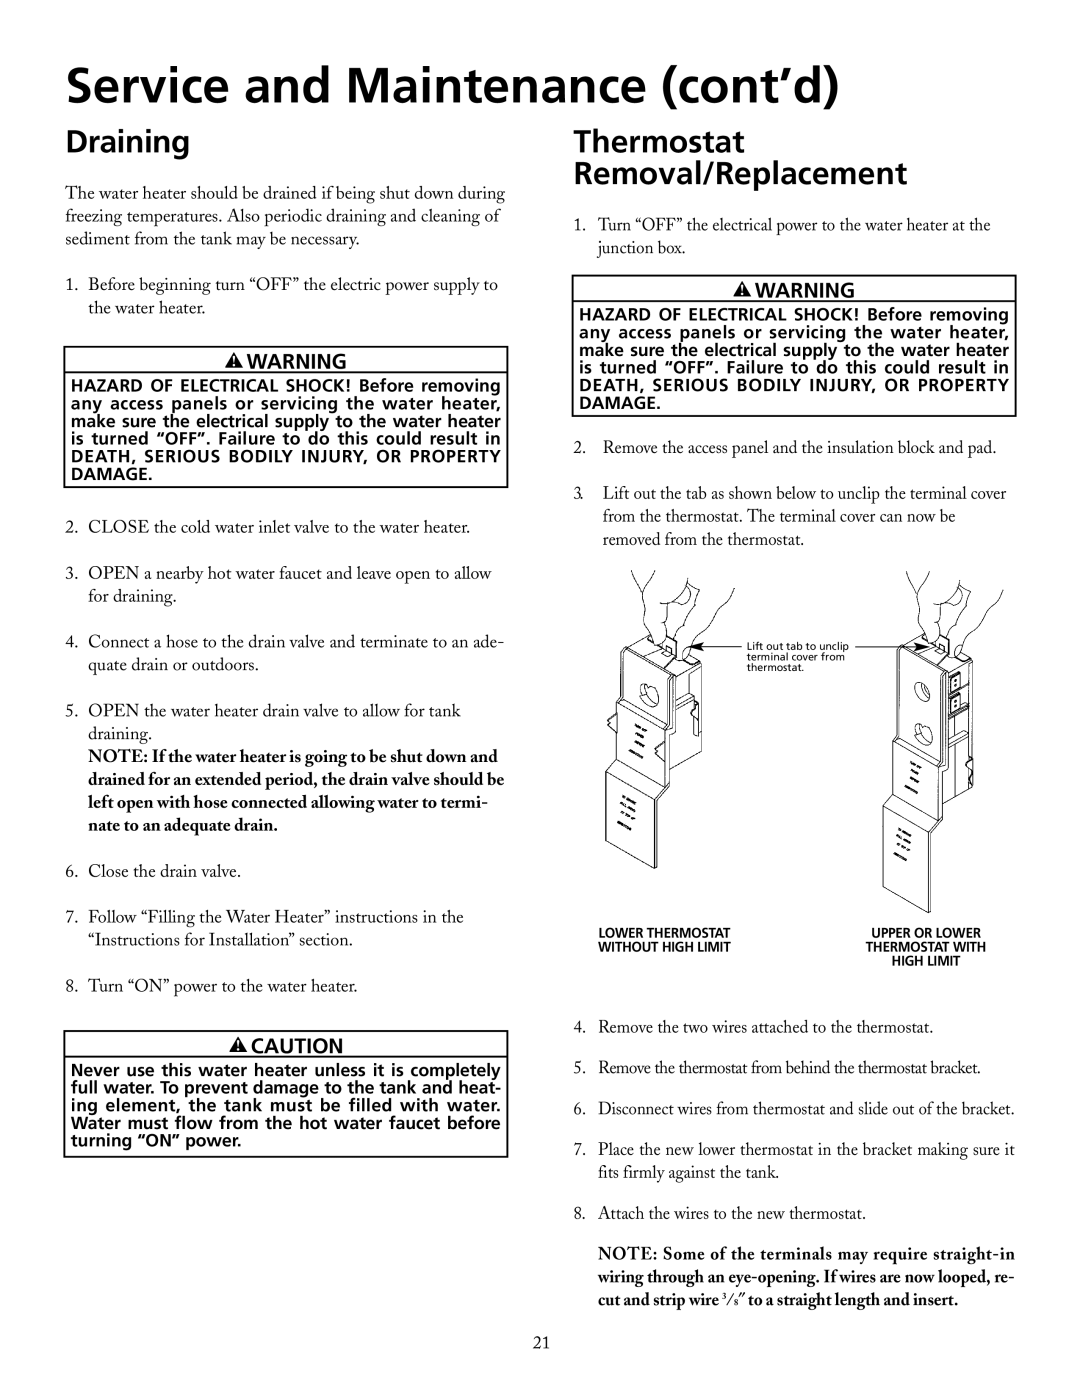
3.Lift out the tab as shown below to unclip the terminal cover from the thermostat. The terminal cover can now be removed from the thermostat.

Lift out tab to unclip terminal cover from thermostat.

LOWER THERMOSTAT

UPPER OR LOWER

WITHOUT HIGH LIMIT

THERMOSTAT WITH


HIGH LIMIT

8. Turn “ON” power to the water heater.

CAUTION

Never use this water heater unless it is completely full water. To prevent damage to the tank and heat- ing element, the tank must be filled with water. Water must flow from the hot water faucet before turning “ON” power.

4.Remove the two wires attached to the thermostat.

5.Remove the thermostat from behind the thermostat bracket.

6.Disconnect wires from thermostat and slide out of the bracket.

7.Place the new lower thermostat in the bracket making sure it fits firmly against the tank.

8.Attach the wires to the new thermostat.

NOTE: Some of the terminals may require straight-in

wiring through an eye-opening. If wires are now looped, re- cut and strip wire 38to a straight length and insert.

21

Page 21
Image 21
Maytag HRE2940L, HRE3966T, HRE3950T, HRE2950T, HRE2940T, HRE2950S, HRE2930T, HRE3940S Draining, Thermostat Removal/Replacement

HRE3950S, HRE2940S, HRE3930T, HRE2966T, HRE3940L specifications

The Maytag ranges HRE2950S, HRE2940S, HRE2940T, HRE3940S, and HRE3930T stand out in the crowded appliance market, known for their robust design and innovative features. Each model is designed with the home chef in mind, ensuring that meal preparation is both efficient and enjoyable.

One of the primary features across these models is the durable cast-iron grates that provide a professional cooking experience. They offer excellent heat retention and stability for pots and pans, allowing for optimal heat distribution when cooking. The grates are also easy to clean, making maintenance a breeze.

Another key technology integrated into these ranges is the precise temperature control, which comes from the advanced direct flame technology. This ensures that cooking temperatures can be accurately maintained, enabling recipes to be executed flawlessly. This is particularly beneficial for baking and searing, where precision is crucial.

The HRE2950S and HRE2940S models come equipped with a powerful 15,000 BTU burner, perfect for boiling and frying, while the HRE2940T model features a high-efficiency burner designed to save energy without sacrificing performance. These powerful burners allow for a range of cooking methods, from fast boiling to slow simmering.

Cooking companions in these ranges include a self-cleaning oven feature, which takes the hassle out of cleaning after a long day of cooking. The self-cleaning cycle uses high temperatures to burn off debris and food residue, resulting in a clean oven without scrubbing or harsh chemicals.

The HRE3940S and HRE3930T models are especially notable for their spacious oven capacity, which allows multiple dishes to be cooked simultaneously. This feature is ideal for entertaining or large family meals, ensuring ample room for various culinary creations.

In addition to functionality, aesthetic appeal is crucial. These Maytag ranges boast a sleek, modern design with a stainless-steel finish that adds a touch of elegance to any kitchen. The ergonomic knobs and handles complement the professional appearance, making these ranges as attractive as they are efficient.

With a commitment to durability, performance, and ease of use, the Maytag HRE2950S, HRE2940S, HRE2940T, HRE3940S, and HRE3930T are perfect for aspiring chefs and seasoned cooks alike. These ranges combine innovative features with practical functionality, making them a valuable addition to any household kitchen.