INSTRUCTIONS FOR INSTALLATION

Removing the Old Water Heater

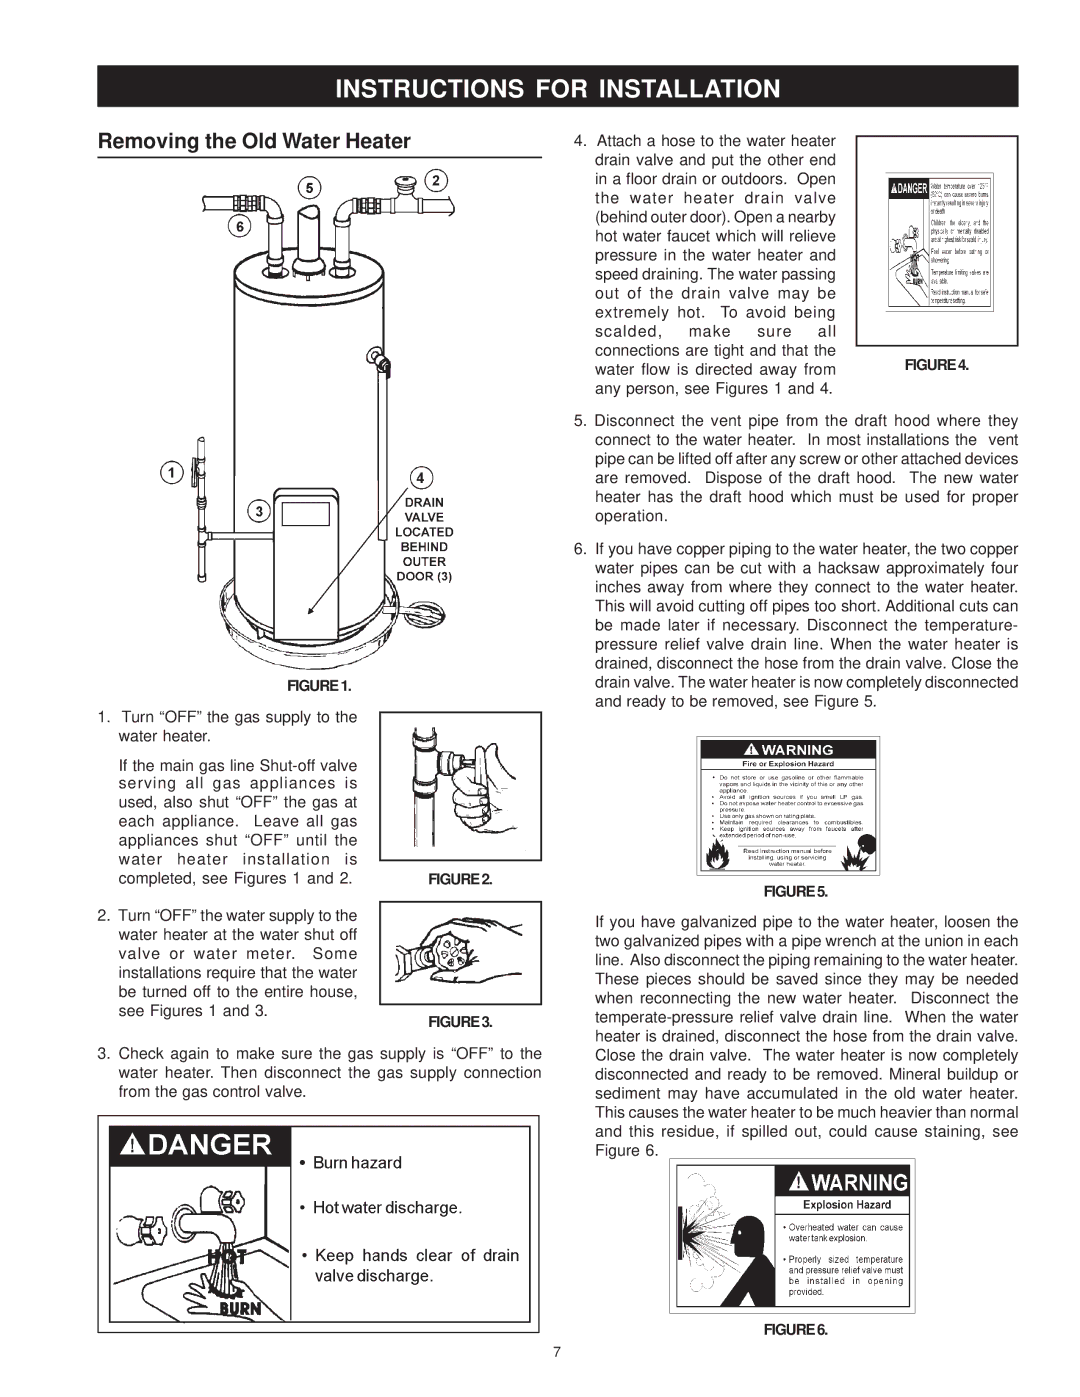
FIGURE1.


1. Turn “OFF” the gas supply to the


water heater.


If the main gas line Shut-off valve


serving all gas appliances is


used, also shut “OFF” the gas at


each appliance. Leave all gas


appliances shut “OFF” until the


water heater installation is


completed, see Figures 1 and 2.

FIGURE2.

2. Turn “OFF” the water supply to the


water heater at the water shut off


valve or water meter. Some


installations require that the water


be turned off to the entire house,


see Figures 1 and 3.


FIGURE3.


3.Check again to make sure the gas supply is “OFF” to the water heater. Then disconnect the gas supply connection from the gas control valve.

4.Attach a hose to the water heater drain valve and put the other end in a floor drain or outdoors. Open the water heater drain valve (behind outer door). Open a nearby hot water faucet which will relieve pressure in the water heater and speed draining. The water passing out of the drain valve may be extremely hot. To avoid being

scalded, make sure all connections are tight and that the

water flow is directed away from FIGURE4. any person, see Figures 1 and 4.

5.Disconnect the vent pipe from the draft hood where they connect to the water heater. In most installations the vent pipe can be lifted off after any screw or other attached devices are removed. Dispose of the draft hood. The new water heater has the draft hood which must be used for proper operation.

6.If you have copper piping to the water heater, the two copper water pipes can be cut with a hacksaw approximately four inches away from where they connect to the water heater. This will avoid cutting off pipes too short. Additional cuts can be made later if necessary. Disconnect the temperature- pressure relief valve drain line. When the water heater is drained, disconnect the hose from the drain valve. Close the drain valve. The water heater is now completely disconnected and ready to be removed, see Figure 5.

FIGURE5.

If you have galvanized pipe to the water heater, loosen the two galvanized pipes with a pipe wrench at the union in each line. Also disconnect the piping remaining to the water heater. These pieces should be saved since they may be needed when reconnecting the new water heater. Disconnect the temperate-pressure relief valve drain line. When the water heater is drained, disconnect the hose from the drain valve. Close the drain valve. The water heater is now completely disconnected and ready to be removed. Mineral buildup or sediment may have accumulated in the old water heater. This causes the water heater to be much heavier than normal and this residue, if spilled out, could cause staining, see Figure 6.

FIGURE6.

7

Page 7
Image 7
Maytag HRN31250Q, HRN11240X, HRN11250Q, HRP31240X, HRP11240X Instructions for Installation, Removing the Old Water Heater

HRN31250X, HRN11250X, HRP11250Q, HRP31250X, HRN31250Q specifications

The Maytag HRP11240X, HRP31250X, HRP11250Q, HRN11250X, and HRN11240X are a range of high-performance refrigerators designed to meet the needs of modern households. These models are well-known for their reliability, innovative features, and user-friendly design, making them a popular choice among consumers looking for durable refrigeration solutions.

One of the standout features of these Maytag models is their robust construction, which includes a stainless-steel exterior that not only offers a sleek appearance but also resists fingerprints, making it easy to maintain. The interiors are spacious and designed for optimal organization, with adjustable shelving that allows for customizable storage options. Families can easily store large items, such as party trays and oversized bottles, thanks to the flexible space configurations.

All these models are equipped with Maytag's PowerCold feature, which quickly cools the refrigerator after the door has been open for an extended period. This technology is especially beneficial during grocery trips, ensuring that perishables remain fresh and properly chilled. In addition, the temperature management system ensures consistent cooling by monitoring temperature fluctuations and adjusting accordingly.

The HRP11250Q and HRP31250X also come with the advanced FreshLock crispers, which are designed to maintain optimal humidity levels for fruits and vegetables, prolonging their freshness. The humidity-controlled environment is crucial for preserving the taste and nutrition of your produce.

Further enhancing the user experience, the Maytag refrigerators feature a bright LED interior lighting system, allowing users to easily find items even in the back of the fridge. The EnergyStar certification on these models indicates that they are energy-efficient, helping to lower utility bills while also being eco-friendly.

The models HRN11250X and HRN11240X offer additional convenience with their easy-to-use digital controls located at the front, providing intuitive access to adjust settings quickly. They also feature a reversible door hinge option, giving homeowners flexibility in installation and ensuring the refrigerator fits seamlessly into their kitchen layout.

Overall, the Maytag HRP11240X, HRP31250X, HRP11250Q, HRN11250X, and HRN11240X refrigerators exhibit a great blend of functionality, style, and durability, making them an excellent investment for any household. With their advanced technologies and thoughtful design features, these models are tailored to enhance everyday life while ensuring food preservation is taken care of efficiently.