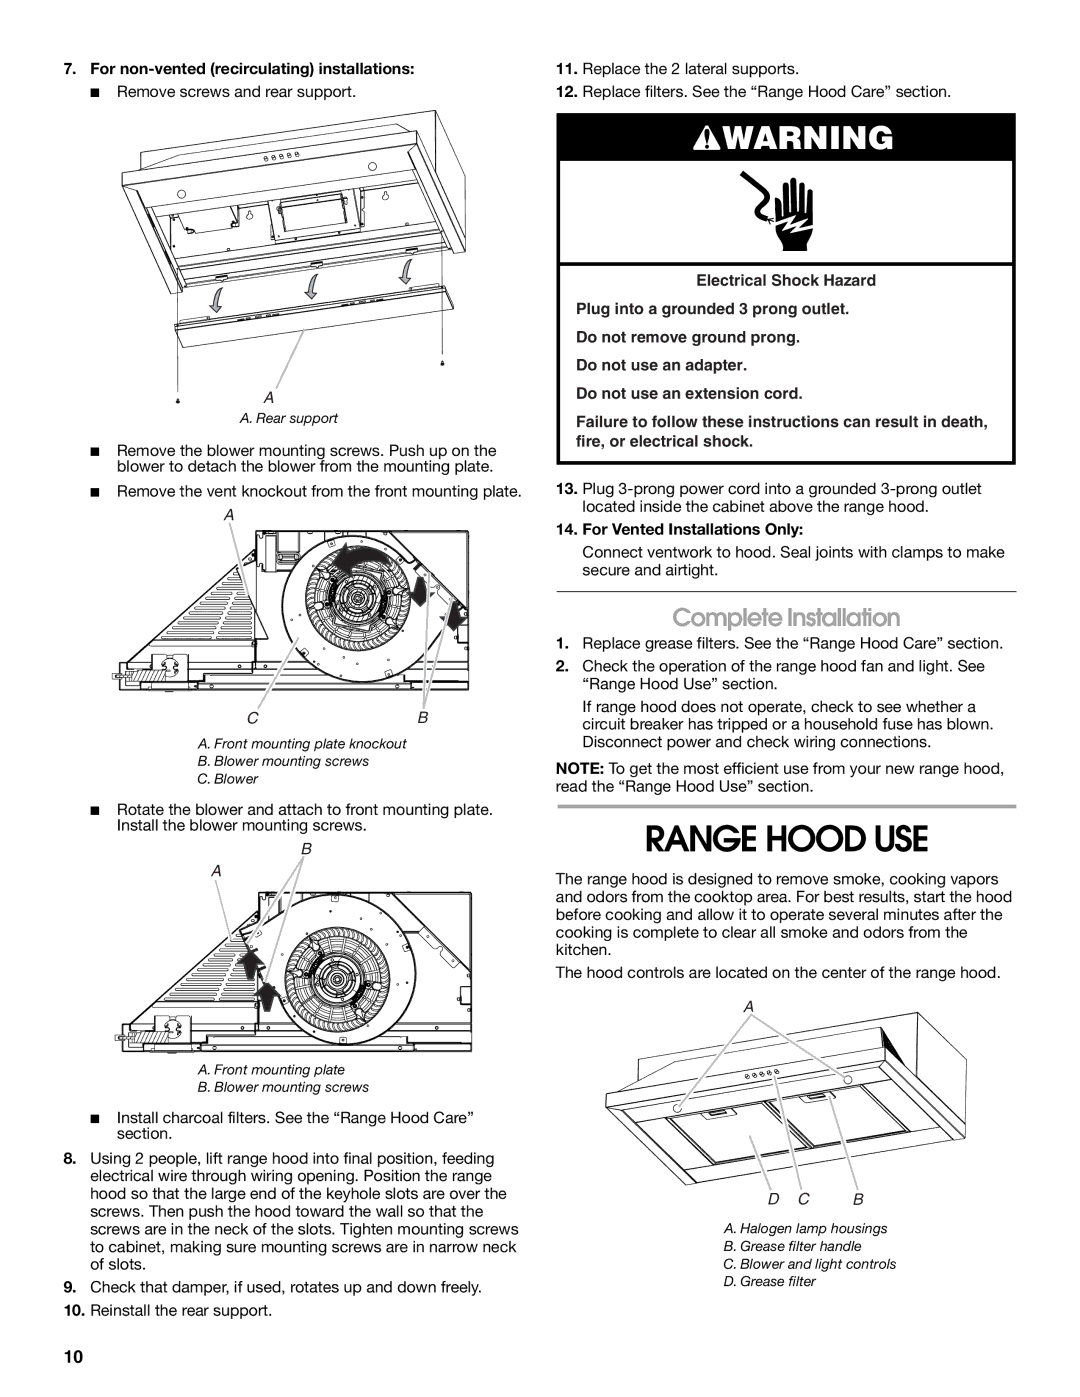
7.For non-vented (recirculating) installations: Remove screws and rear support.

11.Replace the 2 lateral supports.

12.Replace filters. See the “Range Hood Care” section.

A

A. Rear support

Remove the blower mounting screws. Push up on the blower to detach the blower from the mounting plate.

Remove the vent knockout from the front mounting plate.

A

CB

A. Front mounting plate knockout

B. Blower mounting screws

C.Blower

Rotate the blower and attach to front mounting plate. Install the blower mounting screws.

B

A

A. Front mounting plate

B. Blower mounting screws

Install charcoal filters. See the “Range Hood Care” section.

8.Using 2 people, lift range hood into final position, feeding electrical wire through wiring opening. Position the range hood so that the large end of the keyhole slots are over the screws. Then push the hood toward the wall so that the screws are in the neck of the slots. Tighten mounting screws to cabinet, making sure mounting screws are in narrow neck of slots.

9.Check that damper, if used, rotates up and down freely.

10.Reinstall the rear support.

WARNING

Electrical Shock Hazard

Plug into a grounded 3 prong outlet.

Do not remove ground prong.

Do not use an adapter.

Do not use an extension cord.

Failure to follow these instructions can result in death, fire, or electrical shock.

13.Plug 3-prong power cord into a grounded 3-prong outlet located inside the cabinet above the range hood.

14.For Vented Installations Only:

Connect ventwork to hood. Seal joints with clamps to make secure and airtight.

Complete Installation

1.Replace grease filters. See the “Range Hood Care” section.

2.Check the operation of the range hood fan and light. See “Range Hood Use” section.

If range hood does not operate, check to see whether a circuit breaker has tripped or a household fuse has blown. Disconnect power and check wiring connections.

NOTE: To get the most efficient use from your new range hood, read the “Range Hood Use” section.

RANGE HOOD USE

The range hood is designed to remove smoke, cooking vapors and odors from the cooktop area. For best results, start the hood before cooking and allow it to operate several minutes after the cooking is complete to clear all smoke and odors from the kitchen.

The hood controls are located on the center of the range hood.

A

D C B

A. Halogen lamp housings

B. Grease filter handle

C. Blower and light controls

D. Grease filter

10

Page 10
Image 10
Maytag W10274302B, LI3VQA installation instructions Range Hood USE, Complete Installation, For Vented Installations Only

LI3VQA, W10274302B specifications

The Maytag W10274302B, also known as the LI3VQA, is an innovative addition to the realm of home appliances, specifically designed to enhance the functionality of your kitchen. This refrigerator model stands out for its robust features, advanced technologies, and user-friendly characteristics, making it an excellent choice for modern households.

One of the main features of the Maytag LI3VQA is its spacious interior. The refrigerator boasts a generous capacity, ensuring ample room for all your groceries, from fresh produce to frozen items. Its adjustable shelving allows for customized storage options, accommodating larger items with ease. Furthermore, the crisper drawers are designed to maintain optimal humidity levels, ensuring that fruits and vegetables stay fresh longer.

The LI3VQA is equipped with Maytag's innovative PowerCold feature, which quickly chills the refrigerator and freezer compartments after loading them with warm items. This technology ensures that your food reaches safe temperatures rapidly, minimizing food spoilage. Additionally, the refrigerator includes a built-in ice maker and an advanced water filtration system, providing chilled, filtered water and ice on demand.

Energy efficiency is another standout characteristic of this model. The Maytag LI3VQA is Energy Star certified, which means it meets strict energy efficiency guidelines set by the U.S. Environmental Protection Agency. This certification not only helps reduce your carbon footprint but also leads to lower energy bills.

Another noteworthy technology within the Maytag W10274302B is its unique fingerprint-resistant finish. This feature keeps the surface cleaner for longer periods, reducing the need for frequent cleaning and ensuring that your refrigerator maintains its sleek appearance.

Furthermore, the refrigerator is equipped with bright, LED interior lighting that illuminates the entire space, making it easy to find items even in low light conditions. The door bins are also designed for easy access, allowing for convenient storage of condiments and smaller items.

In summary, the Maytag W10274302B, LI3VQA is a feature-rich refrigerator that combines practicality with advanced technology. With its spacious design, efficient cooling systems, and energy-saving capabilities, it caters to the needs of busy households while promoting a sustainable lifestyle. This model exemplifies what modern refrigeration should aspire to be, making it a worthy investment for any kitchen.