Water Pressure

A cold water supply with water pressure of between 30 and 120 psi (207 and 827 kPa) is required to operate the water dispenser and ice maker. If you have questions about your water pressure, call a licensed, qualified plumber.

Reverse Osmosis Water Supply

IMPORTANT: The pressure of the water supply coming out of a reverse osmosis system going to the water inlet valve of the refrigerator needs to be between 30 and 120 psi (207 and

827 kPa).

If a reverse osmosis water filtration system is connected to your cold water supply, the water pressure to the reverse osmosis system needs to be a minimum of 40 to 60 psi (276 to 414 kPa).

If the water pressure to the reverse osmosis system is less than

40 to 60 psi (276 to 414 kPa):

Check to see whether the sediment filter in the reverse osmosis system is blocked. Replace the filter if necessary.

Allow the storage tank on the reverse osmosis system to refill after heavy usage.

If your refrigerator has a water filter, it may further reduce the water pressure when used in conjunction with a reverse osmosis system. Remove the water filter. See “Water Filtration System.”

If you have questions about your water pressure, call a licensed, qualified plumber.

Connect Water Supply

Read all directions before you begin.

IMPORTANT: If you turn the refrigerator on before the water line is connected, turn the ice maker OFF.

Connect to Water Line

1.Unplug refrigerator or disconnect power.

2.Turn OFF main water supply. Turn ON nearest faucet long enough to clear line of water.

3.Locate a ¹⁄₂" (1.27 cm) to 1¹⁄₄" (3.18 cm) vertical cold water pipe near the refrigerator.

IMPORTANT:

Make sure it is a cold water pipe.

Horizontal pipe will work, but drill on the top side of the pipe, not the bottom. This will help keep water away from the drill and normal sediment from collecting in the valve.

4.Determine the length of copper tubing you need. Measure from the connection on the lower rear corner of refrigerator to the water pipe. Add 7 ft (2.1 m) to allow for cleaning. Use ¹⁄₄" (6.35 mm) O.D. (outside diameter) copper tubing. Be sure both ends of copper tubing are cut square.

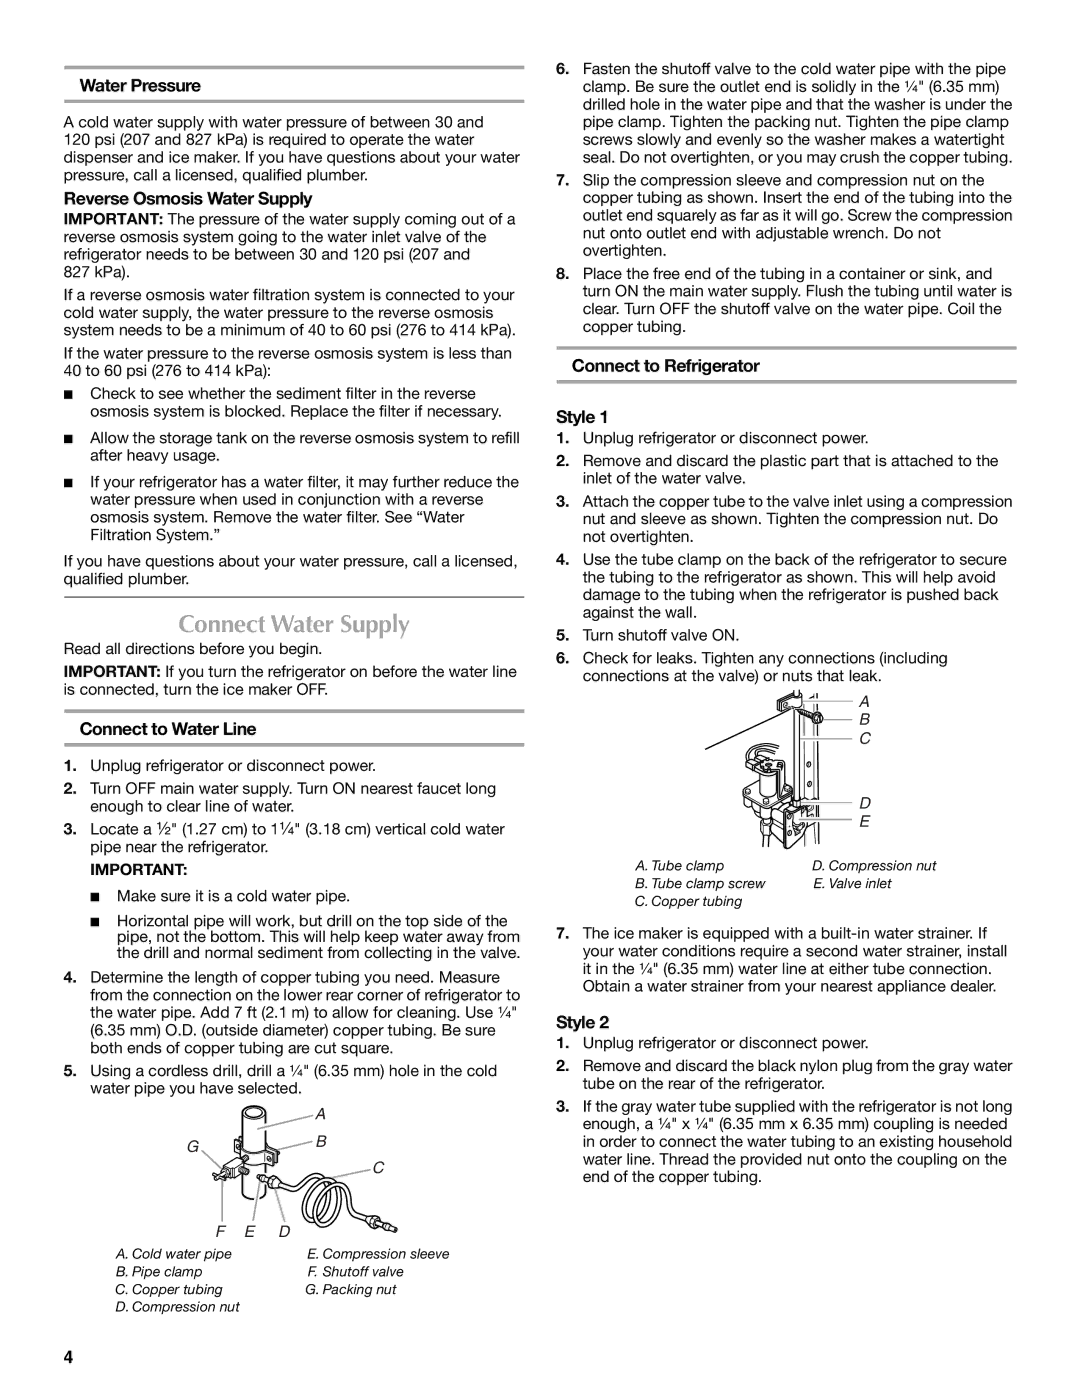
5.Using a cordless drill, drill a ¹⁄₄" (6.35 mm) hole in the cold water pipe you have selected.


A

G

B


C

F E

D

A. Cold water pipe

E. Compression sleeve

B. Pipe clamp

F. Shutoff valve

C. Copper tubing

G. Packing nut

D. Compression nut


6.Fasten the shutoff valve to the cold water pipe with the pipe clamp. Be sure the outlet end is solidly in the ¹⁄₄" (6.35 mm) drilled hole in the water pipe and that the washer is under the pipe clamp. Tighten the packing nut. Tighten the pipe clamp screws slowly and evenly so the washer makes a watertight seal. Do not overtighten, or you may crush the copper tubing.

7.Slip the compression sleeve and compression nut on the copper tubing as shown. Insert the end of the tubing into the outlet end squarely as far as it will go. Screw the compression nut onto outlet end with adjustable wrench. Do not overtighten.

8.Place the free end of the tubing in a container or sink, and turn ON the main water supply. Flush the tubing until water is clear. Turn OFF the shutoff valve on the water pipe. Coil the copper tubing.

Connect to Refrigerator

Style 1

1.Unplug refrigerator or disconnect power.

2.Remove and discard the plastic part that is attached to the inlet of the water valve.

3.Attach the copper tube to the valve inlet using a compression nut and sleeve as shown. Tighten the compression nut. Do not overtighten.

4.Use the tube clamp on the back of the refrigerator to secure the tubing to the refrigerator as shown. This will help avoid damage to the tubing when the refrigerator is pushed back against the wall.

5.Turn shutoff valve ON.

6.Check for leaks. Tighten any connections (including connections at the valve) or nuts that leak.


A


B


C


D


E

A. Tube clamp

D. Compression nut

B. Tube clamp screw

E. Valve inlet

C. Copper tubing


7.The ice maker is equipped with a built-in water strainer. If your water conditions require a second water strainer, install it in the ¹⁄₄" (6.35 mm) water line at either tube connection. Obtain a water strainer from your nearest appliance dealer.

Style 2

1.Unplug refrigerator or disconnect power.

2.Remove and discard the black nylon plug from the gray water tube on the rear of the refrigerator.

3.If the gray water tube supplied with the refrigerator is not long enough, a ¹⁄₄" x ¹⁄₄" (6.35 mm x 6.35 mm) coupling is needed in order to connect the water tubing to an existing household water line. Thread the provided nut onto the coupling on the end of the copper tubing.

4

Page 4
Image 4
Maytag W10289681A, W10289680A Connect Water Supply, Water Pressure, Reverse Osmosis Water Supply, Connect to Water Line

W10289680A, W10289681A specifications

Maytag, renowned for its durable and high-performance appliances, continues to innovate with the release of its key components, the W10289681A and W10289680A. These parts are designed specifically for Maytag washers and dryers, enhancing functionality and efficiency.

The W10289681A is a water inlet valve that plays a crucial role in controlling the flow of water into your washing machine. By utilizing advanced technology, it ensures accurate water levels for optimal washing performance. This part is designed with a high-strength construction to withstand wear and tear, ensuring longevity and reliability. The valve also features a dual inlet design, allowing both hot and cold water to flow into the machine, facilitating versatile washing cycles tailored to different fabric types and soiling levels.

The W10289680A, on the other hand, is a crucial part of the dryer system, specifically the thermal fuse. It serves as a safety feature that prevents the dryer from overheating, thereby protecting both the appliance and your home. When the internal temperature exceeds a predetermined limit, the thermal fuse disconnects the power, effectively shutting down the machine and preventing potential hazards. This safety mechanism is integral in prolonging the life of the dryer and ensuring safe operation.

Both components exemplify Maytag's commitment to quality and customer satisfaction. They are easy to install, making them user-friendly options for DIY repairs. Furthermore, these parts adhere to stringent industry standards, ensuring compatibility with a variety of Maytag washer and dryer models.

In addition to their individual functions, these components work in harmony to enhance the overall performance of the laundry system. The effective water control and safety features provided by the W10289681A and W10289680A ensure that laundry can be done efficiently and safely, reflecting the modern demands of household chores.

Overall, investing in Maytag parts like the W10289681A and W10289680A not only ensures the functionality of your appliances but also promotes a hassle-free laundry experience. With a focus on innovation, safety, and durability, Maytag solidifies its reputation as a leading brand in home appliances.