CARE AND CLEANING | 11 |
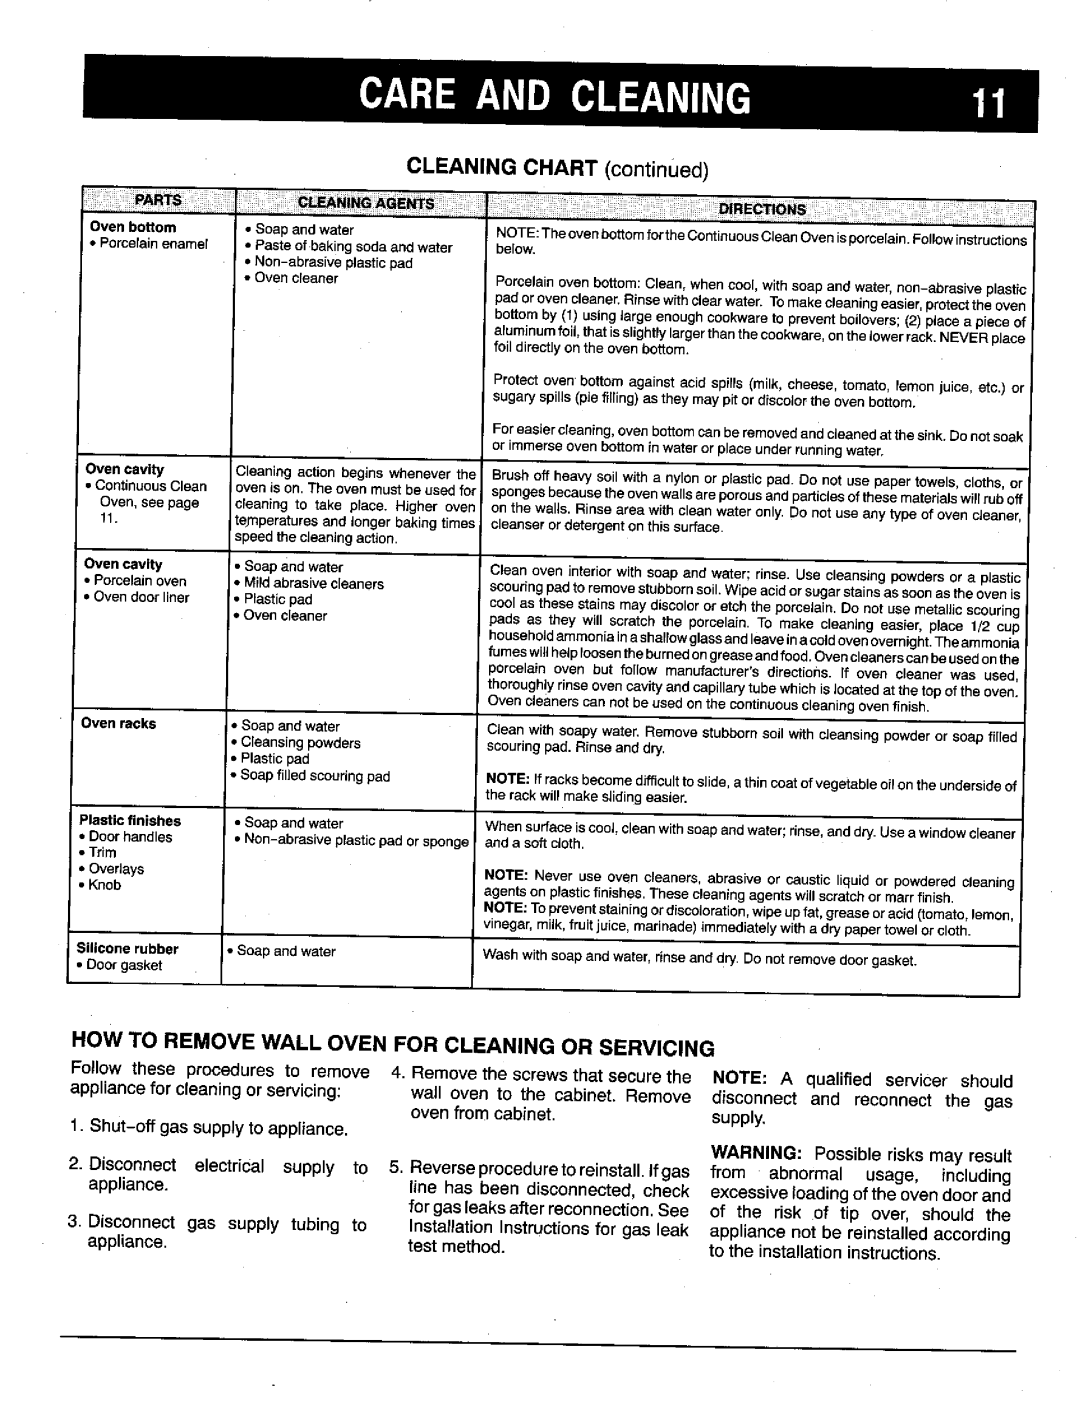
CLEANING CHART (continued) |
|
Oven bottom | • Soap and water |
•Porcelain enamel • Paste of baking soda andwater
•
•Oven cleaner
Oven cavity | Cleaning action begins whenever the |
•Continuous Clean ovenis on. The oven muat be used _or
Oven, see page cleaning to take place. Higher oven
tl. | teynperaturesand longer baking times |
| speed the cleaning action. |
Oven cavity | • Soap and water |
• Porcelain oven | • Mildabrasive cleaners |
• Oven door liner | • Plastic pad |
| • Oven cleaner |
NOTE: The ovenbottom forthe Continuous CleanOven isporcelain. Followinstructions below.
Porcelain oven bottom: Clean, when cool, with soap and water,
Protect oven bottom against acid spills (milk, cheese, tomato, lemon juice, etc.) or sugary spills (pie filling) as they may pit or discolor the oven bottom.
For easier cleaning, oven bottom can be removed and cleaned at the sink. Do not soak or immerse oven bottom in water or place under running water.
Brush off heavy soil with a nylon or plastic pad. Do not use paper towels, cloths, or sponges becausethe oven waUsare porousand par'dolesofthese materials wiltrub off on the walls. Rinse area with clean water only. Do not use any type of oven cleaner cleanser or detergent on this surface.
Clean oven interior with soap and water; rinse, Use cleansing powders or a plastic scouring padto remove stubbornsoil. Wipeacid or sugar stains as soon as the oven is cool as these stains may discolor or etch the porcelain. Do not use metallic scouring pads as they will scratch the porcelain. To make cleaning easier, place 1/2 cup householdammonia ina shallow glass and leaveina cold ovenovernight. The ammonia fumes wilt helploosen theburned on grease andfood. Ovencleanerscan be usedon the porcelain oven but follow manufacturer'sdirections. If oven cleaner was used thoroughly rinse oven cavity and capillary tube which is located at the top of the oven. Oven cleanerscan not be used on the cor_inuous cleaning oven finish.
Oven racks | I • Soap and water | Clean with soapy water. Remove stubborn soil with cleansing powder or soap filled |
| • Cleansing powders | securing pad. Rinse and dry. |
| • Plastic pad |
|
| • Soap fiLLedscouring pad | NOTE: If racks become difficultto slide, a thin coat ofvegetable oil onthe undersideof |
|
| the rack will make sliding easier. |
Plastic finishes | • Soap and water | When surface is cool, clean with soap andwater; rinse, and dry. Use a window cleaner |
•Door handles•
•Trim
• Overlays |
| NOTE: Never use oven cleaners, abrasive or caustic liquid or powdered cleaning |
• Knob |
| agents on plastic finishes. These cleaning agents will scratch or marr finish. |
|
| NOTE: To prevent staining or discoloration, wipe up fat, grease or acid (tomato, lemon, |
|
| vinegar, milk, fruit juice, marinade) immediately with a dry paper towel or cloth. |
I Silicone rubber | • Soap and water | Wash withsoap and water, rinse and dry. Do not remove door gasket. |
• Doorgasket |
|
|
HOW TO REMOVE WALL OVEN FOR CLEANING OR SERVICING |
|
| |||
Follow these | procedures to remove | 4, Remove the screwsthat secure the | NOTE: A qualified servicer should | ||
appliancefor cleaningor servicing: | wall oven to the cabinet, Remove | disconnect and | reconnect the gas | ||
1, | ovenfromcabinet, | supply, |
| ||
| WARNING: Possible risks may result | ||||
|
|
|
| ||
2. | Disconnect | electrical supply to | 5. Reverseproceduretoreinstall.If gas | from abnormal | usage, including |
| appliance, |
| line has been disconnected,check | excessiveloadingofthe ovendoorand | |
|
|
| forgasleaksafterreconnection.See | of the risk of tip over, should the | |
3. | Disconnect | gas supply tubing to | Installation Instructionsfor gas leak | appliance not be reinstalledaccording | |
| appliance, |
| test method, | to the installation instructions. | |
