Hold for 2 seconds and release
Fig. 5
9.Return to the vehicle and firmly press,
hold for 2 seconds and release the programmed HomeLink® button. Fig. 5
10.Repeat Step 9 a second time and possibly a third time (depending on brand of device).
HomeLink® should now activate your
rolling code equipped device.
Auto-Dimming Mirror User Guide
Congratulations! Your new Mazda is equipped with an
Gate Operator / Canadian Programming:
Canadian
If you live in Canada or you are having difficulties programming a gate operator by using the “Programming” procedures (regardless of where you live), replace “Programming HomeLink® step 4 with the following:
NOTE: If programming a garage door opener or gate operator, it is advised to unplug the device during the “cycling” process to prevent possible overheating.
4.Continue to press and hold the HomeLink® button while you press and release
- every 2 seconds (“cycle”) your
Proceed with “Programming” step 5 to complete.
NOTE: Programmed HomeLink® codes can be intentionally erased (when selling vehicle etc.) by holding the 2 outer buttons (as shown in Fig. 1) for 20 seconds until LED indicator begins to flash. Do not hold buttons for more than 30 seconds.
If you have any questions or are having difficulty programming your
HomeLink® buttons, please refer to www.homelink.com or call
Cleaning the mirror:
When cleaning the mirror, use a paper towel or similar material dampened with glass cleaner. Do not spray glass cleaner directly onto the mirror as damage to internal circuitry may result.
Troubleshooting Guidelines:
1.“C” or “CAL” is displayed in the display window
a.Perform calibration procedure.
2.Inaccurate compass direction
a.Perform compass zone setting procedure and then calibration procedure
b.Vehicle magnetics may have changed.
-Press and hold the “ ![]() ” button or the “
” button or the “![]() ” button (if mirror has) for 9 seconds until a “C” or “CAL” appears in the display window.
” button (if mirror has) for 9 seconds until a “C” or “CAL” appears in the display window.
-Perform calibration procedure.
NOTE: Installing items such as a ski rack, antenna, luggage rack or recent body repair can cause changes to the vehicle’s magnetic field. This may require that the compass be recalibrated by performing the recalibration procedure.
3.The temperature display is reading significantly low
a.The temperature display may have been changed to degrees Celsius. Refer to the section of this User Guide pertaining to the temperature feature to correct.
4.The display window shows “SC” or “OC” instead of temperature
a.These problems must be corrected at your authorized Dealer Service Center.
FCC: NZLCTHL3. IC:
Your new mirror may or may not have all of the features shown in this User Guide. Please refer only to the sections that pertain to the model mirror you have in your new vehicle.
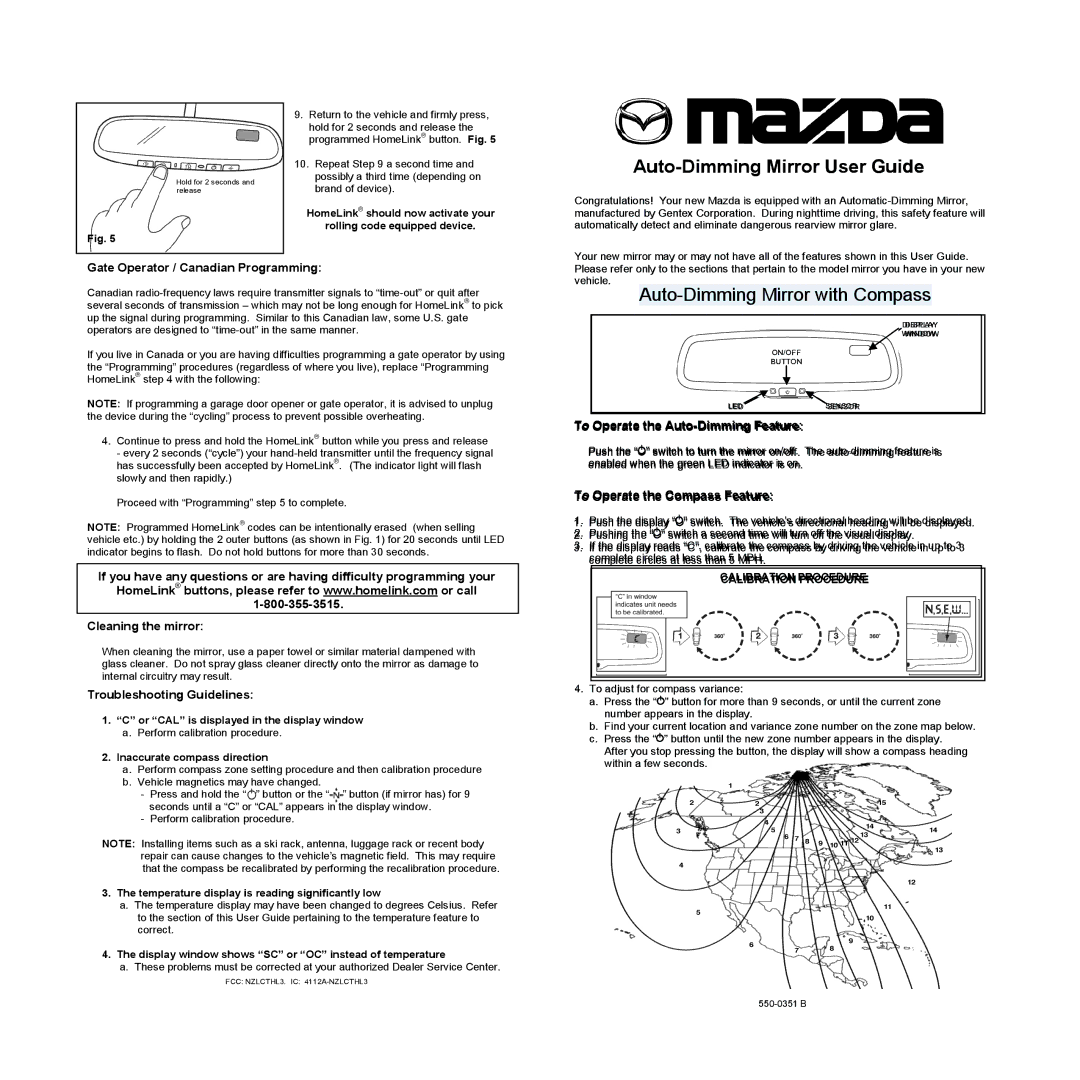
Auto-Dimming Mirror with Compass
DISPLAY
WINDOW
ON/OFF
BUTTON
LEDSENSOR
To Operate the Auto-Dimmiing Feature:re:
Push the “![]()
![]() ” switch to turnrn the mirror on/off..
” switch to turnrn the mirror on/off..
To Operate the Compass Feature:
. | Push the |
|
| “ | ” | . |
| will be | . | |
1. |
|
| display “ | ” switch. The vehicle’s directionalheading will bedisplayed. | ||||||
2. | Pushing the “ |
| ” |
| a | will turn off the visual | . |
| ||
|
|
| ||||||||
2. |
| ” switchitch a second time will turn off the visualdisplay. |
| |||||||
3. | If |
|
|
|
| the | by driving the vehicle in up to 3 |
| ||
3. | If the display reads “C”, calibrate the compass by driving the vehicle in up to 3 |
| ||||||||
|
|
|
|
| at |
| than 5 MPH. |
|
|
|
| complete circles at less than 5 MPH. |
|
|
| ||||||
|
|
|
|
|
|
| CALIBRATION PROCEDURE |
|
| |
|
|
|
|
|
|
| CALIBRATION PROCEDURE |
|
| |
|
|
|
|
|
|
|
|
|
|
|
4.To adjust for compass variance:
a.Press the “![]()
![]() ” button for more than 9 seconds, or until the current zone number appears in the display.
” button for more than 9 seconds, or until the current zone number appears in the display.
b.Find your current location and variance zone number on the zone map below.
c.Press the “![]()
![]() ” button until the new zone number appears in the display. After you stop pressing the button, the display will show a compass heading within a few seconds.
” button until the new zone number appears in the display. After you stop pressing the button, the display will show a compass heading within a few seconds.