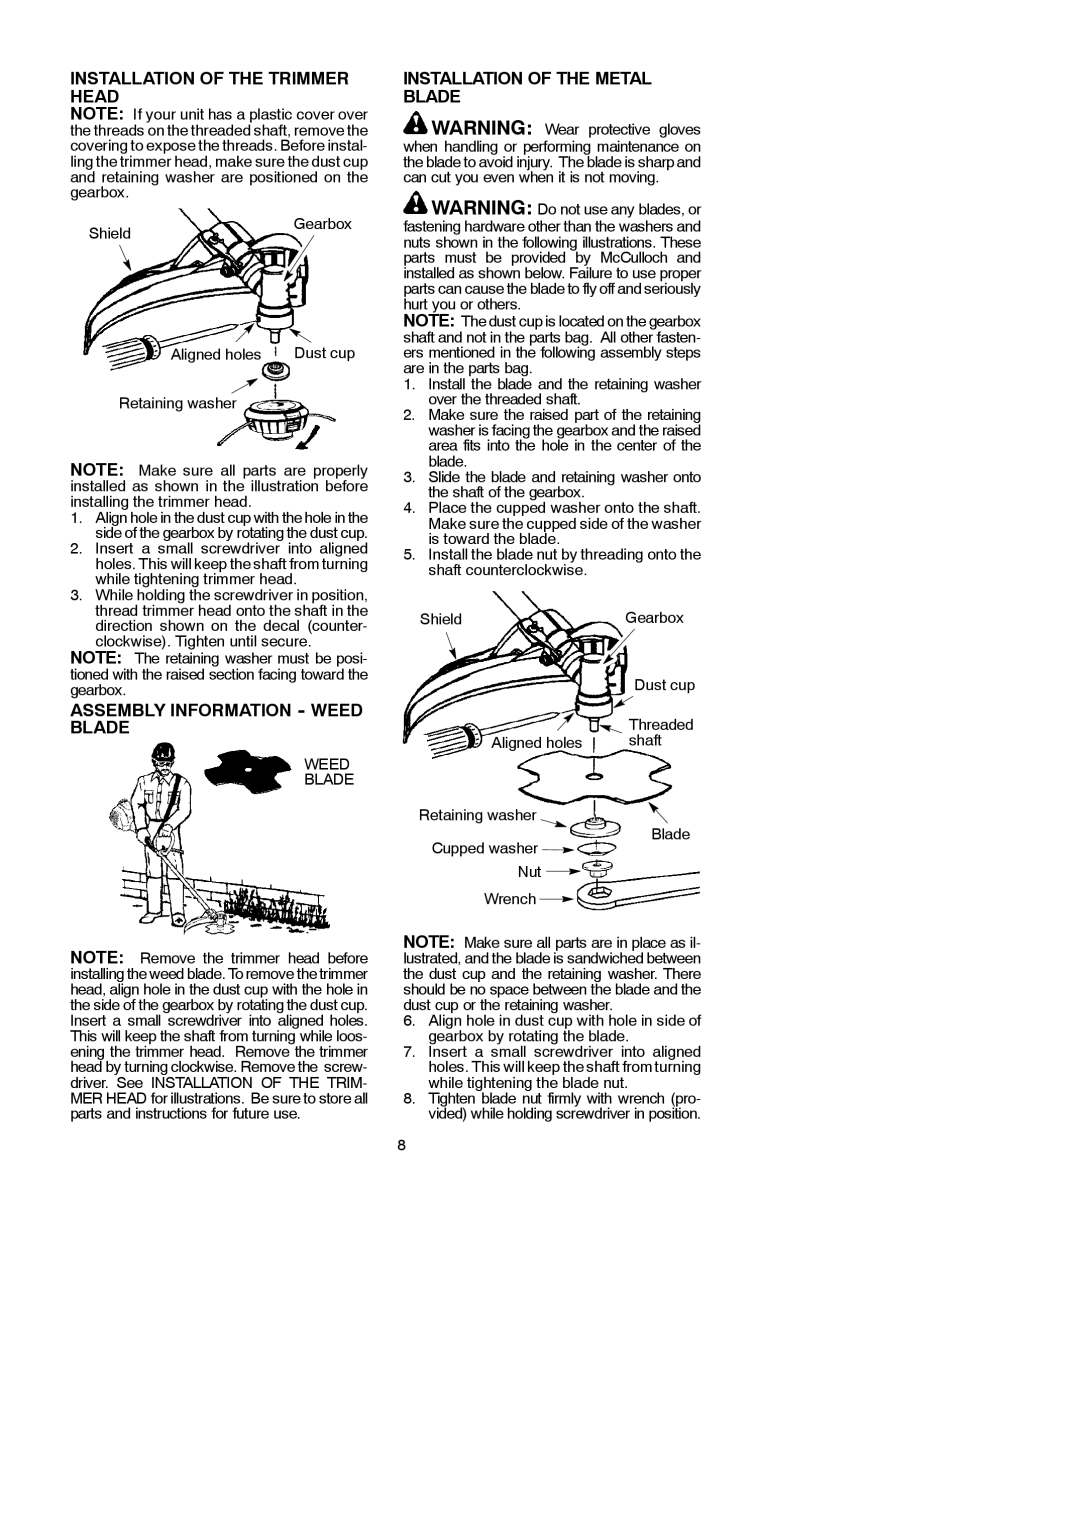
INSTALLATION OF THE TRIMMER HEAD

NOTE: If your unit has a plastic cover over the threads on the threaded shaft, remove the covering to expose the threads. Before instal- ling the trimmer head, make sure the dust cup and retaining washer are positioned on the gearbox.

ShieldGearbox

Aligned holes Dust cup

Retaining washer

NOTE: Make sure all parts are properly installed as shown in the illustration before installing the trimmer head.

1.Align hole in the dust cup with the hole in the side of the gearbox by rotating the dust cup.

2.Insert a small screwdriver into aligned holes. This will keep the shaft from turning while tightening trimmer head.

3.While holding the screwdriver in position, thread trimmer head onto the shaft in the direction shown on the decal (counter- clockwise). Tighten until secure.

NOTE: The retaining washer must be posi- tioned with the raised section facing toward the gearbox.

ASSEMBLY INFORMATION - WEED BLADE

WEED

BLADE

INSTALLATION OF THE METAL BLADE

WARNING: Wear protective gloves when handling or performing maintenance on the blade to avoid injury. The blade is sharp and can cut you even when it is not moving.

WARNING: Do not use any blades, or fastening hardware other than the washers and nuts shown in the following illustrations. These parts must be provided by McCulloch and installed as shown below. Failure to use proper parts can cause the blade to fly off and seriously hurt you or others.

NOTE: The dust cup is located on the gearbox shaft and not in the parts bag. All other fasten- ers mentioned in the following assembly steps are in the parts bag.

1.Install the blade and the retaining washer over the threaded shaft.

2.Make sure the raised part of the retaining washer is facing the gearbox and the raised area fits into the hole in the center of the blade.

3.Slide the blade and retaining washer onto the shaft of the gearbox.

4.Place the cupped washer onto the shaft. Make sure the cupped side of the washer is toward the blade.

5.Install the blade nut by threading onto the shaft counterclockwise.

ShieldGearbox


Dust cup


Threaded

Aligned holes

shaft

Retaining washer

Cupped washer Nut

Wrench

Blade

NOTE: Remove the trimmer head before installing the weed blade. To remove the trimmer head, align hole in the dust cup with the hole in the side of the gearbox by rotating the dust cup. Insert a small screwdriver into aligned holes. This will keep the shaft from turning while loos- ening the trimmer head. Remove the trimmer head by turning clockwise. Remove the screw- driver. See INSTALLATION OF THE TRIM- MER HEAD for illustrations. Be sure to store all parts and instructions for future use.

NOTE: Make sure all parts are in place as il- lustrated, and the blade is sandwiched between the dust cup and the retaining washer. There should be no space between the blade and the dust cup or the retaining washer.

6.Align hole in dust cup with hole in side of gearbox by rotating the blade.

7.Insert a small screwdriver into aligned holes. This will keep the shaft from turning while tightening the blade nut.

8.Tighten blade nut firmly with wrench (pro- vided) while holding screwdriver in position.

8

Page 8
Image 8
McCulloch 115306026 Installation of the Trimmer Head, Assembly Information Weed Blade, Installation of the Metal Blade

115306026, 433L, 952715745 specifications

The McCulloch 433L is a robust and versatile string trimmer designed for homeowners and landscaping professionals alike. It boasts a powerful 32cc engine that provides ample power for tackling tough grass and weeds in various environments. The 433L is ideal for those who require reliability and performance in a lightweight package, making it easy to navigate through gardens and yards.

One of the standout features of the McCulloch 433L is its Smart Start technology. This innovative system allows for easier starting, reducing resistance in the starter cord by up to 40 percent, which means users can get to work quicker without the hassle of multiple pull starts. This is particularly beneficial for those who may not have the time or strength for repeated attempts.

The design of the McCulloch 433L is focused on user comfort and control. It features an adjustable loop handle, allowing for optimal grip and maneuverability. Additionally, the lightweight construction, weighing in at only 10.6 lbs, minimizes fatigue during extended use. The trimmer also includes a bump feed line advancement system, enabling users to quickly and conveniently advance the trimming line with a gentle tap on the ground.

Durability is a vital aspect of the McCulloch 433L, as it is equipped with a heavy-duty cutting head that can withstand the rigors of frequent use. The cutting width of 17 inches ensures efficient coverage, allowing users to trim large areas in less time.

The construction of the trimmer also employs anti-vibration technology, which helps reduce strain on the user’s hands and arms while operating the tool. This is especially advantageous for those who use string trimmers regularly, as it contributes to a more pleasant experience.

In terms of fuel efficiency, the McCulloch 433L’s engine design optimizes fuel consumption, reducing the frequency of refueling and downtime during jobs. This makes it a practical choice for long-term projects where efficiency is paramount.

Overall, the McCulloch 433L combines powerful performance with innovative technologies, making it an excellent choice for both casual yard maintenance and professional landscaping needs. Its user-friendly features, comfort-oriented design, and strong engine enable users to maintain their landscapes with ease and confidence.