Dimensions and Installation
Installation
The XR27 Loudspeaker System requires two or more per- sons to safely handle during assembly and placement. Fol- low the instructions below for unpacking and assembly. It is recommended that the Professionals at your McIntosh Dealer, who are skilled in all aspects of installation and operation, install the XR27 Loudspeaker System and any associated audio equipment.
Unpacking the Loudspeaker System
1.Remove the banding material from the shipping car- ton. Refer to figure 8.
2. Lift off the top of the shipping carton and set
it aside.![]()
![]()
![]()
![]()
![]()
![]()
![]()
![]()
![]() 3. Lift up on the rear of the
3. Lift up on the rear of the
Loudspeaker System, near the foam packing material at both ends.
Place the entire assembly (Loudspeaker System, Loud- speaker Grille,
to the bottom shipping
carton on a flat surface. Refer to figure 9.
4. Release the Loud- speaker Grille from the
packing material by opening the slit in the
packing material located on the top center. Remove the Loudspeaker Grille from the protective shipping wrap and set it aside.
5.In a similar manner, lift out the Loudspeaker System and set it aside.
6.Replace the shipping carton top onto the shipping car- ton bottom. Take the two center pieces of the just re- moved packing material and lay it down flat onto the top of the shipping carton.
7.Carefully remove the protective shipping bag(s) from the Loudspeaker System so as not to mar the finish or damage the Loudspeaker System Drivers.
8.Place the Loudspeaker System, with the front facing down, on top of the packing material located on top of the shipping carton. Refer to figure 10.
Packing material
Figure 10
Installation Methods
The XR27 may be installed using one of five installation methods listed below:
1.Placing the XR27 horizontally on a flat surface using the attached Stabilizer Bar.
2.Mounting the XR27 vertically on a wall using the sup- plied Brackets and Hardware.
3.Mounting the XR27 horizontally on a wall using the supplied Bracket and Hardware.
4.Mounting the XR27 vertically or horizontally
5.Using the optional McIntosh ST27 Vertical Mount Floor Stand.
Proceed to the desired Installation Method that follows.
Installation using the Stabilizer Bar
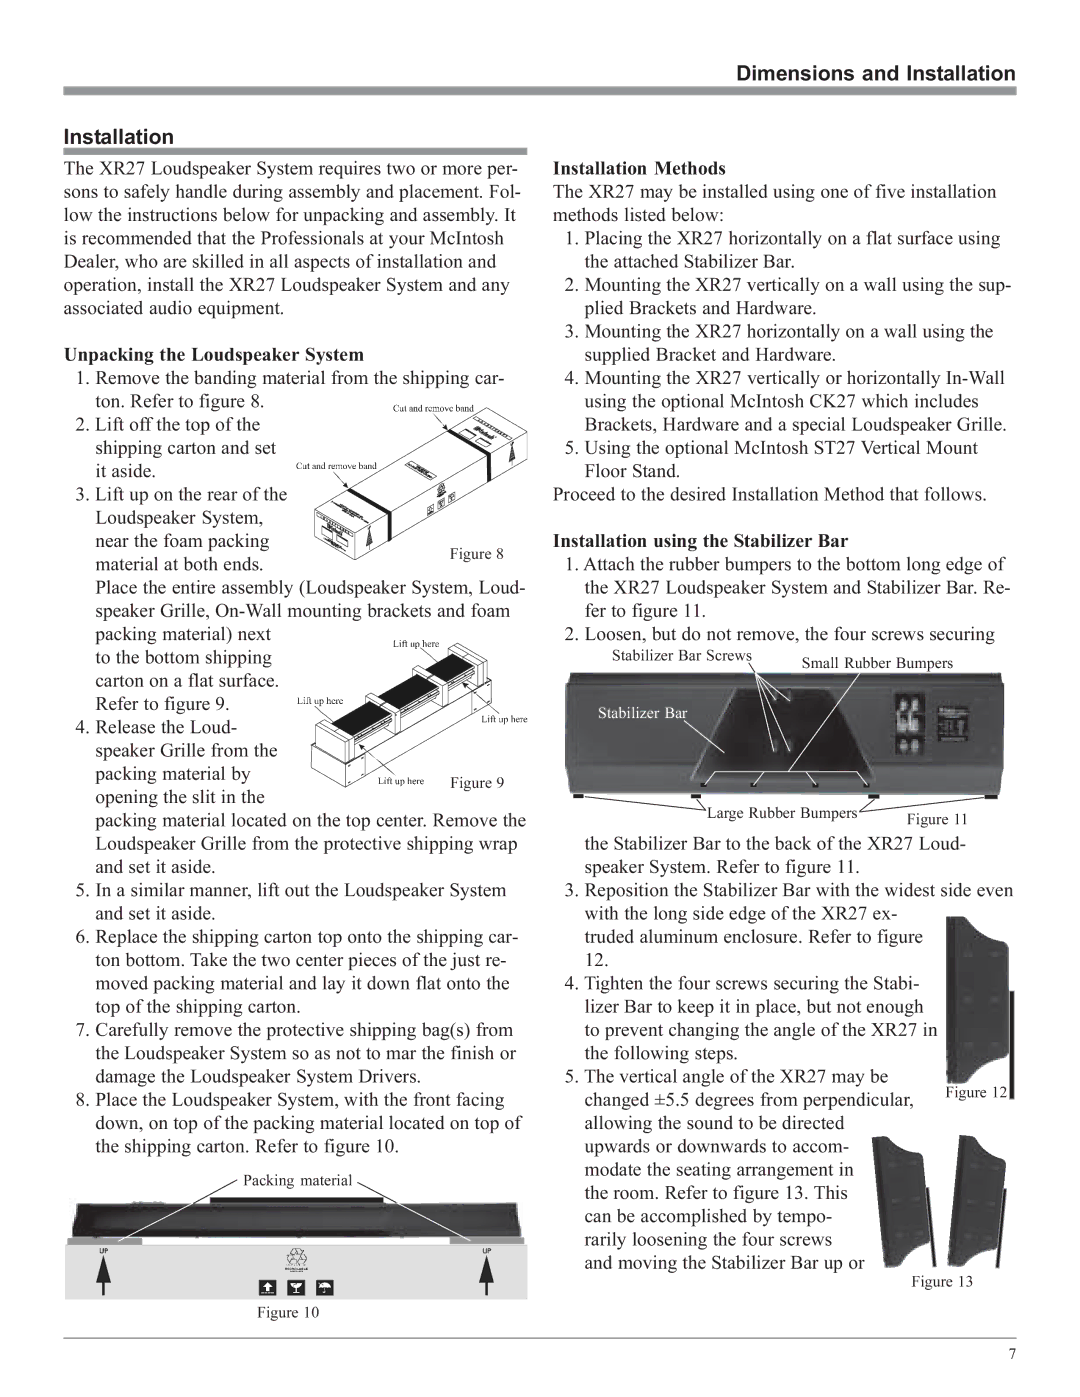
1.Attach the rubber bumpers to the bottom long edge of the XR27 Loudspeaker System and Stabilizer Bar. Re- fer to figure 11.
2.Loosen, but do not remove, the four screws securing
Stabilizer Bar Screws | Small Rubber Bumpers |
| |
Stabilizer Bar |
|
Large Rubber Bumpers | Figure 11 |
|
the Stabilizer Bar to the back of the XR27 Loud- speaker System. Refer to figure 11.
3.Reposition the Stabilizer Bar with the widest side even with the long side edge of the XR27 ex-
truded aluminum enclosure. Refer to figure 12.
4.Tighten the four screws securing the Stabi- lizer Bar to keep it in place, but not enough to prevent changing the angle of the XR27 in the following steps.
5.The vertical angle of the XR27 may be
changed ±5.5 degrees from perpendicular, allowing the sound to be directed upwards or downwards to accom- modate the seating arrangement in
the room. Refer to figure 13. This can be accomplished by tempo- rarily loosening the four screws and moving the Stabilizer Bar up or
Figure 13
7