PHOTOGRAPHY WITH BOTH ETX MODELS
Photography through either ETX model requires the addition of the optional #64 T–Adapter (see OPTIONAL ACCESSORIES, page 17). With the #64 T-Adapter attached to the telescope (Fig. 20), through-the-telescope photography is possible with any 35mm camera body with a removable lens. In this way the telescope effectively becomes the lens of the camera.
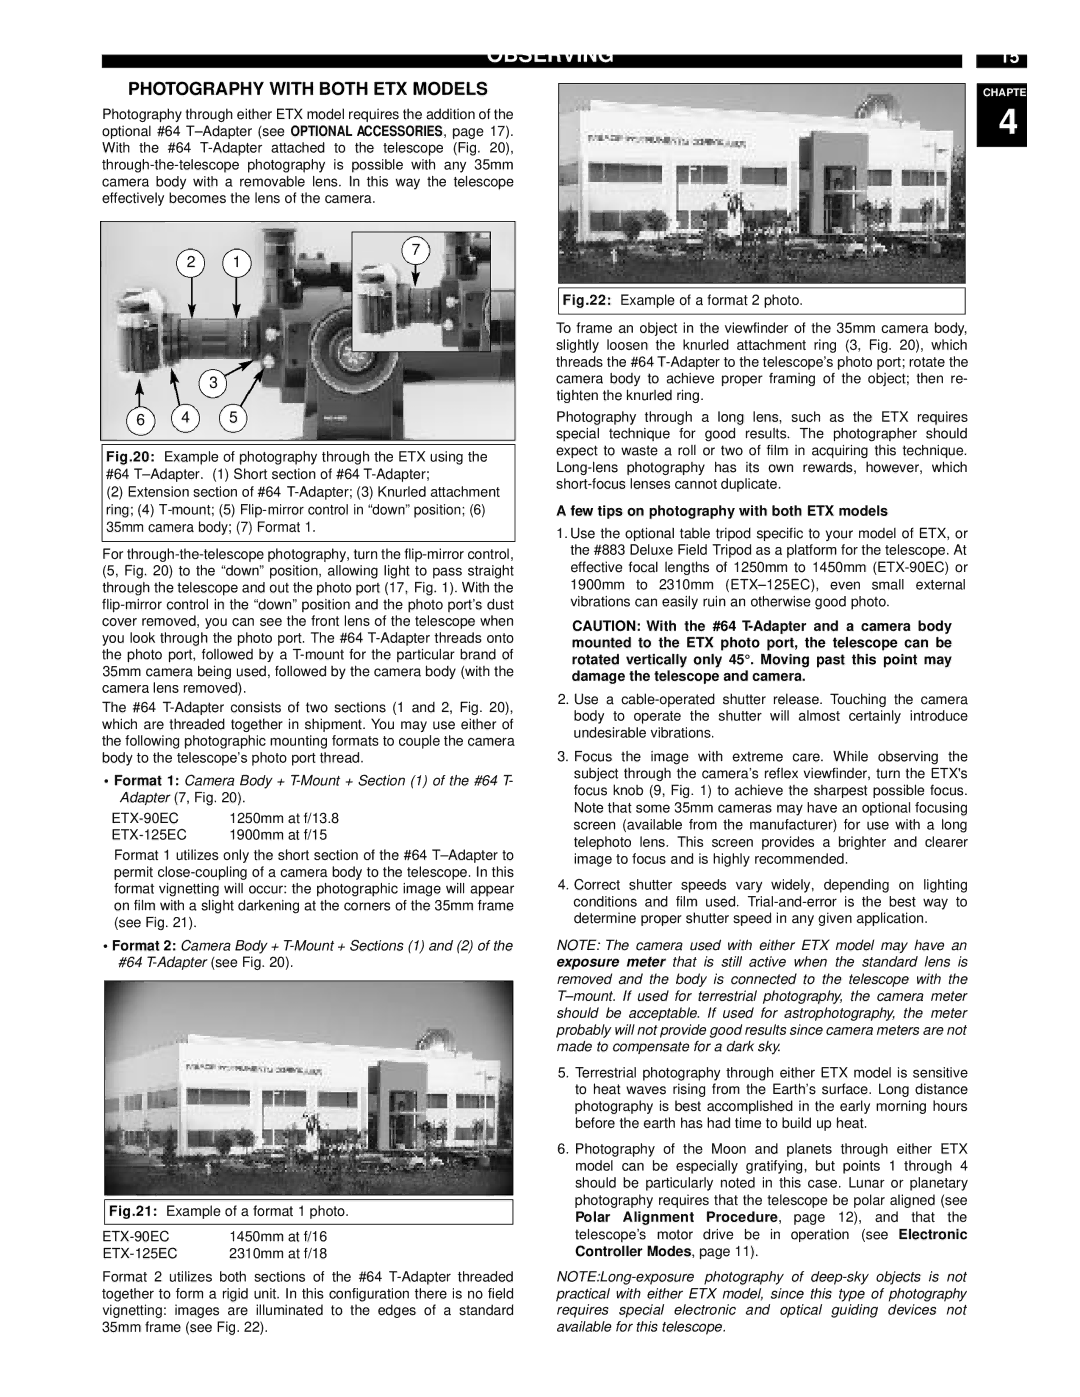
7
2 1
3
6 4 5
Fig.20: Example of photography through the ETX using the #64 T–Adapter. (1) Short section of #64 T-Adapter;
(2)Extension section of #64 T-Adapter; (3) Knurled attachment ring; (4) T-mount; (5) Flip-mirror control in “down” position; (6) 35mm camera body; (7) Format 1.
For through-the-telescope photography, turn the flip-mirror control, (5, Fig. 20) to the “down” position, allowing light to pass straight through the telescope and out the photo port (17, Fig. 1). With the flip-mirror control in the “down” position and the photo port’s dust cover removed, you can see the front lens of the telescope when you look through the photo port. The #64 T-Adapter threads onto the photo port, followed by a T-mount for the particular brand of 35mm camera being used, followed by the camera body (with the camera lens removed).
The #64 T-Adapter consists of two sections (1 and 2, Fig. 20), which are threaded together in shipment. You may use either of the following photographic mounting formats to couple the camera body to the telescope’s photo port thread.
•Format 1: Camera Body + T-Mount + Section (1) of the #64 T- Adapter (7, Fig. 20).
ETX-90EC | 1250mm at f/13.8 |
ETX-125EC | 1900mm at f/15 |
Format 1 utilizes only the short section of the #64 T–Adapter to permit close-coupling of a camera body to the telescope. In this format vignetting will occur: the photographic image will appear on film with a slight darkening at the corners of the 35mm frame (see Fig. 21).
•Format 2: Camera Body + T-Mount + Sections (1) and (2) of the #64 T-Adapter (see Fig. 20).
Fig.21: Example of a format 1 photo.
ETX-90EC | 1450mm at f/16 |
ETX-125EC | 2310mm at f/18 |
Format 2 utilizes both sections of the #64 T-Adapter threaded together to form a rigid unit. In this configuration there is no field vignetting: images are illuminated to the edges of a standard 35mm frame (see Fig. 22).
Fig.22: Example of a format 2 photo.
To frame an object in the viewfinder of the 35mm camera body, slightly loosen the knurled attachment ring (3, Fig. 20), which threads the #64 T-Adapter to the telescope’s photo port; rotate the camera body to achieve proper framing of the object; then re- tighten the knurled ring.
Photography through a long lens, such as the ETX requires special technique for good results. The photographer should expect to waste a roll or two of film in acquiring this technique. Long-lens photography has its own rewards, however, which short-focus lenses cannot duplicate.
A few tips on photography with both ETX models
1.Use the optional table tripod specific to your model of ETX, or the #883 Deluxe Field Tripod as a platform for the telescope. At effective focal lengths of 1250mm to 1450mm (ETX-90EC) or 1900mm to 2310mm (ETX–125EC), even small external vibrations can easily ruin an otherwise good photo.
CAUTION: With the #64 T-Adapter and a camera body mounted to the ETX photo port, the telescope can be rotated vertically only 45°. Moving past this point may damage the telescope and camera.
2.Use a cable-operated shutter release. Touching the camera body to operate the shutter will almost certainly introduce undesirable vibrations.
3.Focus the image with extreme care. While observing the subject through the camera’s reflex viewfinder, turn the ETX's focus knob (9, Fig. 1) to achieve the sharpest possible focus. Note that some 35mm cameras may have an optional focusing screen (available from the manufacturer) for use with a long telephoto lens. This screen provides a brighter and clearer image to focus and is highly recommended.
4.Correct shutter speeds vary widely, depending on lighting conditions and film used. Trial-and-error is the best way to determine proper shutter speed in any given application.
NOTE: The camera used with either ETX model may have an exposure meter that is still active when the standard lens is removed and the body is connected to the telescope with the T–mount. If used for terrestrial photography, the camera meter should be acceptable. If used for astrophotography, the meter probably will not provide good results since camera meters are not made to compensate for a dark sky.
5.Terrestrial photography through either ETX model is sensitive to heat waves rising from the Earth’s surface. Long distance photography is best accomplished in the early morning hours before the earth has had time to build up heat.
6.Photography of the Moon and planets through either ETX model can be especially gratifying, but points 1 through 4 should be particularly noted in this case. Lunar or planetary photography requires that the telescope be polar aligned (see
Polar Alignment Procedure, page 12), and that the telescope’s motor drive be in operation (see Electronic Controller Modes, page 11).
NOTE:Long-exposure photography of deep-sky objects is not practical with either ETX model, since this type of photography requires special electronic and optical guiding devices not available for this telescope.