Meade ETX-90EC GETTING STARTEDz, Indicator Light Key, Light No, Light Status, Blinking

Models: ETX-90EC

1 28
Download 28 pages 5.93 Kb
Page 7
Image 7
GETTING STARTEDz

GETTING STARTEDz

7

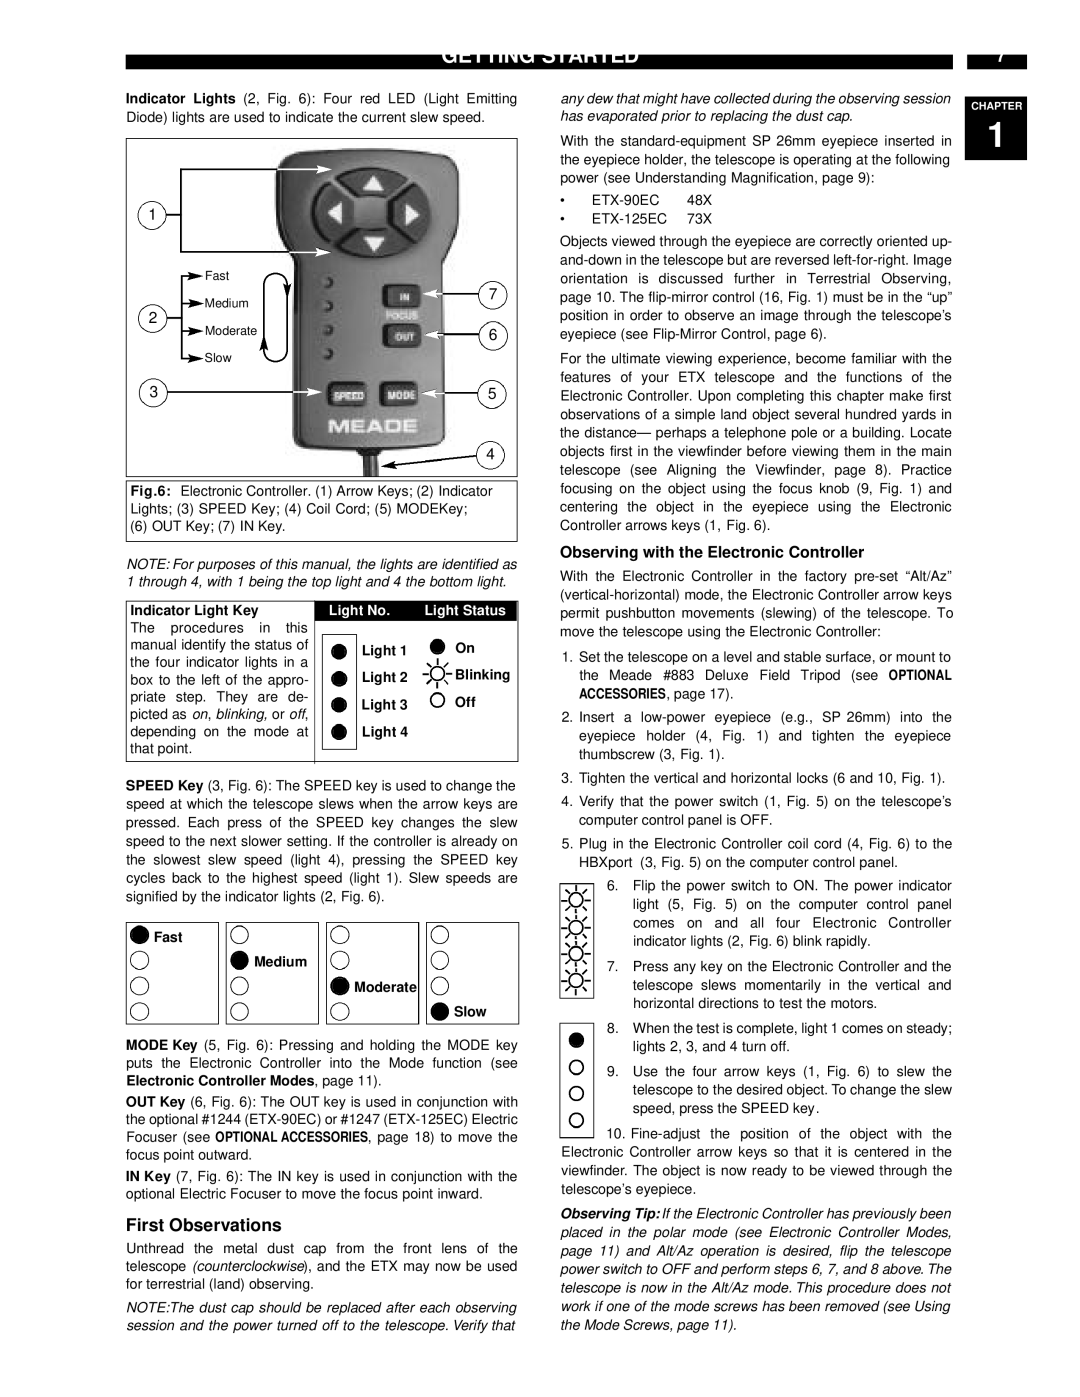
Indicator Lights (2, Fig. 6): Four red LED (Light Emitting Diode) lights are used to indicate the current slew speed.

any dew that might have collected during the observing session has evaporated prior to replacing the dust cap.

With the standard-equipment SP 26mm eyepiece inserted in the eyepiece holder, the telescope is operating at the following power (see Understanding Magnification, page 9):

ETX-90EC 48X

CHAPTER

1

1

Fast

Medium

2

7

ETX-125EC 73X

Objects viewed through the eyepiece are correctly oriented up- and-down in the telescope but are reversed left-for-right. Image orientation is discussed further in Terrestrial Observing, page 10. The flip-mirror control (16, Fig. 1) must be in the “up” position in order to observe an image through the telescope’s

Moderate6

Slow

35

4

Fig.6: Electronic Controller. (1) Arrow Keys; (2) Indicator Lights; (3) SPEED Key; (4) Coil Cord; (5) MODEKey;

(6) OUT Key; (7) IN Key.

NOTE: For purposes of this manual, the lights are identified as 1 through 4, with 1 being the top light and 4 the bottom light.

eyepiece (see Flip-Mirror Control, page 6).

For the ultimate viewing experience, become familiar with the features of your ETX telescope and the functions of the Electronic Controller. Upon completing this chapter make first observations of a simple land object several hundred yards in the distance— perhaps a telephone pole or a building. Locate objects first in the viewfinder before viewing them in the main telescope (see Aligning the Viewfinder, page 8). Practice focusing on the object using the focus knob (9, Fig. 1) and centering the object in the eyepiece using the Electronic Controller arrows keys (1, Fig. 6).

Observing with the Electronic Controller

With the Electronic Controller in the factory pre-set “Alt/Az” (vertical-horizontal) mode, the Electronic Controller arrow keys

Indicator Light Key

The procedures in this manual identify the status of the four indicator lights in a box to the left of the appro- priate step. They are de- picted as on, blinking, or off, depending on the mode at that point.

Light No.

Light Status

Light 1


On

Light 2


Blinking


Light 3


Off


Light 4


permit pushbutton movements (slewing) of the telescope. To move the telescope using the Electronic Controller:

1.

Set the telescope on a level and stable surface, or mount to


the Meade #883 Deluxe Field Tripod (see OPTIONAL


ACCESSORIES, page 17).

2.

Insert a low-power eyepiece (e.g., SP 26mm) into the


eyepiece holder (4, Fig. 1) and tighten the eyepiece


thumbscrew (3, Fig. 1).

3.

Tighten the vertical and horizontal locks (6 and 10, Fig. 1).

SPEED Key (3, Fig. 6): The SPEED key is used to change the speed at which the telescope slews when the arrow keys are pressed. Each press of the SPEED key changes the slew speed to the next slower setting. If the controller is already on the slowest slew speed (light 4), pressing the SPEED key cycles back to the highest speed (light 1). Slew speeds are signified by the indicator lights (2, Fig. 6).

Fast

Medium

Indicator Light Key Moderate

Light No. Slow

MODE Key (5, Fig. 6): Pressing and holding the MODE key puts the Electronic Controller into the Mode function (see Electronic Controller Modes, page 11).

OUT Key (6, Fig. 6): The OUT key is used in conjunction with the optional #1244 (ETX-90EC) or #1247 (ETX-125EC) Electric Focuser (see OPTIONAL ACCESSORIES, page 18) to move the focus point outward.

IN Key (7, Fig. 6): The IN key is used in conjunction with the optional Electric Focuser to move the focus point inward.

First Observations

Unthread the metal dust cap from the front lens of the telescope (counterclockwise), and the ETX may now be used for terrestrial (land) observing.

NOTE:The dust cap should be replaced after each observing session and the power turned off to the telescope. Verify that

4.

Verify that the power switch (1, Fig. 5) on the telescope’s


computer control panel is OFF.

5.

Plug in the Electronic Controller coil cord (4, Fig. 6) to the


HBXport (3, Fig. 5) on the computer control panel.

6. Flip the power switch to ON. The power indicator light (5, Fig. 5) on the computer control panel comes on and all four Electronic Controller indicator lights (2, Fig. 6) blink rapidly.

7. Press any key on the Electronic Controller and the telescope slews momentarily in the vertical and horizontal directions to test the motors.

8.When the test is complete, light 1 comes on steady;

lights 2, 3, and 4 turn off.

9.Use the four arrow keys (1, Fig. 6) to slew the telescope to the desired object. To change the slew speed, press the SPEED key.

10.Fine-adjust the position of the object with the Electronic Controller arrow keys so that it is centered in the viewfinder. The object is now ready to be viewed through the telescope’s eyepiece.

Observing Tip: If the Electronic Controller has previously been placed in the polar mode (see Electronic Controller Modes, page 11) and Alt/Az operation is desired, flip the telescope power switch to OFF and perform steps 6, 7, and 8 above. The telescope is now in the Alt/Az mode. This procedure does not work if one of the mode screws has been removed (see Using the Mode Screws, page 11).

Page 7
Image 7
Meade ETX-90EC GETTING STARTEDz, Indicator Light Key, Light No, Light Status, Blinking, ACCESSORIES , page