Meade ETX-90EC Getting Started, Introduction, The Electronic Controller, Assembly Instructions

Models: ETX-90EC

1 28
Download 28 pages 5.93 Kb
Page 5
Image 5
Chapter 1: GETTING STARTED

Chapter 1: GETTING STARTED

INTRODUCTION

A Meade ETXAstro Telescope is an extremely versatile, high- resolution imaging system that, with advanced features similar to larger and more specialized telescopes, can be used by casual observers and serious astronomers alike. With pushbutton controls, automatic tracking of celestial objects (with one of the optional tripods), and diffraction-limited imaging, an ETX telescope may be all the telescope ever required by many terrestrial and astronomical observers.

As a first telescope, the ETX-90EC or ETX-125EC reveals nature in an ever-expanding level of detail: observe the feather structure of a bird from 50 yards or study the rings of the planet Saturn from a distance of 800 million miles. Beyond the Solar System observe nebulae, star clusters, galaxies, and other deep-sky objects. Both telescopes are instruments fully capable of growing with your interest.

Your Meade ETX Astro Telescope is one of the most revolutionary telescope systems ever developed. Read this manual thoroughly to take full advantage of the telescope’s numerous advanced features.

This manual provides instructions for the following products:

ETX-90EC Astro Telescope

ETX-125EC Astro Telescope

The Electronic Controller

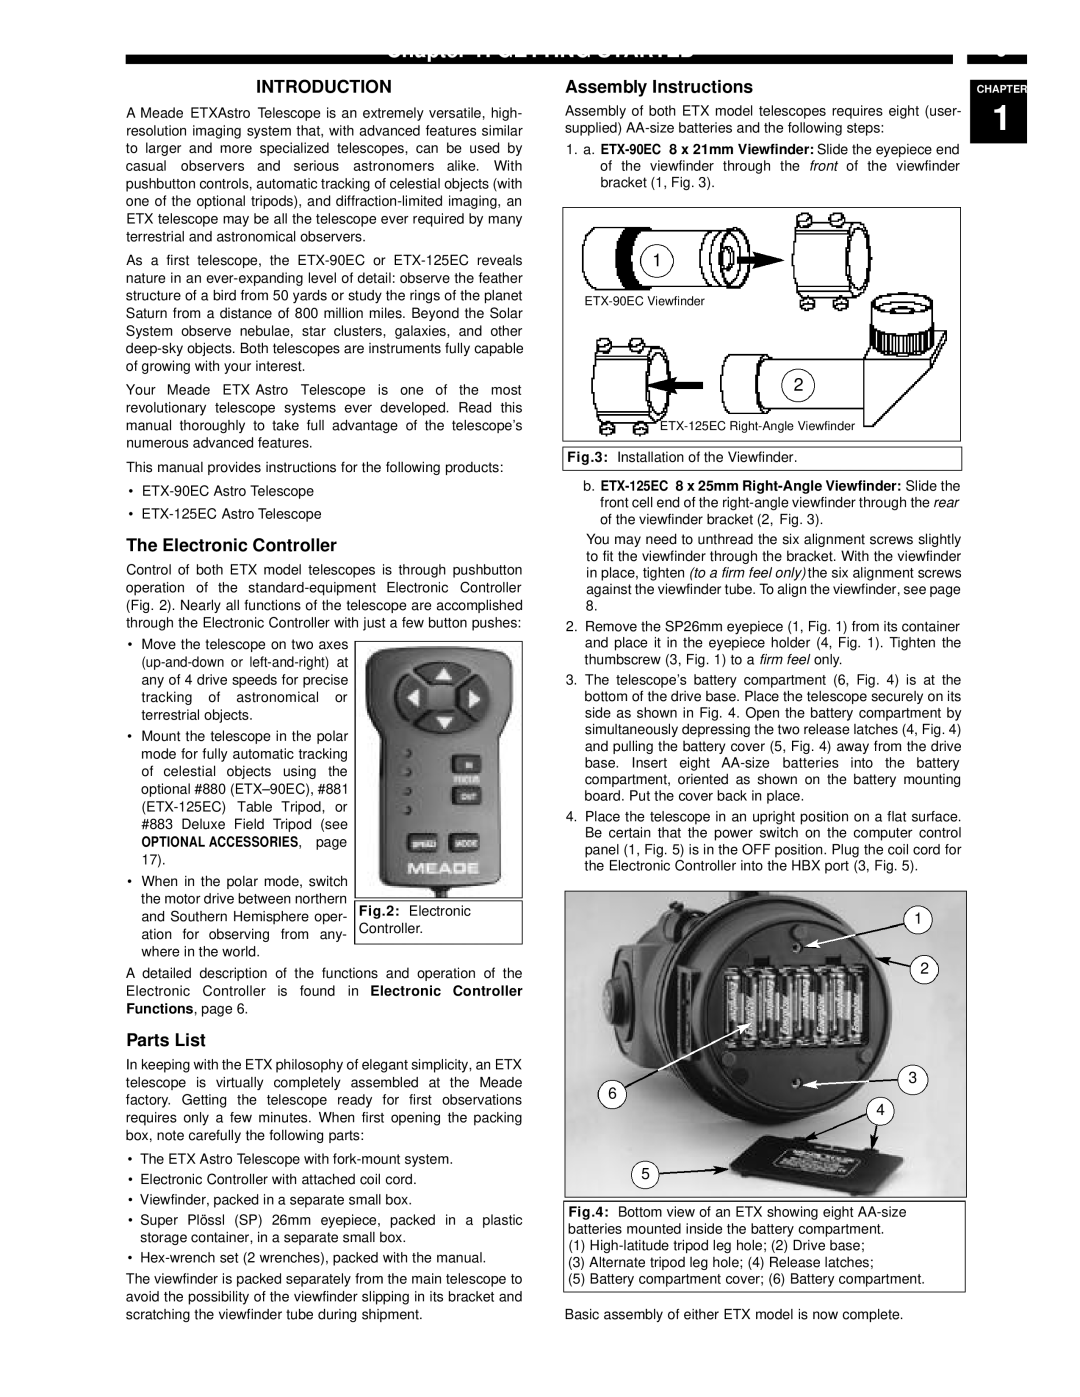
Control of both ETX model telescopes is through pushbutton operation of the standard-equipment Electronic Controller (Fig. 2). Nearly all functions of the telescope are accomplished through the Electronic Controller with just a few button pushes:

Assembly Instructions

Assembly of both ETX model telescopes requires eight (user- supplied) AA-size batteries and the following steps:

1.a. ETX-90EC 8 x 21mm Viewfinder: Slide the eyepiece end of the viewfinder through the front of the viewfinder bracket (1, Fig. 3).

1

ETX-90EC Viewfinder

2

ETX-125EC Right-Angle Viewfinder

Fig.3: Installation of the Viewfinder.

b.ETX-125EC 8 x 25mm Right-Angle Viewfinder: Slide the front cell end of the right-angle viewfinder through the rear of the viewfinder bracket (2, Fig. 3).

You may need to unthread the six alignment screws slightly to fit the viewfinder through the bracket. With the viewfinder in place, tighten (to a firm feel only) the six alignment screws against the viewfinder tube. To align the viewfinder, see page 8.

2. Remove the SP26mm eyepiece (1, Fig. 1) from its container

CHAPTER

1

Move the telescope on two axes (up-and-down or left-and-right) at any of 4 drive speeds for precise tracking of astronomical or terrestrial objects.

Mount the telescope in the polar mode for fully automatic tracking of celestial objects using the optional #880 (ETX–90EC), #881 (ETX-125EC) Table Tripod, or #883 Deluxe Field Tripod (see

OPTIONAL ACCESSORIES, page 17).

When in the polar mode, switch the motor drive between northern and Southern Hemisphere oper- ation for observing from any- where in the world.

Fig.2: Electronic Controller.

and place it in the eyepiece holder (4, Fig. 1). Tighten the

thumbscrew (3, Fig. 1) to a firm feel only.

3. The telescope’s battery compartment (6, Fig. 4) is at the

bottom of the drive base. Place the telescope securely on its

side as shown in Fig. 4. Open the battery compartment by

simultaneously depressing the two release latches (4, Fig. 4)

and pulling the battery cover (5, Fig. 4) away from the drive

base. Insert eight AA-size batteries into the battery

compartment, oriented as shown on the battery mounting

board. Put the cover back in place.

4. Place the telescope in an upright position on a flat surface.

Be certain that the power switch on the computer control

panel (1, Fig. 5) is in the OFF position. Plug the coil cord for

the Electronic Controller into the HBX port (3, Fig. 5).

1

A detailed description of the functions and operation of the Electronic Controller is found in Electronic Controller Functions, page 6.

Parts List

In keeping with the ETX philosophy of elegant simplicity, an ETX telescope is virtually completely assembled at the Meade factory. Getting the telescope ready for first observations requires only a few minutes. When first opening the packing box, note carefully the following parts:

The ETX Astro Telescope with fork-mount system.

Electronic Controller with attached coil cord.

Viewfinder, packed in a separate small box.

Super Plössl (SP) 26mm eyepiece, packed in a plastic storage container, in a separate small box.

Hex-wrench set (2 wrenches), packed with the manual.

The viewfinder is packed separately from the main telescope to avoid the possibility of the viewfinder slipping in its bracket and scratching the viewfinder tube during shipment.

2

3

6

4

5

Fig.4: Bottom view of an ETX showing eight AA-size batteries mounted inside the battery compartment.

(1)High-latitude tripod leg hole; (2) Drive base;

(3)Alternate tripod leg hole; (4) Release latches;

(5)Battery compartment cover; (6) Battery compartment.

Basic assembly of either ETX model is now complete.

Page 5
Image 5
Meade ETX-90EC Getting Started, Introduction, The Electronic Controller, Assembly Instructions, Parts List