Battery

Rib

Compartment


Battery


Holder

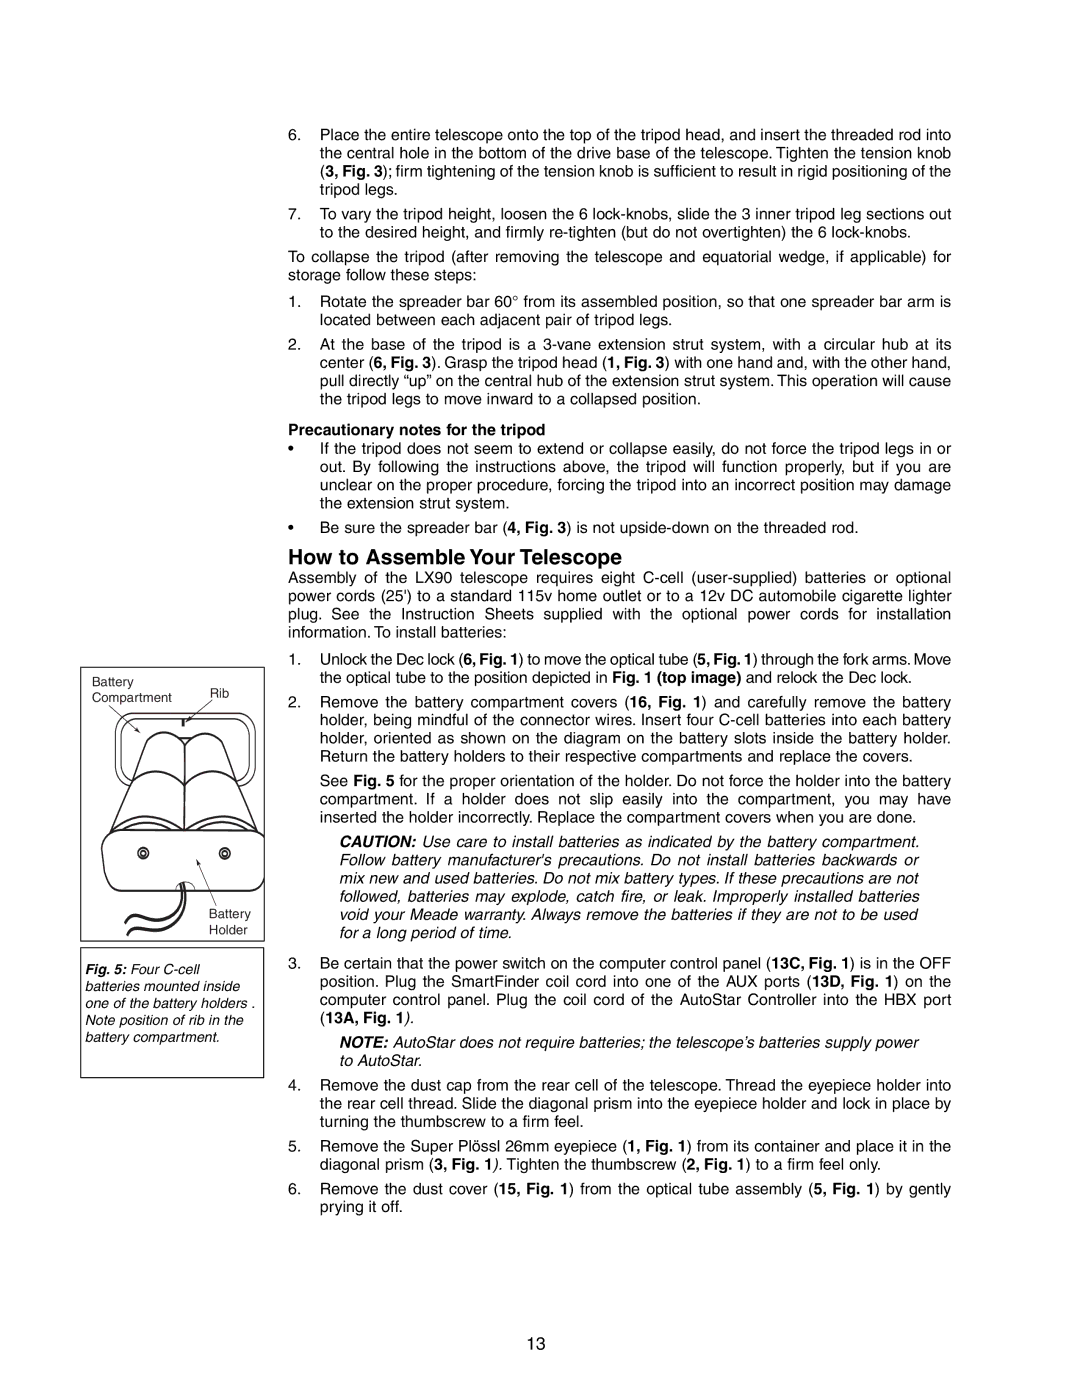
Fig. 5: Four C-cell batteries mounted inside one of the battery holders . Note position of rib in the battery compartment.

6.Place the entire telescope onto the top of the tripod head, and insert the threaded rod into the central hole in the bottom of the drive base of the telescope. Tighten the tension knob (3, Fig. 3); firm tightening of the tension knob is sufficient to result in rigid positioning of the tripod legs.

7.To vary the tripod height, loosen the 6 lock-knobs, slide the 3 inner tripod leg sections out to the desired height, and firmly re-tighten (but do not overtighten) the 6 lock-knobs.

To collapse the tripod (after removing the telescope and equatorial wedge, if applicable) for storage follow these steps:

1.Rotate the spreader bar 60° from its assembled position, so that one spreader bar arm is located between each adjacent pair of tripod legs.

2.At the base of the tripod is a 3-vane extension strut system, with a circular hub at its center (6, Fig. 3). Grasp the tripod head (1, Fig. 3) with one hand and, with the other hand, pull directly “up” on the central hub of the extension strut system. This operation will cause the tripod legs to move inward to a collapsed position.

Precautionary notes for the tripod

If the tripod does not seem to extend or collapse easily, do not force the tripod legs in or out. By following the instructions above, the tripod will function properly, but if you are unclear on the proper procedure, forcing the tripod into an incorrect position may damage the extension strut system.

Be sure the spreader bar (4, Fig. 3) is not upside-down on the threaded rod.

How to Assemble Your Telescope

Assembly of the LX90 telescope requires eight C-cell (user-supplied) batteries or optional power cords (25') to a standard 115v home outlet or to a 12v DC automobile cigarette lighter plug. See the Instruction Sheets supplied with the optional power cords for installation information. To install batteries:

1.Unlock the Dec lock (6, Fig. 1) to move the optical tube (5, Fig. 1) through the fork arms. Move the optical tube to the position depicted in Fig. 1 (top image) and relock the Dec lock.

2.Remove the battery compartment covers (16, Fig. 1) and carefully remove the battery holder, being mindful of the connector wires. Insert four C-cell batteries into each battery holder, oriented as shown on the diagram on the battery slots inside the battery holder. Return the battery holders to their respective compartments and replace the covers.

See Fig. 5 for the proper orientation of the holder. Do not force the holder into the battery compartment. If a holder does not slip easily into the compartment, you may have inserted the holder incorrectly. Replace the compartment covers when you are done.

CAUTION: Use care to install batteries as indicated by the battery compartment. Follow battery manufacturer's precautions. Do not install batteries backwards or mix new and used batteries. Do not mix battery types. If these precautions are not followed, batteries may explode, catch fire, or leak. Improperly installed batteries void your Meade warranty. Always remove the batteries if they are not to be used for a long period of time.

3.Be certain that the power switch on the computer control panel (13C, Fig. 1) is in the OFF position. Plug the SmartFinder coil cord into one of the AUX ports (13D, Fig. 1) on the computer control panel. Plug the coil cord of the AutoStar Controller into the HBX port (13A, Fig. 1).

NOTE: AutoStar does not require batteries; the telescope’s batteries supply power to AutoStar.

4.Remove the dust cap from the rear cell of the telescope. Thread the eyepiece holder into the rear cell thread. Slide the diagonal prism into the eyepiece holder and lock in place by turning the thumbscrew to a firm feel.

5.Remove the Super Plössl 26mm eyepiece (1, Fig. 1) from its container and place it in the diagonal prism (3, Fig. 1). Tighten the thumbscrew (2, Fig. 1) to a firm feel only.

6.Remove the dust cover (15, Fig. 1) from the optical tube assembly (5, Fig. 1) by gently prying it off.

13

Page 13
Image 13
Meade LX90GPS instruction manual How to Assemble Your Telescope, Precautionary notes for the tripod

LX90GPS specifications

The Meade LX90GPS is a premium telescope that offers both amateur and seasoned astronomers a powerful and user-friendly platform for exploring the night sky. This telescope blends advanced technology with robust design, making it one of the preferred choices for stargazers around the globe.

One of the standout features of the LX90GPS is its Advanced Coma-Free (ACF) optics. This design minimizes spherical aberration and eliminates off-axis coma, ensuring sharp, high-contrast images across the entire field of view. Coupled with a large aperture of 8, 10, or 12 inches, users can enjoy stunning views of celestial objects including planets, galaxies, and nebulae.

The telescope is equipped with a fully automated GoTo system that simplifies the hunting of celestial objects. The built-in GPS makes for effortless location setting, locking onto satellites and positioning the telescope accurately. Once set up, users can access a database containing over 30,000 celestial objects, allowing for easy navigation and exploration.

In addition to its exceptional optics and GoTo capabilities, the LX90GPS features Smart Mount technology. This innovative system incorporates adjustments based on real-time sky data, ensuring that the telescope remains aligned with celestial bodies as they move across the night sky. The LX90GPS also includes a unique Auto-Alignment feature, where a simple two-star alignment procedure helps calibrate the telescope quickly and easily.

The design of the LX90GPS is user-centric, combining functionality with comfort. The telescope comes with an easy-to-operate control panel and a large, multi-line LCD screen that displays critical information. Users can easily manage various functions and settings without fumbling through complex menus.

Additional features include the option for removable optical tubes, allowing for easy upgrades or repairs. The telescope is compatible with a variety of Meade accessories, including focal reducers and filter sets, enhancing its versatility for different observing conditions.

In conclusion, the Meade LX90GPS stands out for its remarkable optics, user-friendly technology, and impressive range of features. Whether you’re gazing at the Moon, tracking planets, or delving into deep-sky observations, the LX90GPS provides a fulfilling astronomical experience that inspires exploration and delight in the universe.