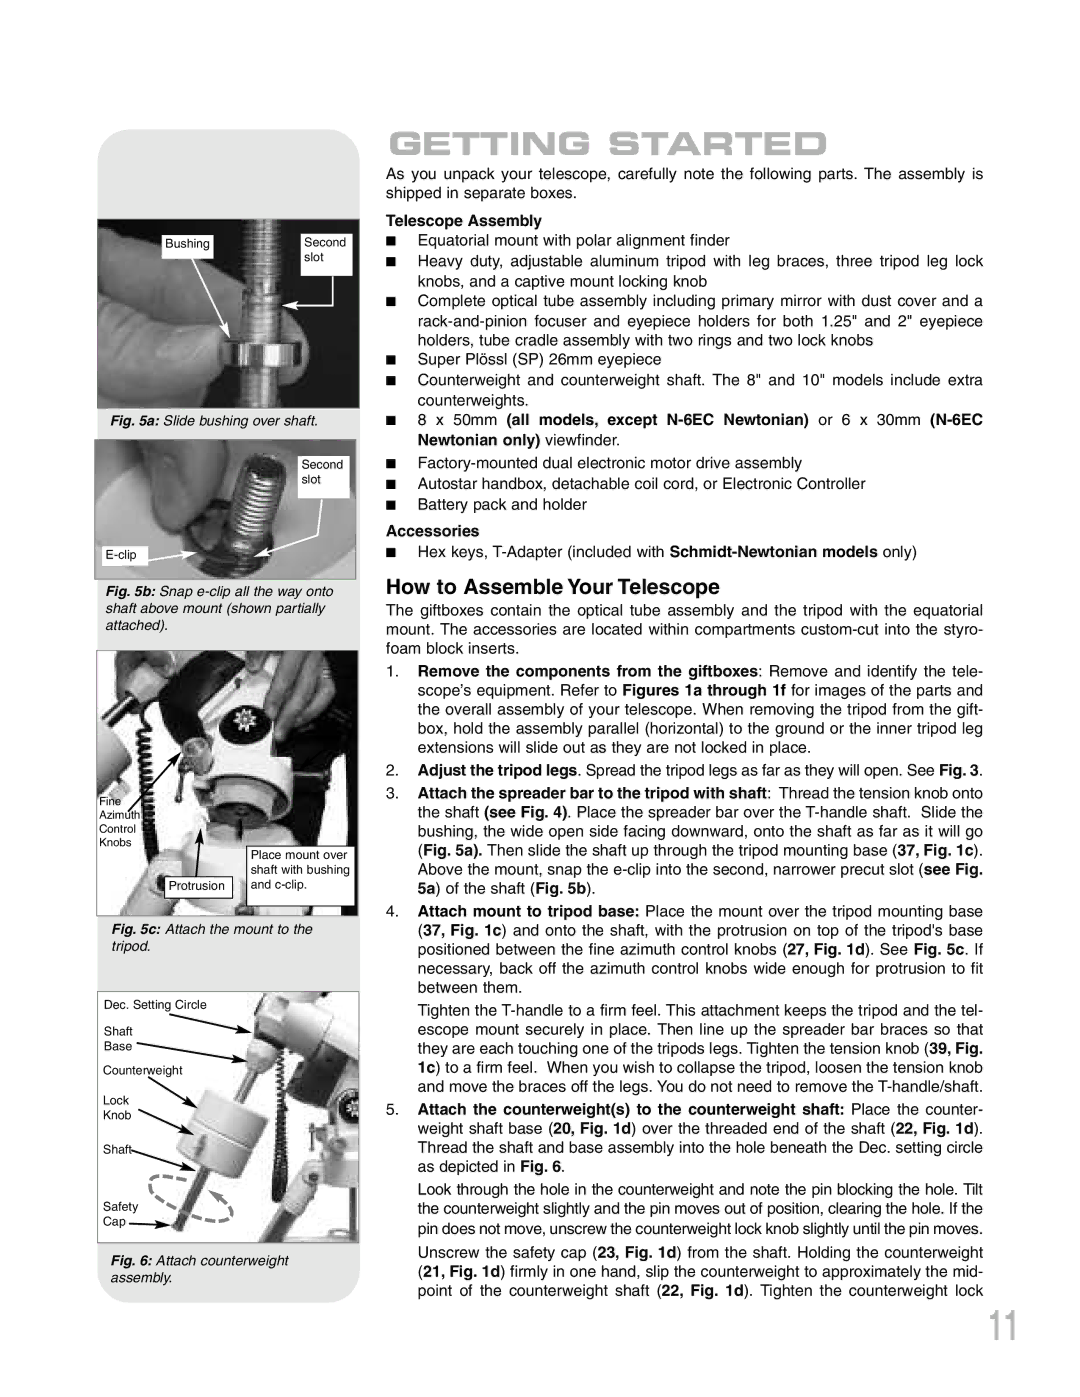
Bushing

Second


slot


Fig. 5a: Slide bushing over shaft.

Second slot

E-clip

Fig. 5b: Snap e-clip all the way onto shaft above mount (shown partially attached).

Fine


Azimuth


Control


Knobs

Place mount over


shaft with bushing

Protrusion

and c-clip.

Fig. 5c: Attach the mount to the tripod.

Dec. Setting Circle

Shaft

Base

Counterweight

Lock

Knob

Shaft

Safety

Cap

Fig. 6: Attach counterweight assembly.

GETTING STARTED

As you unpack your telescope, carefully note the following parts. The assembly is shipped in separate boxes.

Telescope Assembly

Equatorial mount with polar alignment finder

Heavy duty, adjustable aluminum tripod with leg braces, three tripod leg lock knobs, and a captive mount locking knob

Complete optical tube assembly including primary mirror with dust cover and a rack-and-pinion focuser and eyepiece holders for both 1.25" and 2" eyepiece holders, tube cradle assembly with two rings and two lock knobs

Super Plössl (SP) 26mm eyepiece

Counterweight and counterweight shaft. The 8" and 10" models include extra counterweights.

8 x 50mm (all models, except N-6EC Newtonian) or 6 x 30mm (N-6EC Newtonian only) viewfinder.

Factory-mounted dual electronic motor drive assembly

Autostar handbox, detachable coil cord, or Electronic Controller

Battery pack and holder

Accessories

Hex keys, T-Adapter (included with Schmidt-Newtonian models only)

How to Assemble Your Telescope

The giftboxes contain the optical tube assembly and the tripod with the equatorial mount. The accessories are located within compartments custom-cut into the styro- foam block inserts.

1.Remove the components from the giftboxes: Remove and identify the tele- scope’s equipment. Refer to Figures 1a through 1f for images of the parts and the overall assembly of your telescope. When removing the tripod from the gift- box, hold the assembly parallel (horizontal) to the ground or the inner tripod leg extensions will slide out as they are not locked in place.

2.Adjust the tripod legs. Spread the tripod legs as far as they will open. See Fig. 3.

3.Attach the spreader bar to the tripod with shaft: Thread the tension knob onto the shaft (see Fig. 4). Place the spreader bar over the T-handle shaft. Slide the bushing, the wide open side facing downward, onto the shaft as far as it will go (Fig. 5a). Then slide the shaft up through the tripod mounting base (37, Fig. 1c). Above the mount, snap the e-clip into the second, narrower precut slot (see Fig. 5a) of the shaft (Fig. 5b).

4.Attach mount to tripod base: Place the mount over the tripod mounting base (37, Fig. 1c) and onto the shaft, with the protrusion on top of the tripod's base positioned between the fine azimuth control knobs (27, Fig. 1d). See Fig. 5c. If necessary, back off the azimuth control knobs wide enough for protrusion to fit between them.

Tighten the T-handle to a firm feel. This attachment keeps the tripod and the tel- escope mount securely in place. Then line up the spreader bar braces so that they are each touching one of the tripods legs. Tighten the tension knob (39, Fig. 1c) to a firm feel. When you wish to collapse the tripod, loosen the tension knob and move the braces off the legs. You do not need to remove the T-handle/shaft.

5.Attach the counterweight(s) to the counterweight shaft: Place the counter- weight shaft base (20, Fig. 1d) over the threaded end of the shaft (22, Fig. 1d). Thread the shaft and base assembly into the hole beneath the Dec. setting circle as depicted in Fig. 6.

Look through the hole in the counterweight and note the pin blocking the hole. Tilt the counterweight slightly and the pin moves out of position, clearing the hole. If the pin does not move, unscrew the counterweight lock knob slightly until the pin moves.

Unscrew the safety cap (23, Fig. 1d) from the shaft. Holding the counterweight (21, Fig. 1d) firmly in one hand, slip the counterweight to approximately the mid- point of the counterweight shaft (22, Fig. 1d). Tighten the counterweight lock

11

Page 11
Image 11
Meade LXD75 instruction manual Getting Started, How to Assemble Your Telescope, Telescope Assembly, Accessories

LXD75 specifications

The Meade LXD75 series represents a remarkable range of telescopes designed for both amateur astronomers and advanced users seeking high-quality performance at an affordable price. Known for its robust construction and innovative technology, the LXD75 aims to provide a user-friendly experience while catering to the demands of stargazers looking for sophistication in their equipment.

One of the main features of the LXD75 is its advanced German equatorial mount, which provides exceptional stability and tracking accuracy. This mount is equipped with dual-axis servo motors facilitating smooth movements, making it easy to locate and follow celestial objects. The LXD75 also includes a built-in autostar system featuring a database of over 30,000 celestial objects, allowing users to effortlessly navigate the night sky with a push of a button.

The LXD75 series includes several models, each with different optical configurations to suit the preferences of various users. The telescopes come with either an achromatic refractor or Schmidt-Cassegrain optical design, providing clear and bright images. The Schmidt-Cassegrain models offer a compact design with a fast focal ratio, making them excellent for both astrophotography and visual observation.

In terms of build, the Meade LXD75 features high-quality optics with multi-coated lenses, reducing glare and enhancing light transmission. This results in sharper and brighter images, making it easier to observe delicate details on planets, the moon, and deep-sky objects. The telescope tubes are crafted from durable materials, ensuring longevity and resilience against the elements.

Another characteristic worth noting is the ease of setup and operation. The LXD75 mount comes equipped with adjustable legs and can be easily assembled, requiring minimal tools. The intuitive control system also features a user-friendly interface, allowing both novices and experienced astronomers to operate the telescope with confidence.

For astrophotography enthusiasts, the LXD75 provides excellent support, with a wide range of accessories available to enhance imaging capabilities. The mount can accommodate various cameras, providing flexibility for capturing stunning astronomical photographs.

In summary, the Meade LXD75 series delivers a robust combination of features, technologies, and characteristics designed to meet the needs of both amateur and advanced astronomers. With its reliable mount, quality optics, and ease of use, the LXD75 ensures that stargazers can enjoy the wonders of the universe with clarity and precision.