AC

Motor at back of mount

B

D

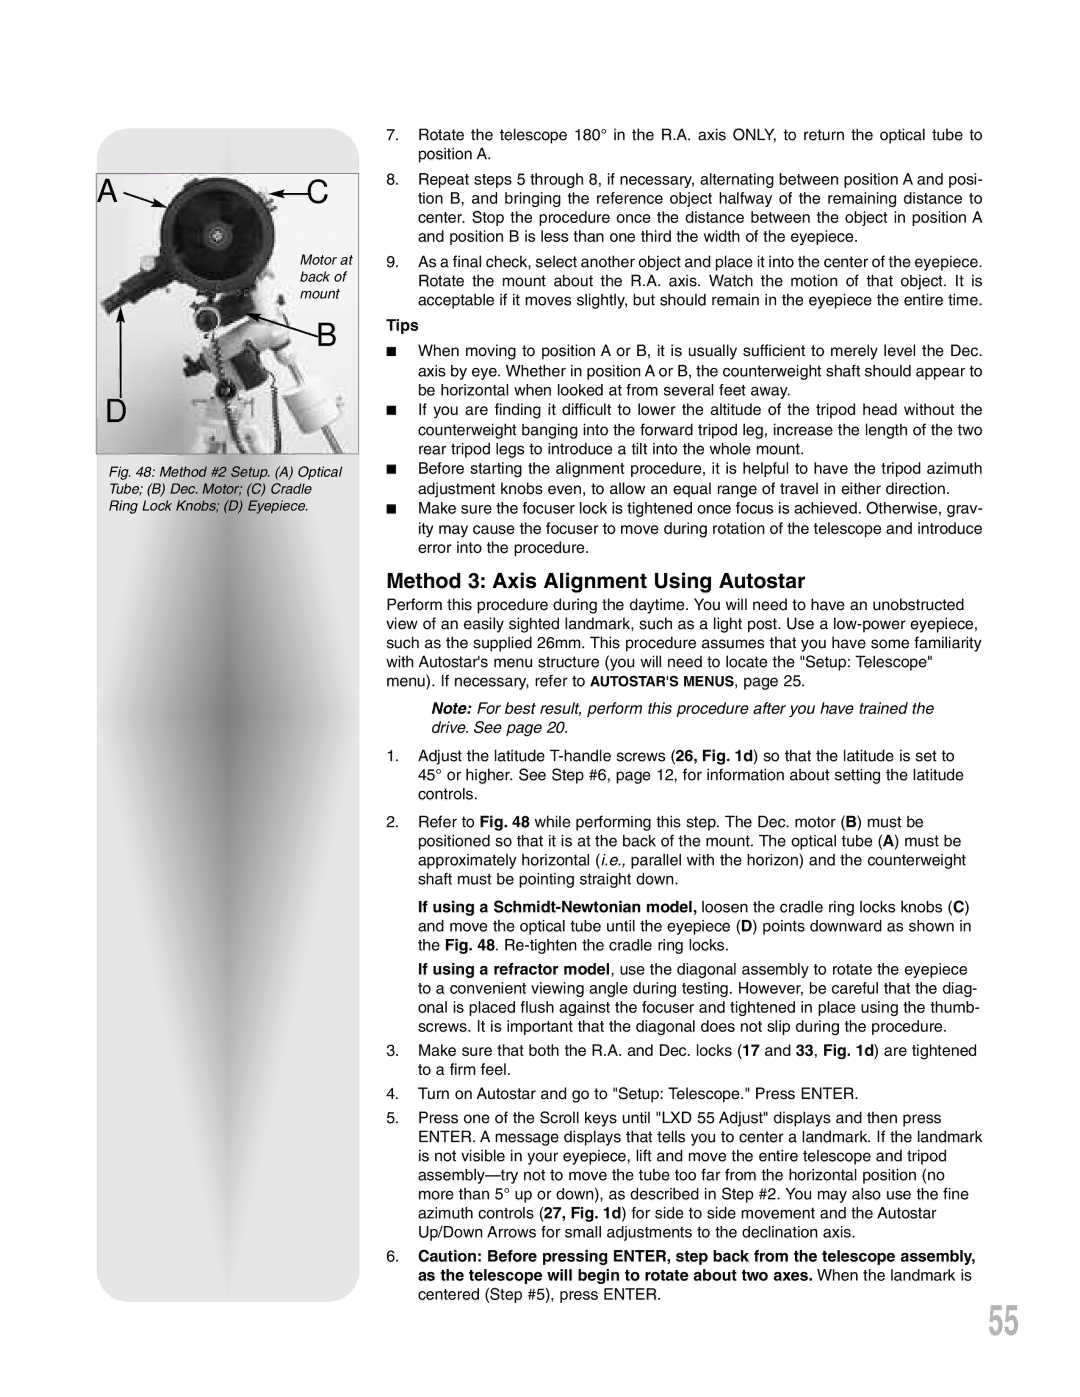
Fig. 48: Method #2 Setup. (A) Optical Tube; (B) Dec. Motor; (C) Cradle Ring Lock Knobs; (D) Eyepiece.

7.Rotate the telescope 180° in the R.A. axis ONLY, to return the optical tube to position A.

8.Repeat steps 5 through 8, if necessary, alternating between position A and posi- tion B, and bringing the reference object halfway of the remaining distance to center. Stop the procedure once the distance between the object in position A and position B is less than one third the width of the eyepiece.

9.As a final check, select another object and place it into the center of the eyepiece. Rotate the mount about the R.A. axis. Watch the motion of that object. It is acceptable if it moves slightly, but should remain in the eyepiece the entire time.

Tips

When moving to position A or B, it is usually sufficient to merely level the Dec. axis by eye. Whether in position A or B, the counterweight shaft should appear to be horizontal when looked at from several feet away.

If you are finding it difficult to lower the altitude of the tripod head without the counterweight banging into the forward tripod leg, increase the length of the two rear tripod legs to introduce a tilt into the whole mount.

Before starting the alignment procedure, it is helpful to have the tripod azimuth adjustment knobs even, to allow an equal range of travel in either direction.

Make sure the focuser lock is tightened once focus is achieved. Otherwise, grav- ity may cause the focuser to move during rotation of the telescope and introduce error into the procedure.

Method 3: Axis Alignment Using Autostar

Perform this procedure during the daytime. You will need to have an unobstructed view of an easily sighted landmark, such as a light post. Use a low-power eyepiece, such as the supplied 26mm. This procedure assumes that you have some familiarity with Autostar's menu structure (you will need to locate the "Setup: Telescope" menu). If necessary, refer to AUTOSTAR'S MENUS, page 25.

Note: For best result, perform this procedure after you have trained the drive. See page 20.

1.Adjust the latitude T-handle screws (26, Fig. 1d) so that the latitude is set to 45° or higher. See Step #6, page 12, for information about setting the latitude controls.

2.Refer to Fig. 48 while performing this step. The Dec. motor (B) must be positioned so that it is at the back of the mount. The optical tube (A) must be approximately horizontal (i.e., parallel with the horizon) and the counterweight shaft must be pointing straight down.

If using a Schmidt-Newtonian model, loosen the cradle ring locks knobs (C) and move the optical tube until the eyepiece (D) points downward as shown in the Fig. 48. Re-tighten the cradle ring locks.

If using a refractor model, use the diagonal assembly to rotate the eyepiece to a convenient viewing angle during testing. However, be careful that the diag- onal is placed flush against the focuser and tightened in place using the thumb- screws. It is important that the diagonal does not slip during the procedure.

3.Make sure that both the R.A. and Dec. locks (17 and 33, Fig. 1d) are tightened to a firm feel.

4.Turn on Autostar and go to "Setup: Telescope." Press ENTER.

5.Press one of the Scroll keys until "LXD 55 Adjust" displays and then press ENTER. A message displays that tells you to center a landmark. If the landmark is not visible in your eyepiece, lift and move the entire telescope and tripod assembly—try not to move the tube too far from the horizontal position (no more than 5° up or down), as described in Step #2. You may also use the fine azimuth controls (27, Fig. 1d) for side to side movement and the Autostar Up/Down Arrows for small adjustments to the declination axis.

6.Caution: Before pressing ENTER, step back from the telescope assembly, as the telescope will begin to rotate about two axes. When the landmark is centered (Step #5), press ENTER.

55

Page 55
Image 55
Meade LXD 75-Series instruction manual Method 3 Axis Alignment Using Autostar, Tips

LXD 75-Series specifications

The Meade LXD 75-Series telescopes represent a significant advancement in amateur astronomy technology, combining ease of use with professional-grade features. Designed for both novice and experienced astronomers, the LXD 75-Series offers sophisticated tracking capabilities and a range of optical tube assemblies, making it a versatile choice for stargazers.

One of the most notable features of the LXD 75-Series is its advanced German equatorial mount, which provides precise tracking of celestial objects. This mount is equipped with digital setting circles and a built-in autoguider port, allowing users to take long-exposure astrophotography without the hassle of manual adjustments. The telescope's mount is designed to be sturdy yet lightweight, enhancing portability for backyard observations or remote excursions.

The optical tube assemblies available in the LXD 75-Series include both refractor and reflector designs, allowing astronomers to choose according to their preferences. Refractors provide crisp, high-contrast images ideal for planetary observations, while reflectors excel in deep-sky viewing, revealing the nuances of nebulae and galaxy structures. The series typically offers apertures ranging from 6 to 10 inches, giving users the flexibility to select a model that best suits their observational needs.

Another feature that stands out in the LXD 75-Series is its user-friendly GoTo system. This system utilizes a database containing thousands of celestial objects and employs sophisticated software to navigate the night sky effortlessly. With a simple push of a button, users can locate and track objects, making the stargazing experience more engaging and less intimidating for beginners.

The LXD 75-Series also emphasizes durability and ease of assembly. The telescopes are designed for quick setup, with intuitive components that make it easy to get started in minutes. Additionally, the quality of craftsmanship ensures longevity, which is vital for a reliable observational tool.

In conclusion, the Meade LXD 75-Series stands out for its combination of advanced technologies and user-centric designs. With powerful tracking capabilities, versatile optical options, and an easy-to-use GoTo system, these telescopes cater to the diverse needs of astronomical enthusiasts. Whether for casual observation or serious astrophotography, the LXD 75-Series proves to be a stellar option for those looking to explore the wonders of the universe.