Tip:

A useful tool for making collimation easier is to make a hole in the plastic cap that comes with the eyepiece to protect it during shipping. Use a drill to make a 1/8" hole in the center of the cap and place it over the eye- piece holder for use during the collimation procedure.

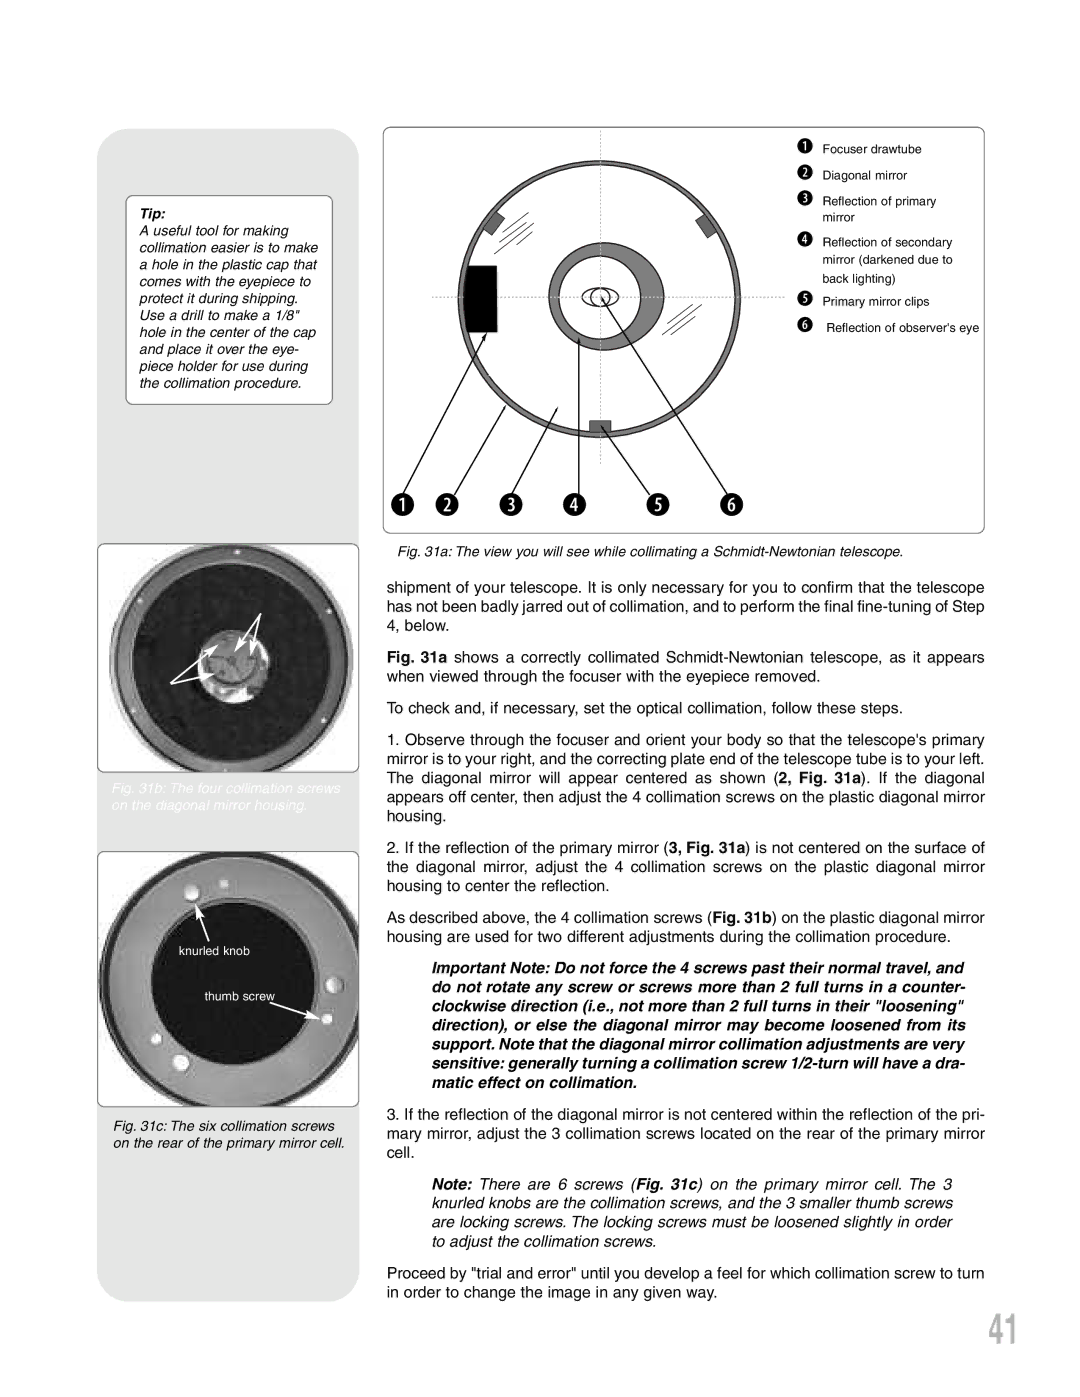
b Focuser drawtube c Diagonal mirror

d Reflection of primary mirror

e Reflection of secondary mirror (darkened due to back lighting)

f Primary mirror clips

g Reflection of observer's eye

Fig. 31b: The four collimation screws on the diagonal mirror housing.

knurled knob

thumb screw

Fig. 31c: The six collimation screws on the rear of the primary mirror cell.

b c d e f g

Fig. 31a: The view you will see while collimating a Schmidt-Newtonian telescope.

shipment of your telescope. It is only necessary for you to confirm that the telescope has not been badly jarred out of collimation, and to perform the final fine-tuning of Step 4, below.

Fig. 31a shows a correctly collimated Schmidt-Newtonian telescope, as it appears when viewed through the focuser with the eyepiece removed.

To check and, if necessary, set the optical collimation, follow these steps.

1.Observe through the focuser and orient your body so that the telescope's primary mirror is to your right, and the correcting plate end of the telescope tube is to your left. The diagonal mirror will appear centered as shown (2, Fig. 31a). If the diagonal appears off center, then adjust the 4 collimation screws on the plastic diagonal mirror housing.

2.If the reflection of the primary mirror (3, Fig. 31a) is not centered on the surface of the diagonal mirror, adjust the 4 collimation screws on the plastic diagonal mirror housing to center the reflection.

As described above, the 4 collimation screws (Fig. 31b) on the plastic diagonal mirror housing are used for two different adjustments during the collimation procedure.

Important Note: Do not force the 4 screws past their normal travel, and do not rotate any screw or screws more than 2 full turns in a counter- clockwise direction (i.e., not more than 2 full turns in their "loosening" direction), or else the diagonal mirror may become loosened from its support. Note that the diagonal mirror collimation adjustments are very sensitive: generally turning a collimation screw 1/2-turn will have a dra- matic effect on collimation.

3.If the reflection of the diagonal mirror is not centered within the reflection of the pri- mary mirror, adjust the 3 collimation screws located on the rear of the primary mirror cell.

Note: There are 6 screws (Fig. 31c) on the primary mirror cell. The 3 knurled knobs are the collimation screws, and the 3 smaller thumb screws are locking screws. The locking screws must be loosened slightly in order to adjust the collimation screws.

Proceed by "trial and error" until you develop a feel for which collimation screw to turn in order to change the image in any given way.

41

Page 41
Image 41
Meade LXD 75, Telescope instruction manual D e f g

Telescope, LXD 75 specifications

The Meade LXD 75 is an advanced telescope mount designed for both amateur and professional astronomers looking to explore the wonders of the night sky. Known for its precision and ease of use, the LXD 75 offers several features and technologies that make it a standout choice for astrophotography and visual observation alike.

At the heart of the Meade LXD 75 is its robust equatorial mount, which provides stable tracking of celestial objects. This mount is both lightweight and durable, allowing for easy transport to observing sites. The equatorial design is especially beneficial for astrophotography, as it compensates for the Earth's rotation, enabling longer exposure times without the trailing effects commonly associated with less sophisticated mounts.

One of the most notable features of the LXD 75 is its dual-axis tracking system. This system allows users to electronically control the telescope's movements along both the right ascension and declination axes. The built-in Data Sky control panel is user-friendly, offering intuitive access to a wealth of astronomical data, including over 30,000 celestial objects. This makes locating and tracking objects in the sky simpler and more efficient.

The LXD 75 also supports a variety of telescope configurations, accommodating optical tubes up to 10 inches in diameter. This versatility makes it suitable for a range of viewing preferences, from planetary observations to deep-sky astrophotography. The mount's heavy-duty construction ensures it can handle the weight of larger telescopes while maintaining stability.

In terms of technology, the Meade LXD 75 is equipped with AutoStar computer technology. This innovative feature enables automatic location and tracking of celestial bodies using a simple pointing and clicking interface. Users can also create custom observing lists, making it easier to plan and execute dedicated viewing sessions.

Additionally, the LXD 75 boasts robust connectivity options, including the ability to integrate with a wide range of imaging software and accessories, making it a great choice for those interested in advanced astrophotography techniques. The mount's compatibility with Meade's own range of cameras and filters further enhances its potential for capturing stunning images of the universe.

In conclusion, the Meade LXD 75 is a well-rounded telescope mount that combines advanced technology with user-friendly features. Its equatorial design, dual-axis tracking, and AutoStar system make it an excellent choice for both novice and experienced astronomers. Whether for visual observation or astrophotography, the LXD 75 offers the performance and versatility to enhance any stargazing experience.