MX4111.O/M.QXD 7/11/02 4:06 PM Page 3

PREPARATION FOR USE (CONTINUED)

SPEAKER CONNECTION

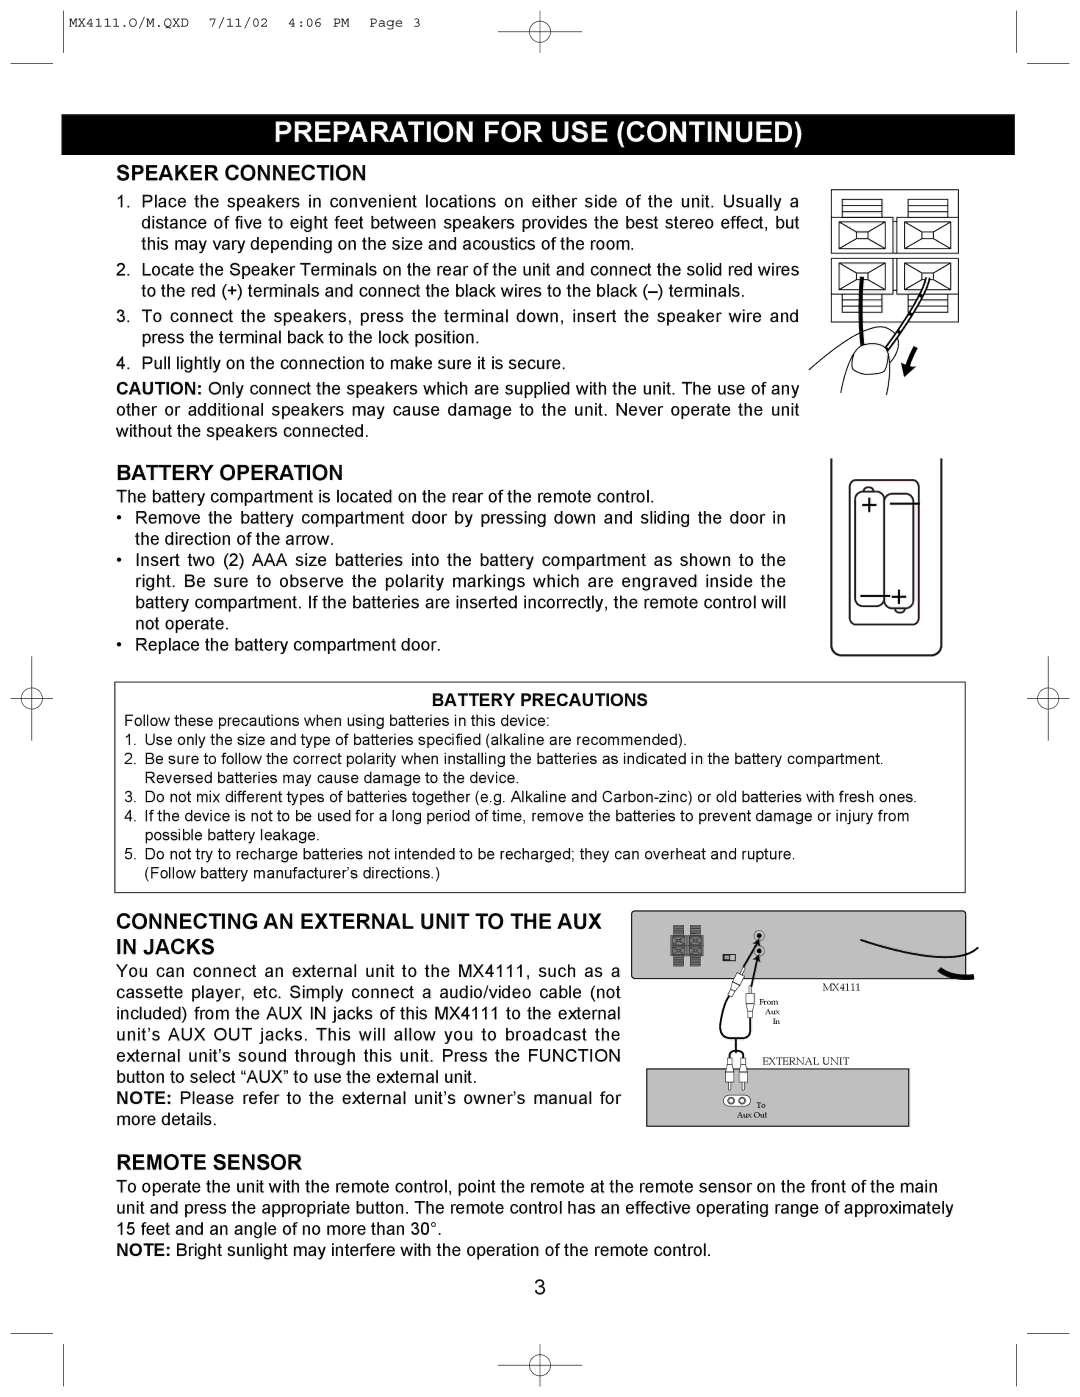
1.Place the speakers in convenient locations on either side of the unit. Usually a distance of five to eight feet between speakers provides the best stereo effect, but this may vary depending on the size and acoustics of the room.

2.Locate the Speaker Terminals on the rear of the unit and connect the solid red wires to the red (+) terminals and connect the black wires to the black (–) terminals.

3.To connect the speakers, press the terminal down, insert the speaker wire and press the terminal back to the lock position.

4.Pull lightly on the connection to make sure it is secure.

CAUTION: Only connect the speakers which are supplied with the unit. The use of any other or additional speakers may cause damage to the unit. Never operate the unit without the speakers connected.

BATTERY OPERATION

The battery compartment is located on the rear of the remote control.

Remove the battery compartment door by pressing down and sliding the door in the direction of the arrow.

Insert two (2) AAA size batteries into the battery compartment as shown to the right. Be sure to observe the polarity markings which are engraved inside the battery compartment. If the batteries are inserted incorrectly, the remote control will not operate.

Replace the battery compartment door.

+

—+

BATTERY PRECAUTIONS

Follow these precautions when using batteries in this device:

1.Use only the size and type of batteries specified (alkaline are recommended).

2.Be sure to follow the correct polarity when installing the batteries as indicated in the battery compartment. Reversed batteries may cause damage to the device.

3.Do not mix different types of batteries together (e.g. Alkaline and Carbon-zinc) or old batteries with fresh ones.

4.If the device is not to be used for a long period of time, remove the batteries to prevent damage or injury from possible battery leakage.

5.Do not try to recharge batteries not intended to be recharged; they can overheat and rupture. (Follow battery manufacturer’s directions.)

CONNECTING AN EXTERNAL UNIT TO THE AUX IN JACKS

You can connect an external unit to the MX4111, such as a cassette player, etc. Simply connect a audio/video cable (not included) from the AUX IN jacks of this MX4111 to the external unit’s AUX OUT jacks. This will allow you to broadcast the external unit’s sound through this unit. Press the FUNCTION button to select “AUX” to use the external unit.

NOTE: Please refer to the external unit’s owner’s manual for more details.

MX4111

From

Aux

In

EXTERNAL UNIT

To

Aux Out

REMOTE SENSOR

To operate the unit with the remote control, point the remote at the remote sensor on the front of the main unit and press the appropriate button. The remote control has an effective operating range of approximately 15 feet and an angle of no more than 30°.

NOTE: Bright sunlight may interfere with the operation of the remote control.

3

Page 4
Image 4
Memorex MX4111 Preparation for USE, Speaker Connection, Battery Operation, Connecting AN External Unit to the AUX in Jacks

MX4111 specifications

The Memorex MX4111 is a versatile digital photo frame that caters to the needs of tech-savvy users who want to display their treasured memories in a stylish and modern way. This photo frame is designed to enhance any living space, boasting a sleek design that complements various home decors.

One of the standout features of the MX4111 is its 11.5-inch high-resolution display. With a resolution of 800x600 pixels, the screen is capable of showcasing vibrant and detailed images, ensuring that your photos come to life. The frame supports multiple image formats, including JPEG and BMP, thereby providing flexibility in displaying your favorite pictures.

The Memorex MX4111 incorporates advanced digital technologies to ensure ease of use. With its intuitive user interface, setting up the frame and navigating through the menu is simple, even for those who may not be tech-savvy. One of the key features is the built-in memory, which allows users to store hundreds of images directly on the device. Additionally, the frame has an SD card slot and USB port, allowing for easy transfer of images from other devices.

Another significant characteristic of the MX4111 is its customizable slideshow feature. Users can choose the duration of each image display and the transition effects, adding a personal touch to their photo viewing experience. This is particularly useful for special occasions where a dynamic display can enhance the atmosphere.

The MX4111 also includes a clock and calendar feature, making it a functional addition to any room. Users can easily switch between the photo display and time or date mode, blending functionality with aesthetics.

In terms of power, the frame operates via a standard power adapter, which ensures reliable performance without the need for frequent battery replacements. The frame is designed with energy efficiency in mind, making it an eco-friendly choice for consumers.

In summary, the Memorex MX4111 is more than just a digital photo frame; it is a stylish and multifunctional device that enhances the presentation of your memories. With its high-resolution display, multiple image compatibility, extensive storage options, and customizable features, the MX4111 is a remarkable choice for anyone looking to bring their photographs to life. Whether on a shelf, desk, or wall, this digital frame is sure to be a conversation starter in any home.