Orbit 3 | MICROBOARDS TECHNOLOGY, LLC |
Main Menu
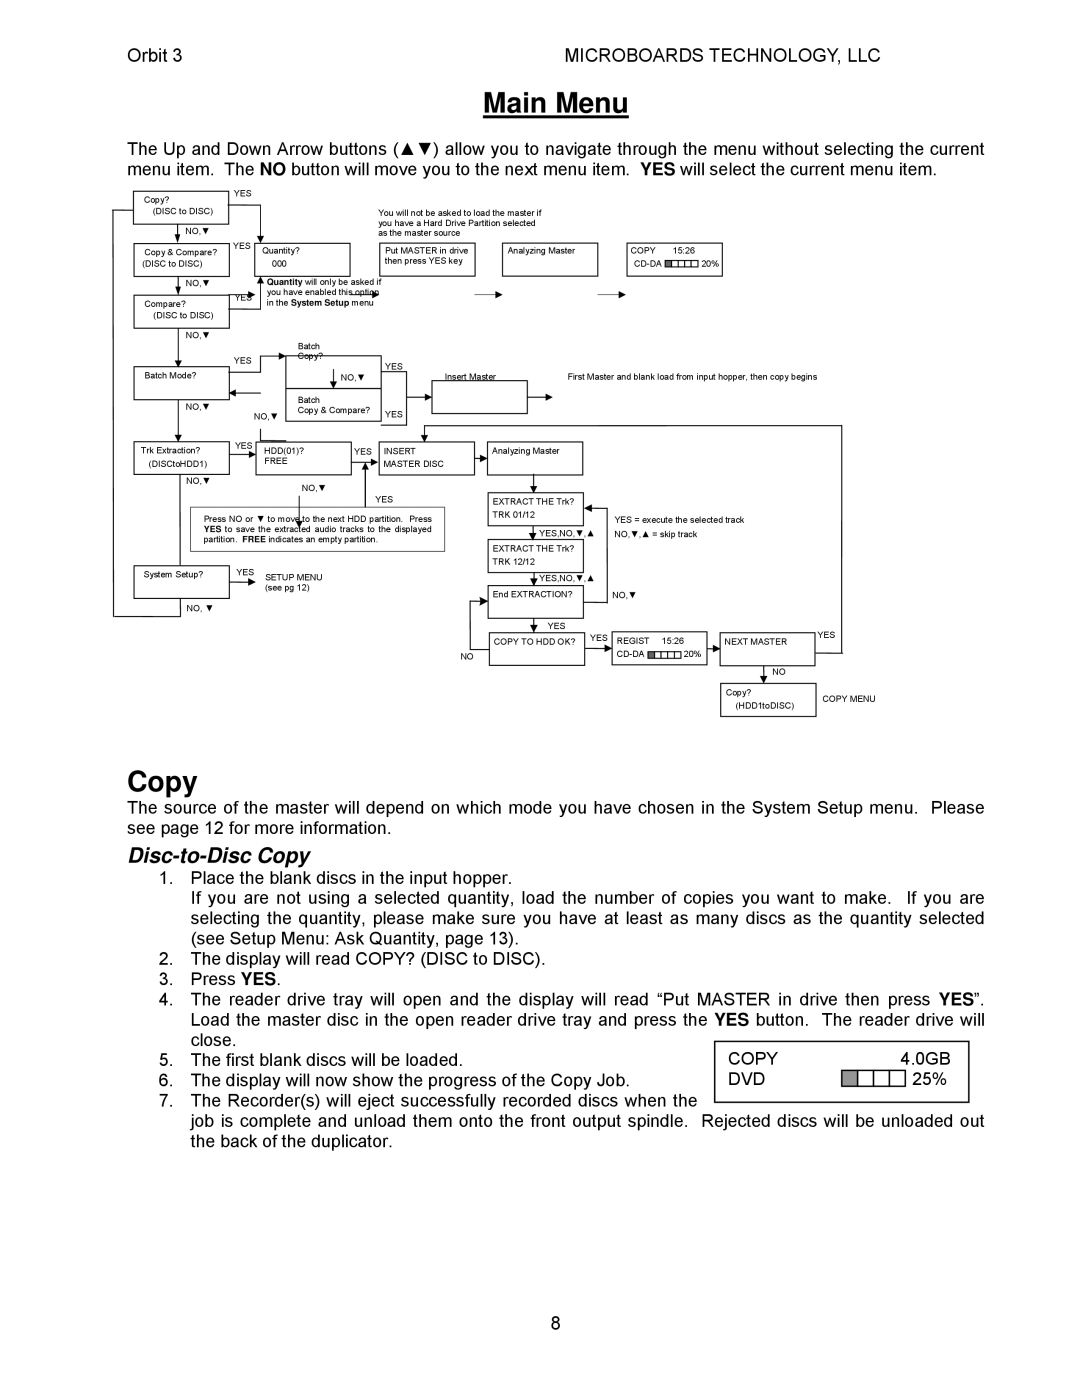
The Up and Down Arrow buttons (▲▼) allow you to navigate through the menu without selecting the current menu item. The NO button will move you to the next menu item. YES will select the current menu item.
Copy?
(DISC to DISC)
NO,▼
Copy & Compare? (DISC to DISC)
NO,▼
Compare? (DISC to DISC)
NO,▼
Batch Mode?
NO,▼
YES
You will not be asked to load the master if you have a Hard Drive Partition selected as the master source
YES | Quantity? |
| Put MASTER in drive |
| Analyzing Master |
| COPY | 15:26 |
| |||
|
|
|
|
| ||||||||
| 000 |
| then press YES key |
|
|
|
|
|
|
| 20% | |
|
|
|
|
|
|
|
|
|
|
|
|
|
|
|
|
|
|
|
|
|
|
|
|
|
|
| Quantity will only be asked if | |
YES | you have enabled this option | |
in the System Setup menu | ||
|
|
| Batch |
|
|
YES |
| Copy? | YES |
|
|
|
| ||
|
|
|
| |
|
| NO,▼ | Insert Master | First Master and blank load from input hopper, then copy begins |
|
| Batch |
|
|
| NO,▼ | Copy & Compare? | YES |
|
|
|
|
|
| YES |
|
|
|
|
|
Trk Extraction? |
| HDD(01)? | YES | INSERT | |||
|
| ||||||
(DISCtoHDD1) |
|
| FREE |
| MASTER DISC | ||
|
|
|
| ||||
|
|
|
|
|
|
|
|
NO,▼ |
|
| NO,▼ | YES | |||
|
|
|
| ||||
|
|
|
|
| |||
| Press NO or ▼ to move to the next HDD partition. Press |
| |||||
| YES to save the extracted audio tracks to the displayed |
| |||||
| partition. FREE indicates an empty partition. |
| |||||
|
|
|
|
|
|
| |
|
| YES SETUP MENU |
|
|
| ||
System Setup? |
|
|
| ||||
|
|
|
| (see pg 12) |
|
|
|
|
|
|
|
|
|
|
|
NO, ▼ |
|
|
|
|
|
| |
NO
Analyzing Master
EXTRACT THE Trk?
TRK 01/12
![]() YES,NO,▼,▲
YES,NO,▼,▲
EXTRACT THE Trk? TRK 12/12
![]() YES,NO,▼,▲
YES,NO,▼,▲
End EXTRACTION?
YES |
|
COPY TO HDD OK? | YES |
| |
|
|
YES = execute the selected track
NO,▼,▲ = skip track
NO,▼
REGIST 15:26 |
|
| NEXT MASTER |
20% |
|
| |
|
|
|
|
|
|
|
|
NO
Copy?
(HDD1toDISC)
YES
COPY MENU
Copy
The source of the master will depend on which mode you have chosen in the System Setup menu. Please see page 12 for more information.
Disc-to-Disc Copy
1.Place the blank discs in the input hopper.
If you are not using a selected quantity, load the number of copies you want to make. If you are selecting the quantity, please make sure you have at least as many discs as the quantity selected (see Setup Menu: Ask Quantity, page 13).
2.The display will read COPY? (DISC to DISC).
3.Press YES.
4.The reader drive tray will open and the display will read “Put MASTER in drive then press YES”. Load the master disc in the open reader drive tray and press the YES button. The reader drive will
| close. |
|
|
|
|
|
|
| COPY |
|
|
| 4.0GB | ||
5. | The first blank discs will be loaded. |
|
|
| |||
6. | The display will now show the progress of the Copy Job. | DVD |
|
|
|
| 25% |
7.The Recorder(s) will eject successfully recorded discs when the
job is complete and unload them onto the front output spindle. Rejected discs will be unloaded out the back of the duplicator.
8
