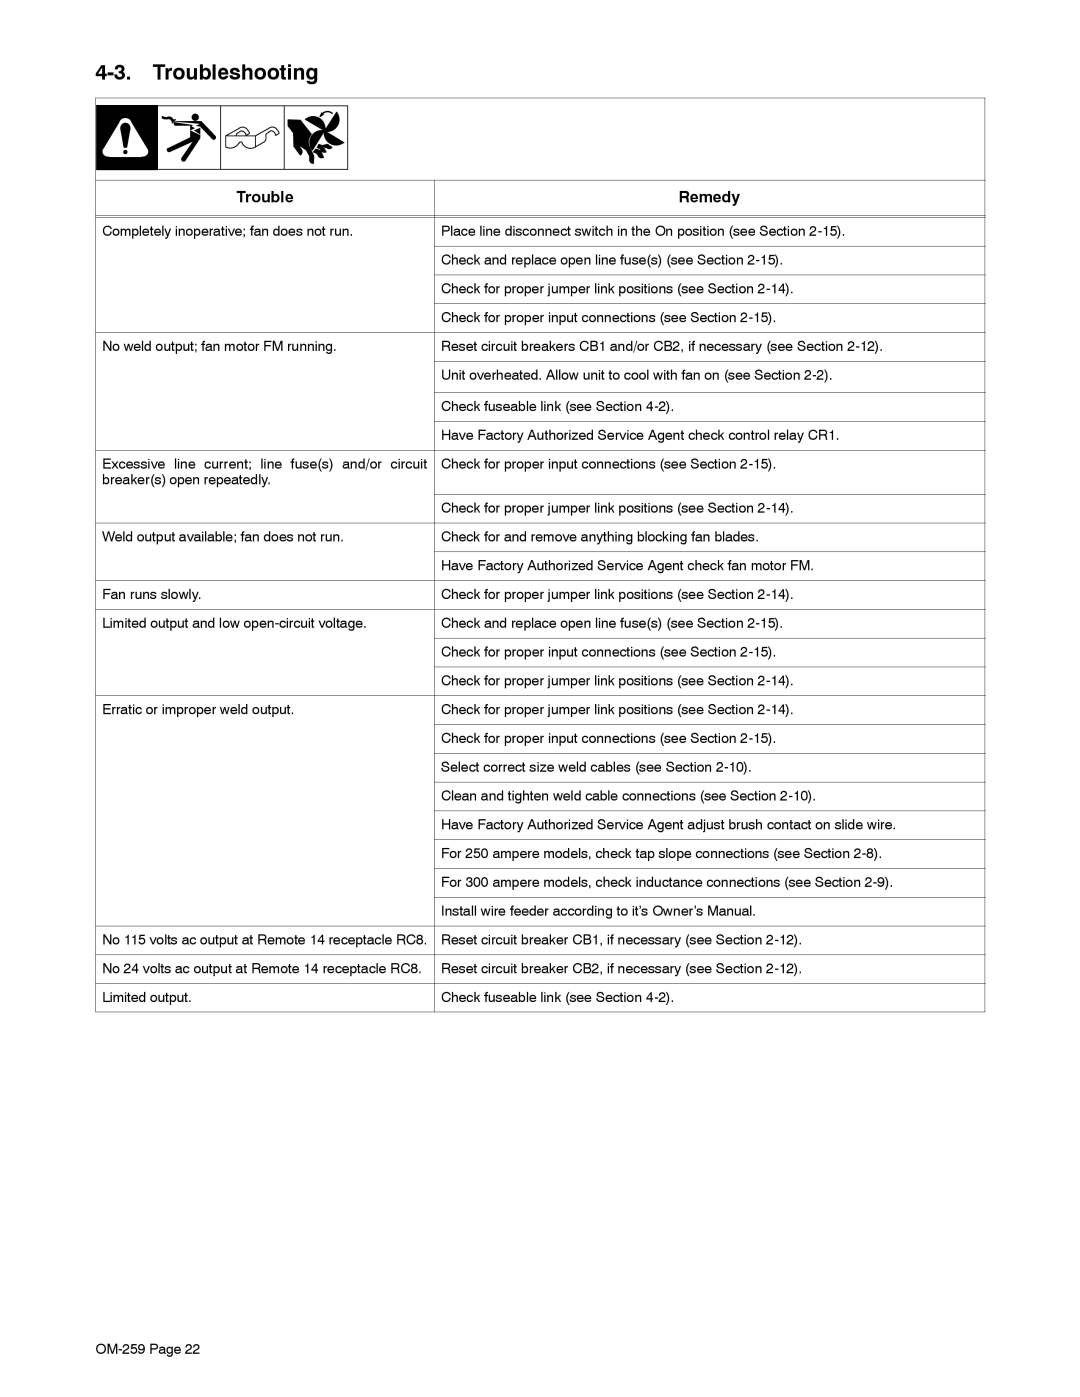
4-3. Troubleshooting


Trouble

Remedy


Completely inoperative; fan does not run.

Place line disconnect switch in the On position (see Section 2-15).


Check and replace open line fuse(s) (see Section 2-15).


Check for proper jumper link positions (see Section 2-14).


Check for proper input connections (see Section 2-15).


No weld output; fan motor FM running.

Reset circuit breakers CB1 and/or CB2, if necessary (see Section 2-12).


Unit overheated. Allow unit to cool with fan on (see Section 2-2).


Check fuseable link (see Section 4-2).


Have Factory Authorized Service Agent check control relay CR1.


Excessive line current; line fuse(s) and/or circuit

Check for proper input connections (see Section 2-15).

breaker(s) open repeatedly.


Check for proper jumper link positions (see Section 2-14).


Weld output available; fan does not run.

Check for and remove anything blocking fan blades.


Have Factory Authorized Service Agent check fan motor FM.


Fan runs slowly.

Check for proper jumper link positions (see Section 2-14).


Limited output and low open-circuit voltage.

Check and replace open line fuse(s) (see Section 2-15).


Check for proper input connections (see Section 2-15).


Check for proper jumper link positions (see Section 2-14).


Erratic or improper weld output.

Check for proper jumper link positions (see Section 2-14).


Check for proper input connections (see Section 2-15).


Select correct size weld cables (see Section 2-10).


Clean and tighten weld cable connections (see Section 2-10).


Have Factory Authorized Service Agent adjust brush contact on slide wire.


For 250 ampere models, check tap slope connections (see Section 2-8).


For 300 ampere models, check inductance connections (see Section 2-9).


Install wire feeder according to it’s Owner’s Manual.


No 115 volts ac output at Remote 14 receptacle RC8.

Reset circuit breaker CB1, if necessary (see Section 2-12).


No 24 volts ac output at Remote 14 receptacle RC8.

Reset circuit breaker CB2, if necessary (see Section 2-12).


Limited output.

Check fuseable link (see Section 4-2).


OM-259 Page 22

Page 26
Image 26
Miller Electric CP-252TS, CP-302 manual Troubleshooting, Trouble Remedy

CP-302, CP-252TS specifications

The Miller Electric CP-252TS and CP-302 are advanced power sources designed to meet the demands of both the industrial and manufacturing sectors. Known for their reliability and performance, these models are ideal for a variety of welding applications, including MIG, TIG, and stick welding.

One of the main features of the CP-252TS is its superior arc stability, which is essential for achieving high-quality welds. This model integrates Miller's Auto-Set technology, enabling users to easily configure their welding parameters for optimal performance. By simply selecting the material type and thickness, the machine automatically adjusts voltage and wire feed speed, streamlining the setup process and significantly reducing the likelihood of user error.

In contrast, the CP-302 model emphasizes versatility and connectivity, offering multiple welding processes in one machine. It is equipped with a robust wire feeder that can handle various wire diameters, making it suitable for both thin sheet metal and thicker materials. The CP-302 also features Miller’s advanced inverter technology, ensuring high energy efficiency and reducing power consumption. This makes it an environmentally friendly option without compromising on performance.

Both models come equipped with a user-friendly interface, allowing operators to monitor and adjust settings with ease. The clear LCD display provides critical information at a glance, improving workflow and efficiency in high-demand environments. Additionally, these machines are designed with durability in mind, featuring rugged construction that withstands the rigors of daily use in challenging industrial conditions.

Safety is a priority with the Miller Electric CP-252TS and CP-302. They include advanced protection features that prevent overheating and electrical overloading, ensuring both equipment longevity and operator safety. Furthermore, Miller's commitment to compliance with industry standards means these machines offer peace of mind in terms of regulatory adherence.

In summary, the Miller Electric CP-252TS and CP-302 are exceptional choices for professionals looking for reliable, efficient, and versatile welding solutions. Their combination of advanced technology, user-friendly design, and robust safety features make them indispensable tools in any welding operation. Whether for fabrication, maintenance, or production, these power sources deliver the performance and efficiency required to keep pace with modern industrial demands.