6-2.

Diagnostics


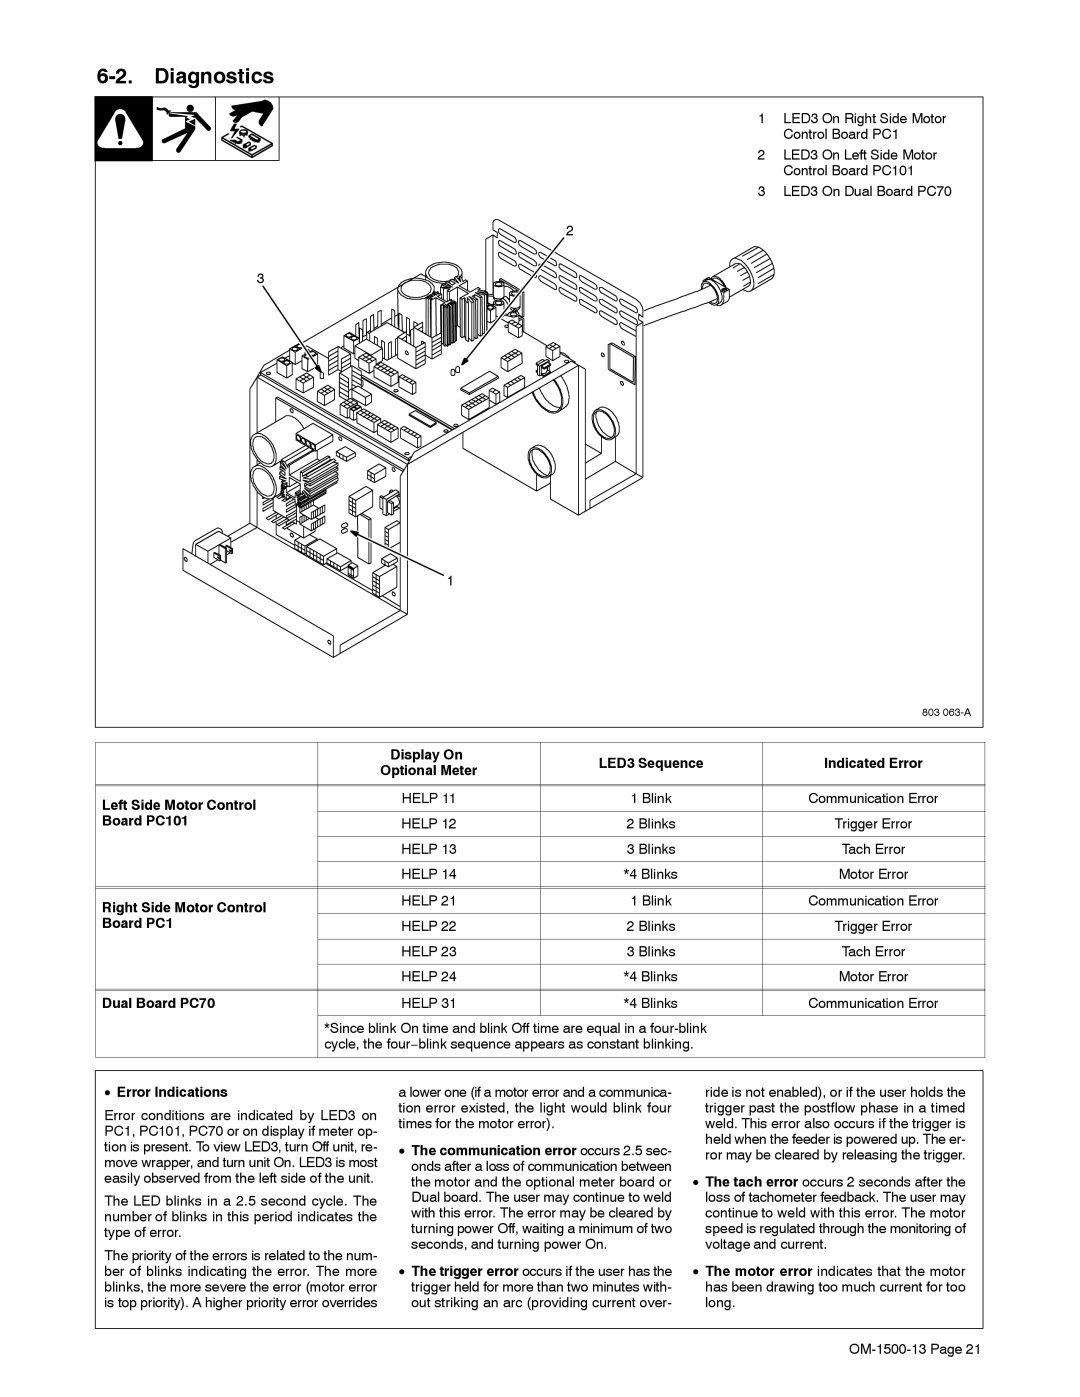
1 LED3 On Right Side Motor


Control Board PC1


2 LED3 On Left Side Motor


Control Board PC101


3 LED3 On Dual Board PC70


2


3


1


803 063-A


Display On


LED3 Sequence


Indicated Error


Optional Meter


Left Side Motor Control


HELP 11


1 Blink


Communication Error


Board PC101


HELP 12


2 Blinks


Trigger Error


HELP 13


3 Blinks


Tach Error


HELP 14


*4 Blinks


Motor Error


Right Side Motor Control


HELP 21


1 Blink


Communication Error


Board PC1


HELP 22


2 Blinks


Trigger Error


HELP 23


3 Blinks


Tach Error


HELP 24


*4 Blinks


Motor Error


Dual Board PC70


HELP 31


*4 Blinks


Communication Error


*Since blink On time and blink Off time are equal in a four-blink


cycle, the four−blink sequence appears as constant blinking.


Error Indications

a lower one (if a motor error and a communica-


ride is not enabled), or if the user holds the

Error conditions are indicated by LED3 on

tion error existed, the light would blink four


trigger past the postflow phase in a timed

times for the motor error).


weld. This error also occurs if the trigger is

PC1, PC101, PC70 or on display if meter op-


held when the feeder is powered up. The er-

tion is present. To view LED3, turn Off unit, re-

The communication error occurs 2.5 sec-


ror may be cleared by releasing the trigger.

move wrapper, and turn unit On. LED3 is most

onds after a loss of communication between


easily observed from the left side of the unit.

the motor and the optional meter board or

The tach error occurs 2 seconds after the

The LED blinks in a 2.5 second cycle. The

Dual board. The user may continue to weld


loss of tachometer feedback. The user may

number of blinks in this period indicates the

with this error. The error may be cleared by


continue to weld with this error. The motor

type of error.

turning power Off, waiting a minimum of two


speed is regulated through the monitoring of

The priority of the errors is related to the num-

seconds, and turning power On.


voltage and current.

The trigger error occurs if the user has the

The motor error indicates that the motor

ber of blinks indicating the error. The more

blinks, the more severe the error (motor error

trigger held for more than two minutes with-


has been drawing too much current for too

is top priority). A higher priority error overrides

out striking an arc (providing current over-


long.


OM-1500-13 Page 21

Page 25
Image 25
Miller Electric DS-74S16, DS-74S12, DS-74D12, and DS-74D16 manual Diagnostics

DS-74D12, DS-74S12, and DS-74D16, DS-74S16 specifications

Miller Electric has long been recognized for its high-quality welding and cutting equipment. Among their extensive lineup, the DS-74S16, DS-74D16, DS-74S12, and DS-74D12 models stand out for their robust features and advanced technologies tailored for professional welders and metal fabricators.

The Miller DS-74S16 is particularly engineered for heavy-duty applications, making it perfect for industrial environments. It boasts a powerful input range, providing versatility for different welding processes. Its user-friendly interface allows for quick adjustments, ensuring efficiency during operation. The design emphasizes safety and reliability, with protections against overcurrent and thermal overload. Similarly, the DS-74D16 offers dual capabilities for welding and cutting, which adds flexibility to a welder's toolkit. This model integrates advanced digital controls that help maintain consistent performance, enhancing the overall quality of the welds produced.

Moving on to the DS-74S12 and DS-74D12 models, these versions cater to lighter applications without compromising on quality. The DS-74S12 is designed with portability in mind, making it an excellent choice for fieldwork and smaller workshops. It features a compact design while still delivering impressive performance, ideal for less demanding tasks. The DS-74D12 variant shares this lightweight construction but offers the added benefit of dual-functionality. Users can effortlessly switch between welding and cutting, accommodating various project requirements.

Across the board, these models incorporate Miller’s innovative technologies. Their advanced inverter technology helps increase efficiency, reduce energy consumption, and minimize noise levels during operation. Additionally, the use of durable materials ensures longevity and resilience in harsh working conditions.

The entire range is characterized by ease of maintenance and serviceability, with components designed for quick replacement when needed. User support and comprehensive documentation provided by Miller Electric further enhance the experience for both novice and experienced welders.

Overall, the DS-74S16, DS-74D16, DS-74S12, and DS-74D12 models represent a perfect blend of power, flexibility, and precision, catering to the evolving needs of professionals in the welding industry. These machines are suitable for diverse applications, ranging from heavy industrial tasks to light repairs, making them an invaluable addition to any welder’s arsenal.