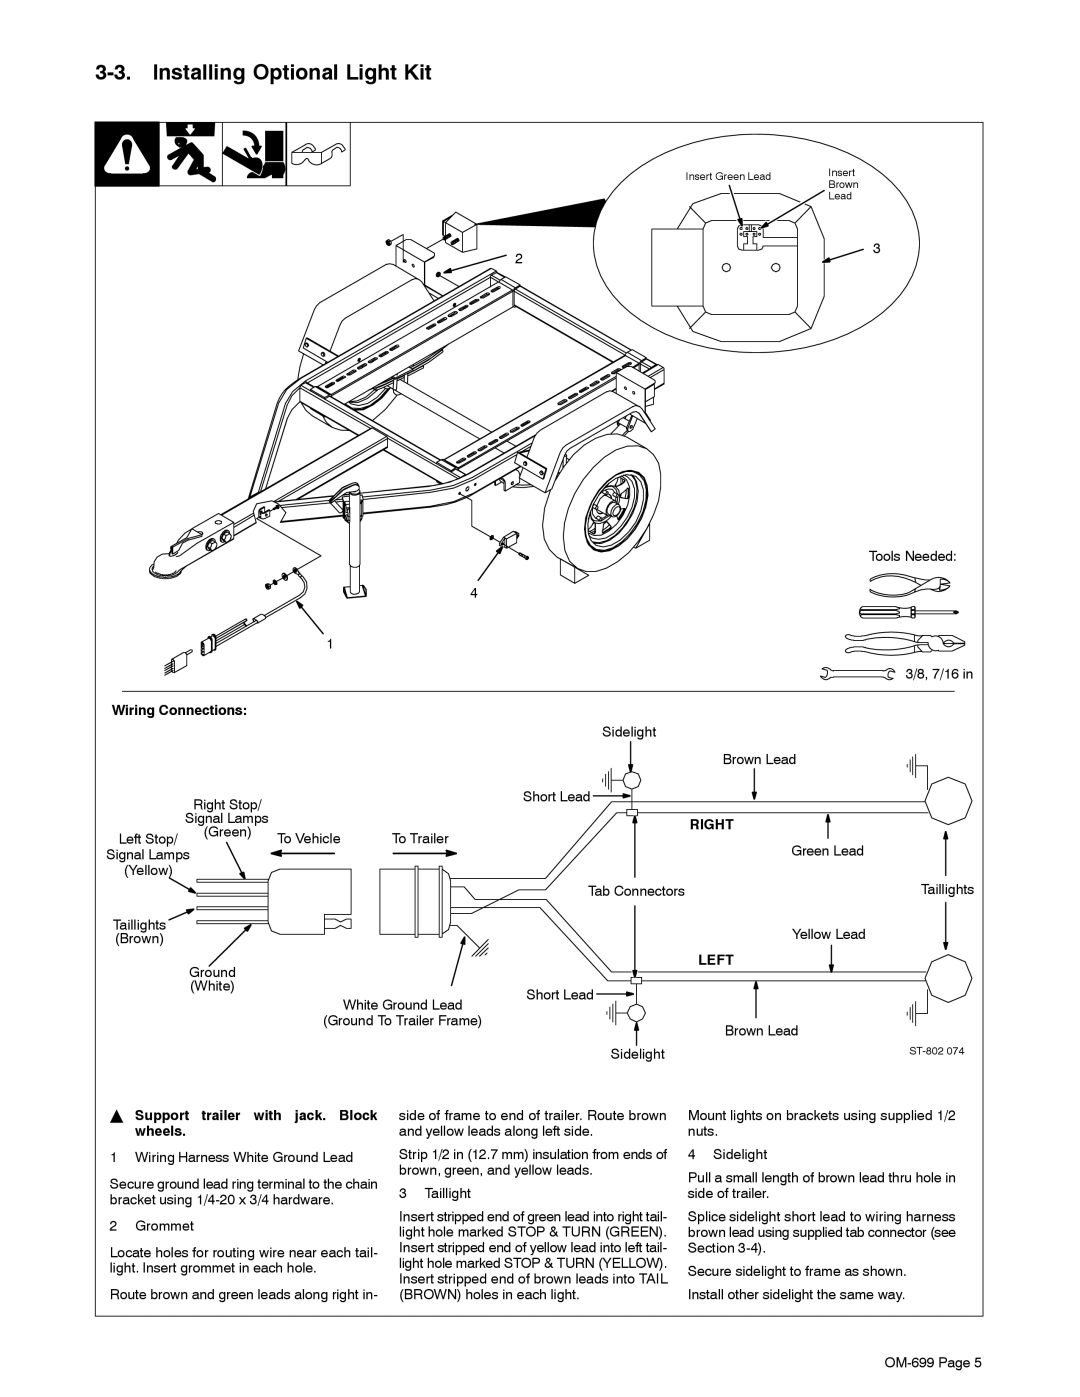
3-3. Installing Optional Light Kit
Insert Green Lead | Insert | |
Brown | ||
| ||
| Lead |
2 | 3 |
|
Tools Needed:
4
1
3/8, 7/16 in
Wiring Connections:
|
|
|
| Sidelight |
|
|
|
|
|
| Brown Lead |
| Right Stop/ |
|
| Short Lead |
|
|
|
|
|
| |
| Signal Lamps |
|
|
| RIGHT |
Left Stop/ | (Green) | To Vehicle | To Trailer |
| |
|
| ||||
|
| Green Lead | |||
Signal Lamps |
|
|
| ||
(Yellow) |
|
|
|
|
|
|
|
|
| Tab Connectors | Taillights |
Taillights |
|
|
|
| Yellow Lead |
(Brown) |
|
|
|
| |
| Ground |
|
|
| LEFT |
|
|
|
|
| |
| (White) |
|
| Short Lead |
|
|
|
| White Ground Lead |
| |
|
|
|
|
| |
|
| (Ground To Trailer Frame) |
| Brown Lead | |
|
|
|
|
| |
|
|
|
| Sidelight | |
YSupport trailer with jack. Block wheels.
1 Wiring Harness White Ground Lead
Secure ground lead ring terminal to the chain bracket using
2 Grommet
Locate holes for routing wire near each tail- light. Insert grommet in each hole.
Route brown and green leads along right in-
side of frame to end of trailer. Route brown and yellow leads along left side.
Strip 1/2 in (12.7 mm) insulation from ends of brown, green, and yellow leads.
3 Taillight
Insert stripped end of green lead into right tail- light hole marked STOP & TURN (GREEN). Insert stripped end of yellow lead into left tail- light hole marked STOP & TURN (YELLOW). Insert stripped end of brown leads into TAIL (BROWN) holes in each light.
Mount lights on brackets using supplied 1/2 nuts.
4 Sidelight
Pull a small length of brown lead thru hole in side of trailer.
Splice sidelight short lead to wiring harness brown lead using supplied tab connector (see Section
Secure sidelight to frame as shown. Install other sidelight the same way.
