Starting, Stopping and Controlling Speed
1.To start the tool, grasp the handle firmly and pull the trigger.
2.To vary the speed, increase or de- crease the pressure on the trigger. The further the trigger is pulled, the greater the speed. The maximum RPM is de- termined by the high/low/trigger lock switch.
3.To stop the tool, release the trigger. Make sure the blade comes to a com- plete stop before removing the blade from a partial cut or laying the tool down.
Electric Brake
The electric brake engages when the trig- ger is released, causing the blade to stop and allowing you to proceed with your work. Generally, the saw blade stops within two seconds. However, there may be a delay between the time you release the trigger and when the brake engages.
Battery Pack Protection
To protect itself from damage and extend its life, the V28™battery pack's intelligent circuit will turn off the battery pack if its internal temperature becomes too high. This could happen in extremely high torque, bind- ing and stalling situations. The pack must be placed on the charger to turn it back on. The charger's light indicator will flash red, indicating that the pack is too hot. Once the light is continuously red, the pack has cooled and can be used again.
Cold Weather Operation
The
General Cutting
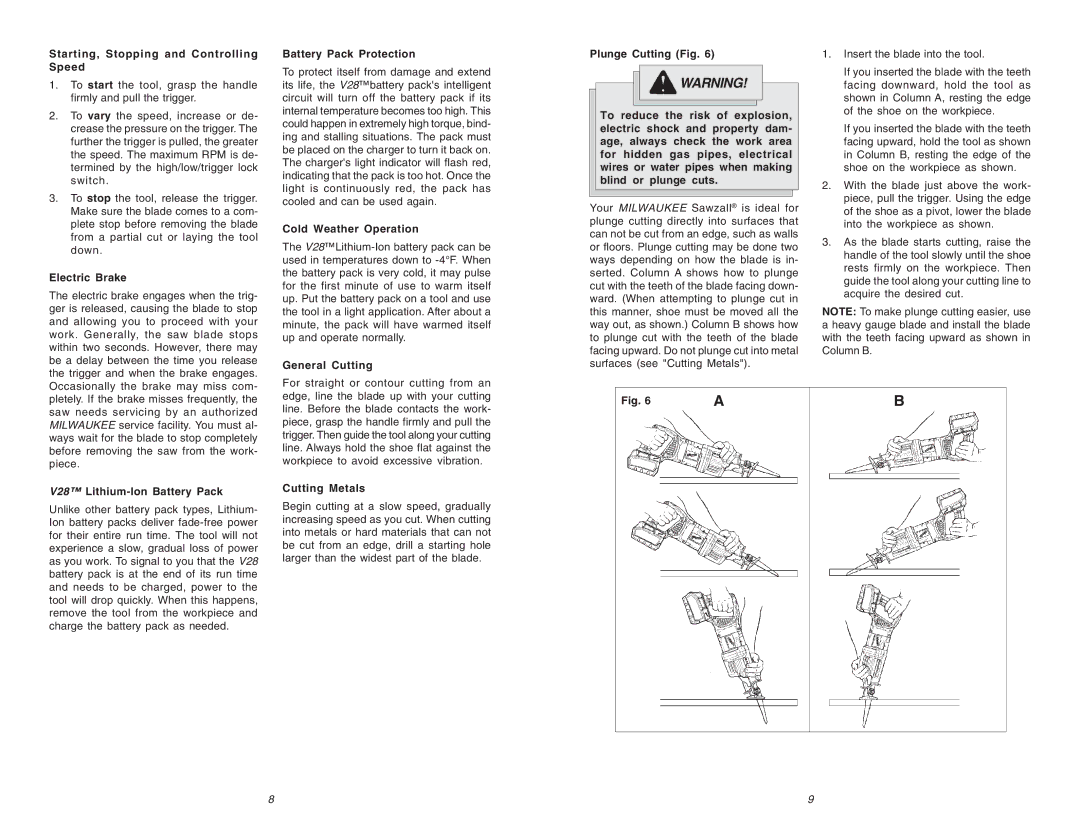
Plunge Cutting (Fig. 6)
![]() WARNING!
WARNING!
To reduce the risk of explosion, electric shock and property dam- age, always check the work area for hidden gas pipes, electrical wires or water pipes when making blind or plunge cuts.
Your MILWAUKEE Sawzall® is ideal for plunge cutting directly into surfaces that can not be cut from an edge, such as walls or floors. Plunge cutting may be done two ways depending on how the blade is in- serted. Column A shows how to plunge cut with the teeth of the blade facing down- ward. (When attempting to plunge cut in this manner, shoe must be moved all the way out, as shown.) Column B shows how to plunge cut with the teeth of the blade facing upward. Do not plunge cut into metal surfaces (see "Cutting Metals").
1.Insert the blade into the tool.
If you inserted the blade with the teeth facing downward, hold the tool as shown in Column A, resting the edge of the shoe on the workpiece.
If you inserted the blade with the teeth facing upward, hold the tool as shown in Column B, resting the edge of the shoe on the workpiece as shown.
2.With the blade just above the work- piece, pull the trigger. Using the edge of the shoe as a pivot, lower the blade into the workpiece as shown.
3.As the blade starts cutting, raise the handle of the tool slowly until the shoe rests firmly on the workpiece. Then guide the tool along your cutting line to acquire the desired cut.
NOTE: To make plunge cutting easier, use a heavy gauge blade and install the blade with the teeth facing upward as shown in Column B.
Occasionally the brake may miss com- pletely. If the brake misses frequently, the saw needs servicing by an authorized MILWAUKEE service facility. You must al- ways wait for the blade to stop completely before removing the saw from the work- piece.
V28™ Lithium-Ion Battery Pack
Unlike other battery pack types, Lithium- Ion battery packs deliver
For straight or contour cutting from an edge, line the blade up with your cutting line. Before the blade contacts the work- piece, grasp the handle firmly and pull the trigger. Then guide the tool along your cutting line. Always hold the shoe flat against the workpiece to avoid excessive vibration.
Cutting Metals
Begin cutting at a slow speed, gradually increasing speed as you cut. When cutting into metals or hard materials that can not be cut from an edge, drill a starting hole larger than the widest part of the blade.
Fig. 6 | A | B |
|
|
|
8 | 9 |