Symbology |
| ASSEMBLY |
Selecting MODES
Press the MODE button to display one of the fol-
![]() WARNING Never connect the Tem-
WARNING Never connect the Tem-
![]() Volts Direct Current
Volts Direct Current
CAUTION Laser Light - Do Not
Stare Into Beam
Laser product
Avoid Exposure: Laser Radiation Is
Emitted From This Aperture
To reduce the risk of injury, user must read operator’s manual.
WARNING Recharge only with the charger specified for the battery. For specific charging instructions, read the operator’s manual supplied with your charger and battery.
Inserting/Removing the Battery
To remove the battery, push in the release buttons and pull the battery pack away from the tool.
To insert the battery, slide the pack into the body of the tool. Make sure it latches securely into place.
lowing:
Average Temperature (AVG)
During a temperature reading, the average temperature read during the scan is displayed.
Maximum Temperature (MAX)
During a temperature reading, the highest temperature read during the scan is displayed.
perature Probe to an energized circuit.
Contact Temperature Measurement with
Only use
1.Insert the probe. The unit detects a connection of a K-
type probe and displays the contact temperature (CON) as the secondary measure- ment.
2 The display will continue to update the contact tem- perature (CON) while the temperature probe reaches thermal equilibrium with the
OPERATION
Minimum Temperature (MIN)
During a temperature reading,
object being measured. The display will shut off after
WARNING Always remove battery pack before changing or removing acces- sories. Only use accessories specifically recommended for this tool. Others may be hazardous.
Scanning Object IR Temperature
1.Pull and hold the trigger for at least 2 seconds and scan the surface temperature of an object. A laser pointer indicates the center of the circular area being scanned.
NOTE: The object should be larger than the spot being scanned. If not, readings will be affected. See Distance To Spot for necessary object size.
2.As you continue to hold
the trigger, the icon ![]() is displayed along with the sur- face temperature (primary measurement) along with any selected mode readings (secondary measurement).
is displayed along with the sur- face temperature (primary measurement) along with any selected mode readings (secondary measurement).
3.Release the trigger. HOLD is displayed until the screen shuts off in about seven sec- onds.
NOTE: A quick change in tem- perature affects the unit’s read- ings. Allow unit to reach ambient temperature before use.
the lowest temperature read during the scan is displayed.
Humidity (HUM)-2277-20 only
During a temperature reading, the relative humidity (RH%) read during the scan is displayed. The relative humidity is taken at the meter, not at the point of the temperature reading.
Dew Point Temperature (DEW)
about 20 minutes.
3. To take an IR reading while using the
the trigger. The IR reading is displayed as the primary measurement.
4If set, the alarm will alert for the contact tem- perature when the sensor probe is installed.
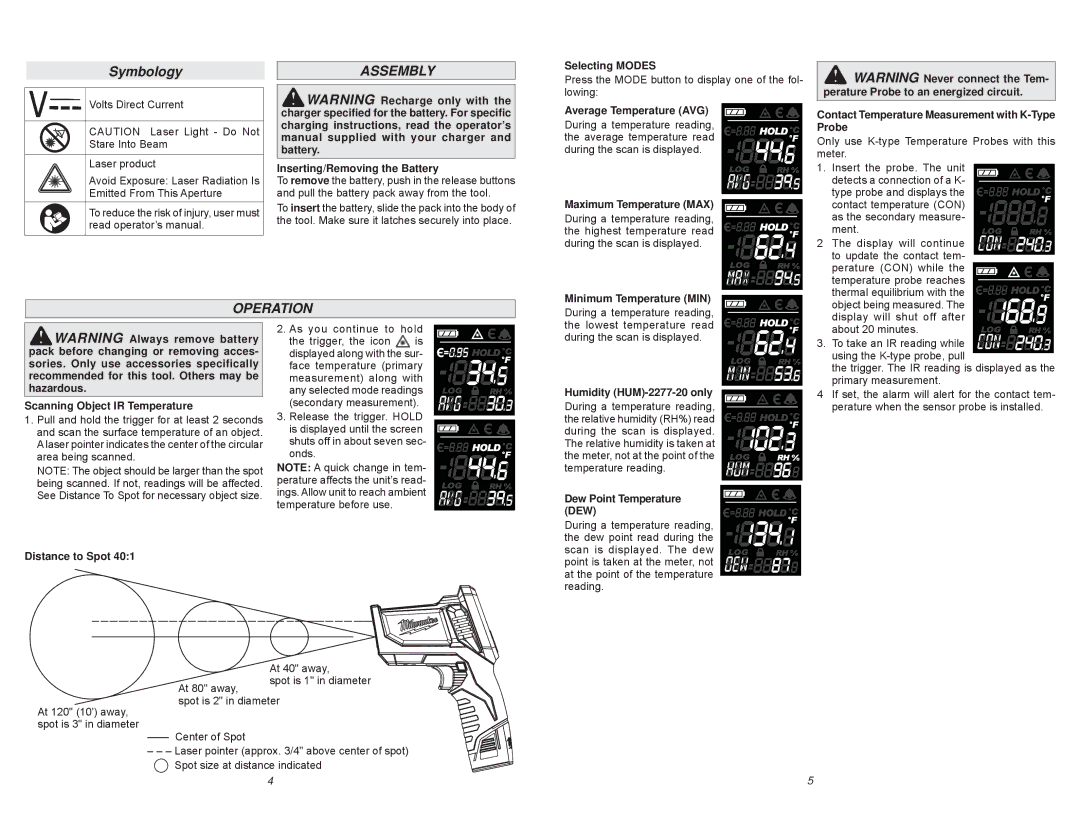
Distance to Spot 40:1
At 80" away,
At 40" away,
spot is 1" in diameter
During a temperature reading, the dew point read during the scan is displayed. The dew point is taken at the meter, not at the point of the temperature reading.
spot is 2" in diameter
At 120" (10') away, spot is 3" in diameter
– – – Laser pointer (approx. 3/4" above center of spot)
Spot size at distance indicated
4 | 5 |