IMPORTANT SAFETY INSTRUCTIONS
WARNING READ ALL SAFETY WARNINGS AND INSTRUCTIONS. Failure to follow
the warnings and instructions may result in electric shock, fire and/or serious injury.
Save these instructions - This operator’s manual contains important safety and operating instructions for the MILWAUKEE M12
Specifications
Metal Mode depth accuracy: ±0.5" at 0.5" up to 6.0" depth
Metal Mode center accuracy: ±0.5" at 0.5" up to 6.0" depth
Stud Mode center accuracy: ±0.5" at 0.5" up to 1.5" depth
Drop test: 1 meter
Operating temperature:
Storage temperature:
Voltage: 12 DC
Battery run time: Greater than 12 hrs with all functions
METAL Mode
In metal mode, the
WORK AREA SAFETY
•Avoid dangerous environments. Do not use in rain, snow, damp or wet locations. Do not use in the presence of explosive atmospheres (gaseous fumes, dust or flammable materials) because sparks may be generated when inserting or remov- ing battery pack, possibly causing fire.
PERSONAL SAFETY
•Stay alert, watch what you are doing and use common sense when operating the
•Do not overreach. Keep proper footing and balance at all times. This enables better control in unexpected situations.
BATTERY USE AND CARE
•Recharge only with the charger specified by the manufacturer. A charger that is suitable for one type of battery pack may create a risk of fire when used with another battery pack.
•Use power tools only with specifically desig- nated battery packs. Use of any other battery packs may create a risk of injury and fire.
•When battery pack is not in use, keep it away from other metal objects like paper clips, coins, keys, nails, screws, or other small metal objects that can make a connection from one terminal to another. Shorting the battery termi- nals together may cause burns or a fire.
•Under abusive conditions, liquid may be eject- ed from the battery, avoid contact. If contact accidentally occurs, flush with water. If liquid contacts eyes, additionally seek medical help. Liquid ejected from the battery may cause irritation or burns.
SERVICE
•Have your
•Do not disassemble. Incorrect reassembly may result in the risk of electric shock or fire. If it is dam- aged, take it to a MILWAUKEE service facility.
•Store in a cool, dry place. Do not store where temperatures may exceed 140°F (60°C) such as in direct sunlight, a vehicle or metal building during the summer.
•Do not remove or deface labels. Maintain labels and nameplates. These carry important information. If unreadable or missing, contact a MILWAUKEE service facility for a free replacement.
SYMBOLOGY
Direct Current
Federal Communications
Commission
Read Operator’s Manual
Federal Communications Commission
WARNING: Changes or modifications to this unit not ex- pressly approved by the party responsible for compliance could void the user’s authority to operate the equipment. This equipment has been tested and found to comply with the limits for a Class B digital device, pursuant to Part 15 of the FCC Rules. These limits are designed to provide reasonable protection against harmful interference in a residential installation. This equipment generates, uses and can radiate radio frequency energy and, if not installed and used in accordance with the instructions, may cause harmful interference to radio communications.
However, there is no guarantee that interference will not occur in a particular installation. If this equipment does cause harmful interference to radio or television reception, which can be determined by turning the equipment off and on, the user is encouraged to try to correct the interference by one or more of the following measures:
•Reorient or relocate the receiving antenna.
•Increase the separation between the equipment and receiver.
•Connect the equipment into an outlet on a circuit different from that to which the receiver is connected.
•Consult the dealer or an experienced radio/TV technician for help.
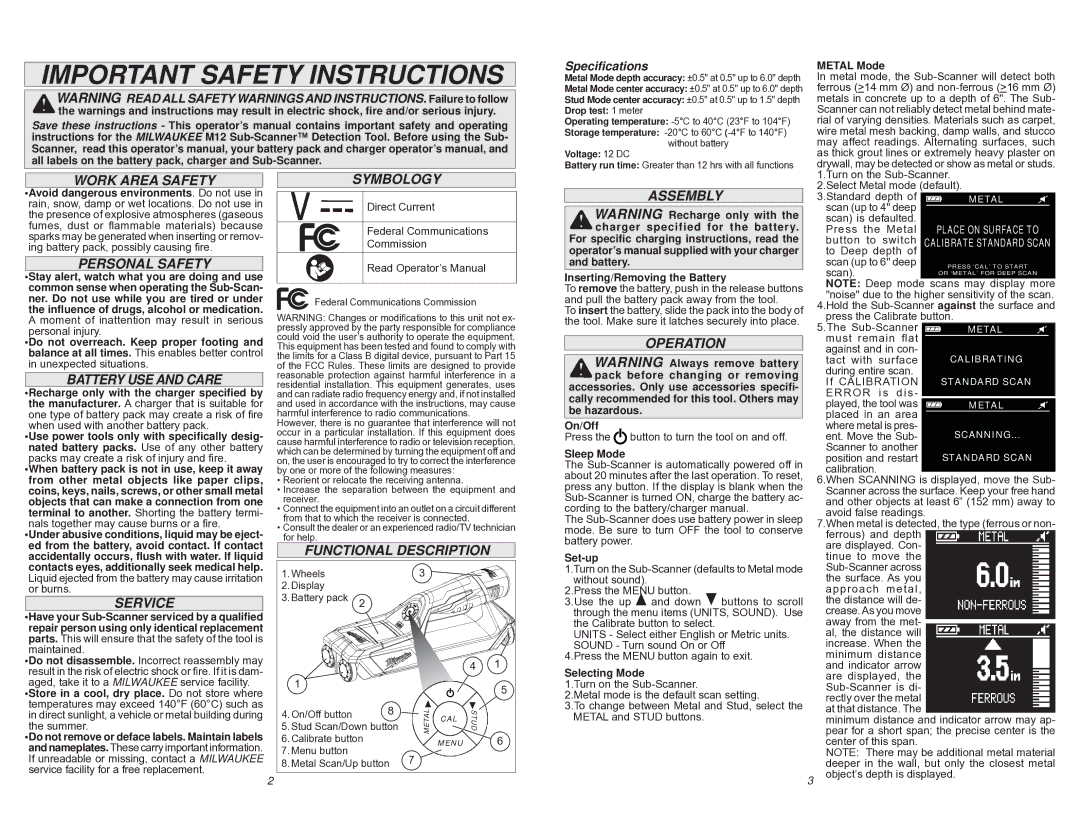
FUNCTIONAL DESCRIPTION
1. Wheels |
| 3 |
|
|
|
2. Display |
|
|
|
|
|
3. Battery pack | 2 |
|
|
|
|
|
|
|
| 4 | 1 |
1 |
|
|
|
| 5 |
|
|
|
|
| |
4. On/Off button | 8 | METAL | CAL | STUD |
|
5. Stud Scan/Down button |
| 6 | |||
6. Calibrate button |
| MENU |
| ||
7. Menu button |
| 7 |
|
|
|
8. Metal Scan/Up button |
|
|
| ||
2
ASSEMBLY
WARNING Recharge only with the charger specified for the battery.
For specific charging instructions, read the operator’s manual supplied with your charger and battery.
Inserting/Removing the Battery
To remove the battery, push in the release buttons and pull the battery pack away from the tool.
To insert the battery, slide the pack into the body of the tool. Make sure it latches securely into place.
OPERATION
WARNING Always remove battery pack before changing or removing accessories. Only use accessories specifi- cally recommended for this tool. Others may
be hazardous.
On/Off
Press the ![]() button to turn the tool on and off.
button to turn the tool on and off.
Sleep Mode
The
The
Set-up
1.Turn on the
2.Press the MENU button.
3.Use the up and down buttons to scroll through the menu items (UNITS, SOUND). Use the Calibrate button to select.
UNITS - Select either English or Metric units. SOUND - Turn sound On or Off
4.Press the MENU button again to exit.
Selecting Mode
1.Turn on the
2.Metal mode is the default scan setting.
3.To change between Metal and Stud, select the METAL and STUD buttons.
1.Turn on the
scan (up to 4" deep scan) is defaulted. Press the Metal button to switch to Deep depth of scan (up to 6" deep scan).
NOTE: Deep mode scans may display more "noise" due to the higher sensitivity of the scan.
4.Hold the
5.The
tact with surface during entire scan. If CALIBRATION ERROR is dis -
played, the tool was placed in an area
where metal is pres- ent. Move the Sub- Scanner to another position and restart calibration.
6.When SCANNING is displayed, move the Sub- Scanner across the surface. Keep your free hand and other objects at least 6” (152 mm) away to avoid false readings.
7.When metal is detected, the type (ferrous or non- ferrous) and depth
are displayed. Con- tinue to move the
minimum distance and indicator arrow may ap- pear for a short span; the precise center is the center of this span.
NOTE: There may be additional metal material deeper in the wall, but only the closest metal
3object’s depth is displayed.