TOOL ASSEMBLY

WARNING!

To reduce the risk of injury, always unplug tool before attaching or removing accessories or mak- ing adjustments. Use only specifically recom- mended accessories. Others may be hazardous.

Selecting Blade

Always use sharp blades. Dull blades tend to overload the tool and increase the chance of KICKBACK (see "Causes and Operator Preven- tion of Kickback"). Only use blades with a maximum safe operating speed greater than the no load RPM marked on the tool's nameplate. Read the blade manufacturer's instructions before use.

Installing and Removing Blades on 7-1/4" & 8-1/4" Saws (Fig. 1 & 2)

1.Unplug tool before installing or removing blades.

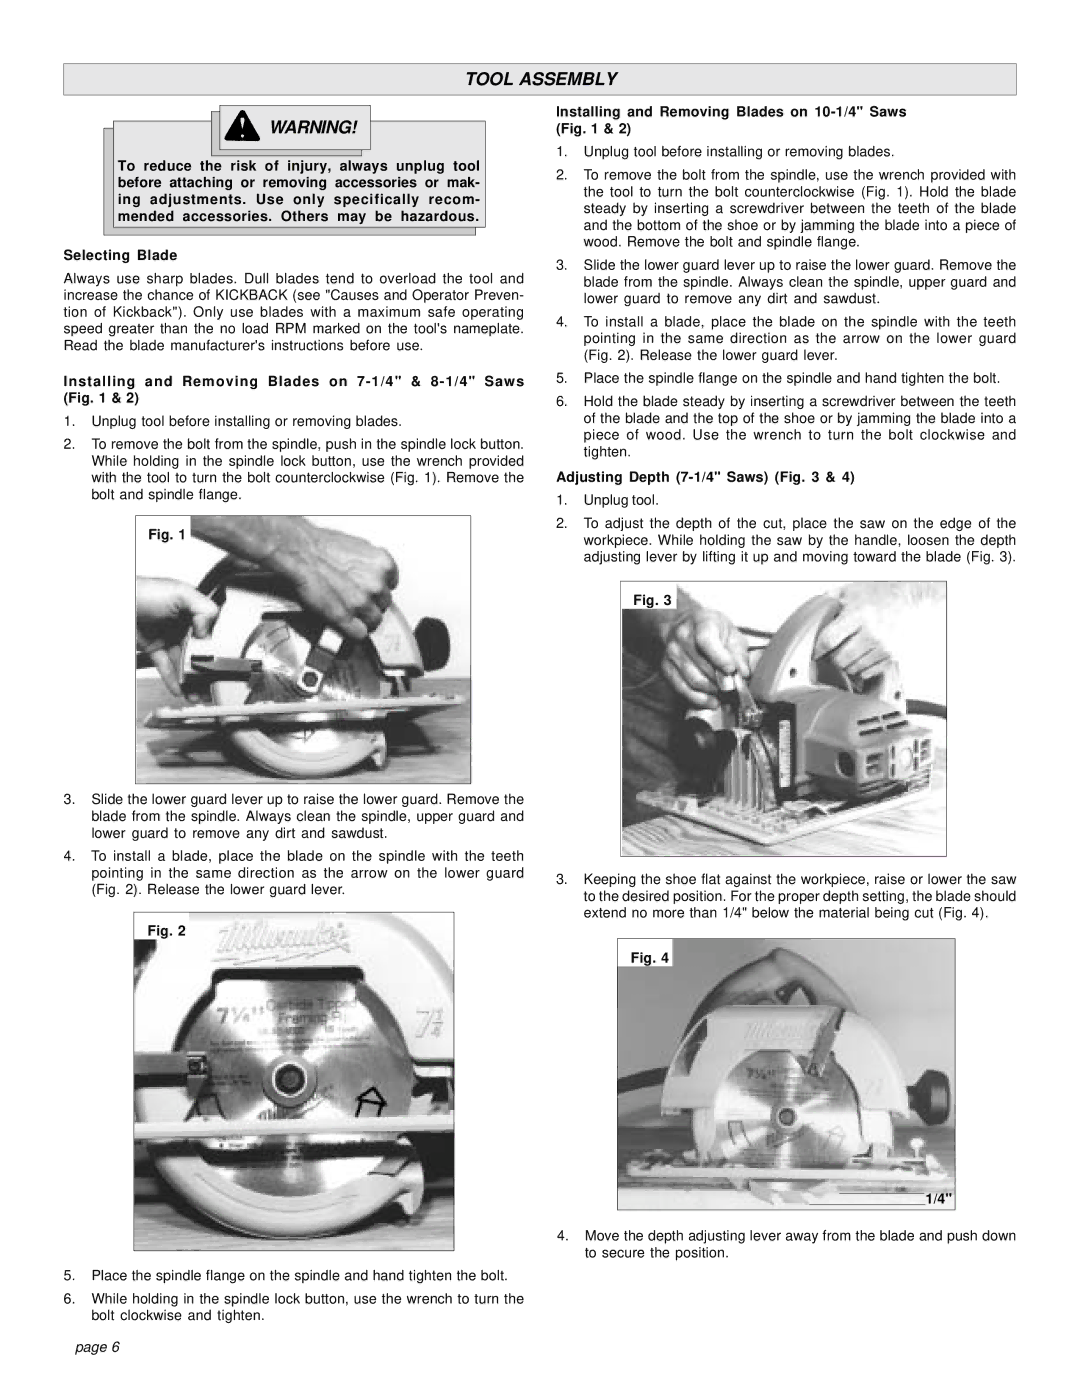
2.To remove the bolt from the spindle, push in the spindle lock button. While holding in the spindle lock button, use the wrench provided with the tool to turn the bolt counterclockwise (Fig. 1). Remove the bolt and spindle flange.

Fig. 1

3.Slide the lower guard lever up to raise the lower guard. Remove the blade from the spindle. Always clean the spindle, upper guard and lower guard to remove any dirt and sawdust.

4.To install a blade, place the blade on the spindle with the teeth pointing in the same direction as the arrow on the lower guard (Fig. 2). Release the lower guard lever.

Fig. 2

5.Place the spindle flange on the spindle and hand tighten the bolt.

6.While holding in the spindle lock button, use the wrench to turn the bolt clockwise and tighten.

Installing and Removing Blades on 10-1/4" Saws (Fig. 1 & 2)

1.Unplug tool before installing or removing blades.

2.To remove the bolt from the spindle, use the wrench provided with the tool to turn the bolt counterclockwise (Fig. 1). Hold the blade steady by inserting a screwdriver between the teeth of the blade and the bottom of the shoe or by jamming the blade into a piece of wood. Remove the bolt and spindle flange.

3.Slide the lower guard lever up to raise the lower guard. Remove the blade from the spindle. Always clean the spindle, upper guard and lower guard to remove any dirt and sawdust.

4.To install a blade, place the blade on the spindle with the teeth pointing in the same direction as the arrow on the lower guard (Fig. 2). Release the lower guard lever.

5.Place the spindle flange on the spindle and hand tighten the bolt.

6.Hold the blade steady by inserting a screwdriver between the teeth of the blade and the top of the shoe or by jamming the blade into a piece of wood. Use the wrench to turn the bolt clockwise and tighten.

Adjusting Depth (7-1/4" Saws) (Fig. 3 & 4)

1.Unplug tool.

2.To adjust the depth of the cut, place the saw on the edge of the workpiece. While holding the saw by the handle, loosen the depth adjusting lever by lifting it up and moving toward the blade (Fig. 3).

Fig. 3

3.Keeping the shoe flat against the workpiece, raise or lower the saw to the desired position. For the proper depth setting, the blade should extend no more than 1/4" below the material being cut (Fig. 4).

Fig. 4

1/4"

4.Move the depth adjusting lever away from the blade and push down to secure the position.

page 6

Page 6
Image 6
Milwaukee 6376-20, 6460 Tool Assembly, Installing and Removing Blades on 7-1/4 & 8-1/4 Saws, Adjusting Depth 7-1/4 Saws

6405-6, 6376-20, 6375-20, 6460 specifications

Milwaukee has long been a trusted name in power tools, and its line of cordless tools continues to push the boundaries of performance and efficiency. Among their impressive catalog, models Milwaukee 6460, 6375-20, 6376-20, and 6405-6 stand out as prime examples of cutting-edge technology and user-centric design.

The Milwaukee 6460, also known as the M18 FUEL 1/2” Hammer Drill/Driver, is a powerhouse designed for professional contractors. It boasts a brushless motor that delivers up to 1,200 in-lbs of torque, making it perfect for heavy-duty applications. One of its main features is the REDLINK PLUS intelligence, which provides advanced overload protection and ensures optimal performance under load. With a compact design, it enhances maneuverability in tight spaces, an essential trait for any job site.

Next is the Milwaukee 6375-20, a 7-1/4” circular saw that enables users to achieve straight, accurate cuts in a range of materials. It features a powerful 15-amp motor that produces up to 5,800 RPM, allowing for fast and efficient cutting. The saw’s magnesium construction contributes to its lightweight yet durable design, reducing user fatigue while ensuring longevity. Additionally, the electric brake enhances safety by stopping the blade quickly after release of the trigger.

The Milwaukee 6376-20 is known for its versatility as a 7-1/4” rear handle circular saw. This model offers a similar powerful motor but is engineered for different cutting orientations. Its ergonomic design, along with an integrated rafter hook, makes it ideal for use in framing and roofing applications. Furthermore, the LED light ensures visibility in poorly lit conditions, enabling precise cuts no matter where the job takes you.

Lastly, the Milwaukee 6405-6 band saw is engineered for efficient cutting of metal and other materials, featuring a variable speed control that allows users to adjust the saw speed between 0-200 FPM depending on the material being cut. Its lightweight design and carrying handle make it easily portable, making it a go-to tool for contractors who need to cut on the go. The integrated LED work light adds another layer of convenience, ensuring proper visibility during operations.

In summary, Milwaukee 6460, 6375-20, 6376-20, and 6405-6 embody the brand’s commitment to producing high-quality, high-performance tools that meet the demands of professionals. Their innovative technologies and thoughtful designs enhance user experience while ensuring durability and efficiency on the job site. Whether you are drilling, cutting, or slicing through materials, Milwaukee offers tools that deliver unmatched reliability.