Hook and Loop Pads (Fig. 4)
Hook & loop pads are available in both wool/polyester and foam. Foam pads should be used on slower/low speed dial settings when using polisher Cat. Nos. 5540 and 5460. Foam pads are not recommended for the inexperienced operator.
Foam pad Cat. No.
Foam pad Cat. No.
Backing |
|
| Recommended | |
Pad | Hook & Loop Pad | Application | Surface | |
|
| Compounding | Paints, clearcoats | |
|
| 100% Wool Pad | High Gloss | and fiberglass |
|
| Finishing | Paints or clearcoats | |
|
| Wool Blend Pad | Compounding |
|
|
| High Gloss | Clearcoat | |
|
| Finishing | Clearcoat | |
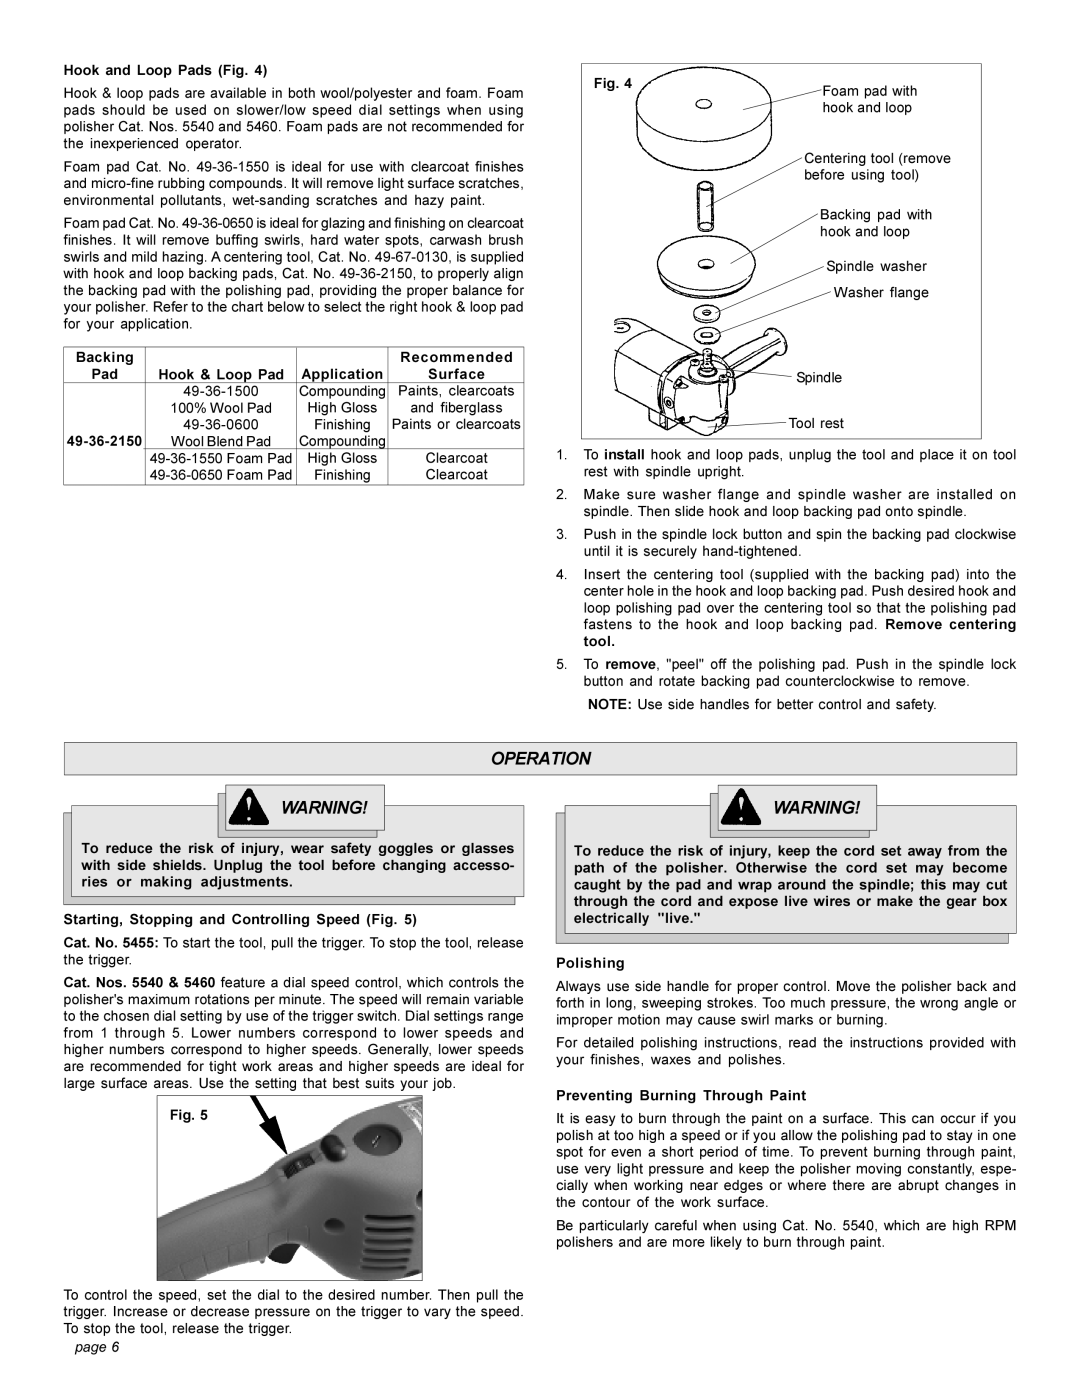
Fig. 4 | Foam pad with |
| |
| hook and loop |
Centering tool (remove before using tool)
Backing pad with hook and loop
Spindle washer
Washer flange
Spindle
Tool rest
1.To install hook and loop pads, unplug the tool and place it on tool rest with spindle upright.
2.Make sure washer flange and spindle washer are installed on spindle. Then slide hook and loop backing pad onto spindle.
3.Push in the spindle lock button and spin the backing pad clockwise until it is securely
4.Insert the centering tool (supplied with the backing pad) into the center hole in the hook and loop backing pad. Push desired hook and loop polishing pad over the centering tool so that the polishing pad fastens to the hook and loop backing pad. Remove centering tool.
5.To remove, "peel" off the polishing pad. Push in the spindle lock button and rotate backing pad counterclockwise to remove.
NOTE: Use side handles for better control and safety.
OPERATION
![]()
![]()
![]() WARNING!
WARNING!
To reduce the risk of injury, wear safety goggles or glasses with side shields. Unplug the tool before changing accesso- ries or making adjustments.
Starting, Stopping and Controlling Speed (Fig. 5)
Cat. No. 5455: To start the tool, pull the trigger. To stop the tool, release the trigger.
Cat. Nos. 5540 & 5460 feature a dial speed control, which controls the polisher's maximum rotations per minute. The speed will remain variable to the chosen dial setting by use of the trigger switch. Dial settings range from 1 through 5. Lower numbers correspond to lower speeds and higher numbers correspond to higher speeds. Generally, lower speeds are recommended for tight work areas and higher speeds are ideal for large surface areas. Use the setting that best suits your job.
Fig. 5
To control the speed, set the dial to the desired number. Then pull the trigger. Increase or decrease pressure on the trigger to vary the speed. To stop the tool, release the trigger.
![]()
![]()
![]() WARNING!
WARNING!
To reduce the risk of injury, keep the cord set away from the path of the polisher. Otherwise the cord set may become caught by the pad and wrap around the spindle; this may cut through the cord and expose live wires or make the gear box electrically "live."
Polishing
Always use side handle for proper control. Move the polisher back and forth in long, sweeping strokes. Too much pressure, the wrong angle or improper motion may cause swirl marks or burning.
For detailed polishing instructions, read the instructions provided with your finishes, waxes and polishes.
Preventing Burning Through Paint
It is easy to burn through the paint on a surface. This can occur if you polish at too high a speed or if you allow the polishing pad to stay in one spot for even a short period of time. To prevent burning through paint, use very light pressure and keep the polisher moving constantly, espe- cially when working near edges or where there are abrupt changes in the contour of the work surface.
Be particularly careful when using Cat. No. 5540, which are high RPM polishers and are more likely to burn through paint.
page 6