BASIC RECORDING
SETTING THE CAMERA TO RECORD IMAGES AUTOMATICALLY
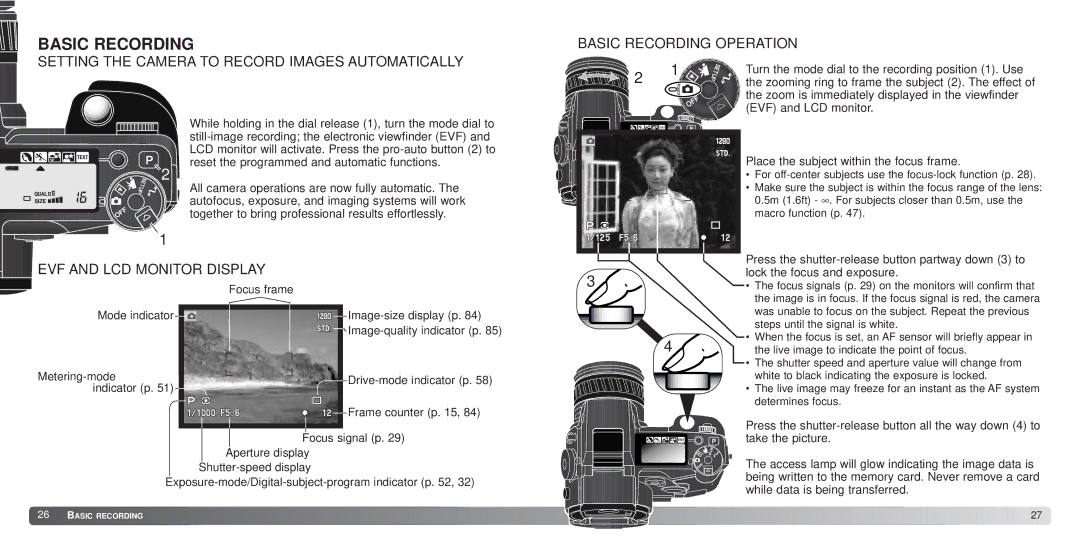
While holding in the dial release (1), turn the mode dial to
2
All camera operations are now fully automatic. The autofocus, exposure, and imaging systems will work together to bring professional results effortlessly.
1
BASIC RECORDING OPERATION | ||
2 | 1 | Turn the mode dial to the recording position (1). Use |
| the zooming ring to frame the subject (2). The effect of | |
|
| the zoom is immediately displayed in the viewfinder |
|
| (EVF) and LCD monitor. |
|
| Place the subject within the focus frame. |
|
| • For |
|
| • Make sure the subject is within the focus range of the lens: |
|
| 0.5m (1.6ft) - ∞ . For subjects closer than 0.5m, use the |
|
| macro function (p. 47). |
EVF AND LCD MONITOR DISPLAY
Focus frame
3
Press the
• The focus signals (p. 29) on the monitors will confirm that |
the image is in focus. If the focus signal is red, the camera |
was unable to focus on the subject. Repeat the previous |
Mode indicator ![]()
![]()
![]()
![]()
![]()


Image-quality indicator (p. 85)
![]()
![]()
![]()
![]() Frame counter (p. 15, 84)
Frame counter (p. 15, 84)
Focus signal (p. 29)
4 |
steps until the signal is white. |
• When the focus is set, an AF sensor will briefly appear in |
the live image to indicate the point of focus. |
• The shutter speed and aperture value will change from |
white to black indicating the exposure is locked. |
• The live image may freeze for an instant as the AF system |
determines focus. |
Press the
Aperture display
26BASIC RECORDING
The access lamp will glow indicating the image data is being written to the memory card. Never remove a card while data is being transferred.
![]()
![]()
![]()
![]()
![]()
![]()
![]()
![]()
![]()
![]()
![]()
![]()
![]()
![]()
![]()
![]()
![]()
![]()
![]()
![]()
![]()
![]()
![]()
![]()
![]()
![]()
![]()
![]()
![]()
![]()
![]()
![]()
![]()
![]()
![]()
![]()
![]()
![]()
![]()
![]()
![]()
![]()
![]()
![]()
![]()
![]()
![]()
![]()
![]()
![]()
![]()
![]()
![]()
![]()
![]()
![]()
![]()
![]()
![]()
![]()
![]()
![]()
![]()
![]()
![]()
![]()
![]()
![]()
![]()
![]()
![]()
![]()
![]()
![]()
![]()
![]()
![]()
![]()
![]()
![]()
![]()
![]()
![]()
![]()
![]()
![]()
![]()
![]()
![]()
![]()
![]()
![]()
![]()
![]()
![]()
![]()
![]()
![]()
![]()
![]() 27
27 ![]()
