SETTING THE DATE AND TIME
After initially inserting a memory card and battery, the camera’s clock and calendar must be set. When images are recorded, the image data is saved with the date and time of recording. Depending on the region, the menu language may also have to be set. To change the language, see the camera notes on the following page.
Turn the mode dial on the top of the camera to the setup position. The camera will turn on and the setup menu will be displayed.
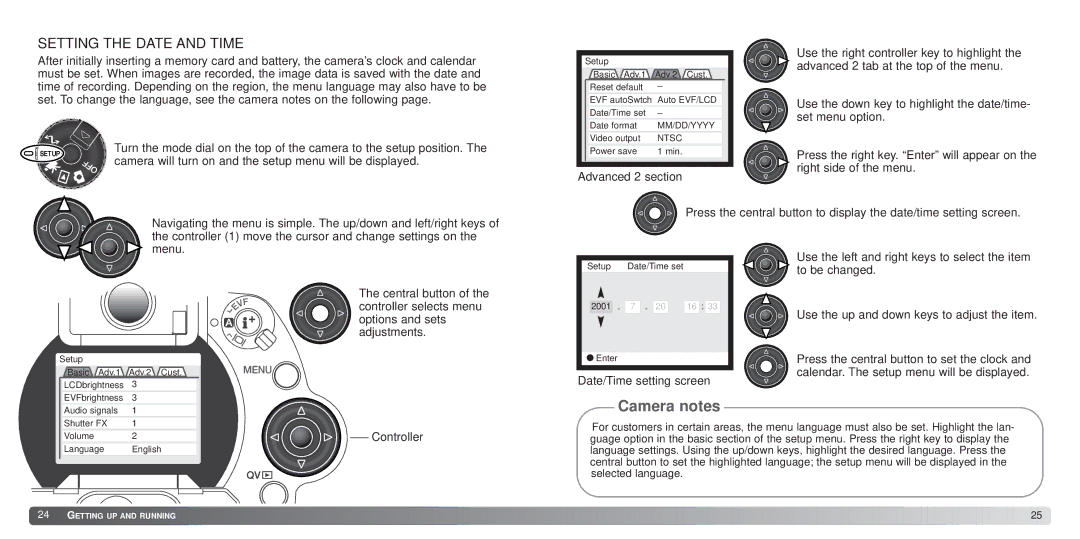
Setup |
|
|
|
Basic | Adv.1 | Adv.2 | Cust. |
Reset default | – |
| |
EVF autoSwtch | Auto EVF/LCD | ||
Date/Time set | – |
| |
Date format | MM/DD/YYYY | ||
Video output | NTSC |
| |
Power save | 1 min. |
| |
Advanced 2 section
Use the right controller key to highlight the advanced 2 tab at the top of the menu.
Use the down key to highlight the date/time- set menu option.
Press the right key. “Enter” will appear on the right side of the menu.
Press the central button to display the date/time setting screen.
Navigating the menu is simple. The up/down and left/right keys of the controller (1) move the cursor and change settings on the menu.
The central button of the controller selects menu options and sets adjustments.
Setup
Basic Adv.1 Adv.2 Cust.
LCDbrightness 3
Setup | Date/Time set |
|
|
|
| |||||
|
| . |
| . |
|
|
| : |
|
|
2001 | 7 | 20 | 16 | 33 | ||||||
Enter
Date/Time setting screen
Use the left and right keys to select the item to be changed.
Use the up and down keys to adjust the item.
Press the central button to set the clock and calendar. The setup menu will be displayed.
EVFbrightness 3
Audio signals | 1 |
|
Shutter FX | 1 |
|
Volume | 2 | Controller |
Language | English |
|
Camera notes
For customers in certain areas, the menu language must also be set. Highlight the lan- guage option in the basic section of the setup menu. Press the right key to display the language settings. Using the up/down keys, highlight the desired language. Press the central button to set the highlighted language; the setup menu will be displayed in the selected language.
![]() 24
24![]()
![]() GETTING UP AND RUNNING
GETTING UP AND RUNNING![]()
![]()
![]()
![]()
![]()
![]()
![]()
![]()
![]()
![]()
![]()
![]()
![]()
![]()
![]()
![]()
![]()
![]()
![]()
![]()
![]()
![]()
![]()
![]()
![]()
![]()
![]()
![]()
![]()
![]()
![]()
![]()
![]()
![]()
![]()
![]()
![]()
![]()
![]()
![]()
![]()
![]()
![]()
![]()
![]()
![]()
![]()
![]()
![]()
![]()
![]()
![]()
![]()
![]()
![]()
![]()
![]()
![]()
![]()
![]()
![]()
![]()
![]()
![]()
![]()
![]()
![]()
![]()
![]()
![]()
![]()
![]()
![]()
![]()
![]()
![]()
![]()
![]()
![]()
![]()
![]()
![]()
![]()
![]()
![]()
![]()
![]()
![]()
![]()
![]() 25
25 ![]()