Manuals
/
Mitsubishi Electronics
/
Computer Equipment
/
Projector
Mitsubishi Electronics
LVP-X120A
user manual
Picture adjustment, Adjustment from personal computer
Models:
LVP-X120A
1
20
44
44
Download
44 pages
42.87 Kb
17
18
19
20
21
22
23
24
Troubleshooting
Specifications
Install
Control command diagram
to the type of the signal
indicators
Maintenance
Command reference For Windows
Battery installation
adjustment foot right and left
Page 20
Image 20
Page 19
Page 21
Page 20
Image 20
Page 19
Page 21
Contents
X120
LCD Projector User Manual
MODEL LVP-X120A
ENGLISH FRANÇAIS ESPAÑOL APPENDIX
DO NOT REMOVE COVER OR BACK NO USER-SERVICEABLE PARTS INSIDE
REFER SERVICING TO QUALIFIED SERVICE PERSONNEL
RISK OF ELECTRIC SHOCK DO NOT OPEN
CAUTION TO REDUCE THE RISK OF ELECTRIC SHOCK
Contents
Trademark, Registered trademark
Important safeguards
Unplug immediately if there is something wrong with your projector
Never remove the cabinet
Do not modify this equipment
If you break or drop the cabinet
remote control sensor Front / Rear
power
indicators
Overview of the projector
adjustment foot up and down filter cover
adjustment foot right and left
Front lamp lid
MAIN power
Overview of the remote control
About laser beam
power input source auto position
+, - volume
Battery installation
Operation area
Preparing the projector for operation
screen
Orientation of the projector
Front projection
Adjusting the angle of projection
Getting ready for projection
ground
terminal
Basic connections
Projector + AV equipment
Cables and adapters
Projector + DVD player
Projector + IBM PC or IBM PC compatibles
When outputting to both a PC monitor and the projector
desktop computer
notebook computer
Basic connections continue
Projector + Macintosh
Power Book
desktop
To operate projector power ON
LAMP
TEMP
CARD
To operate projector power ON continue
Turning off the projector
The volume from the speaker
AUTO POSITION button
Menu operation
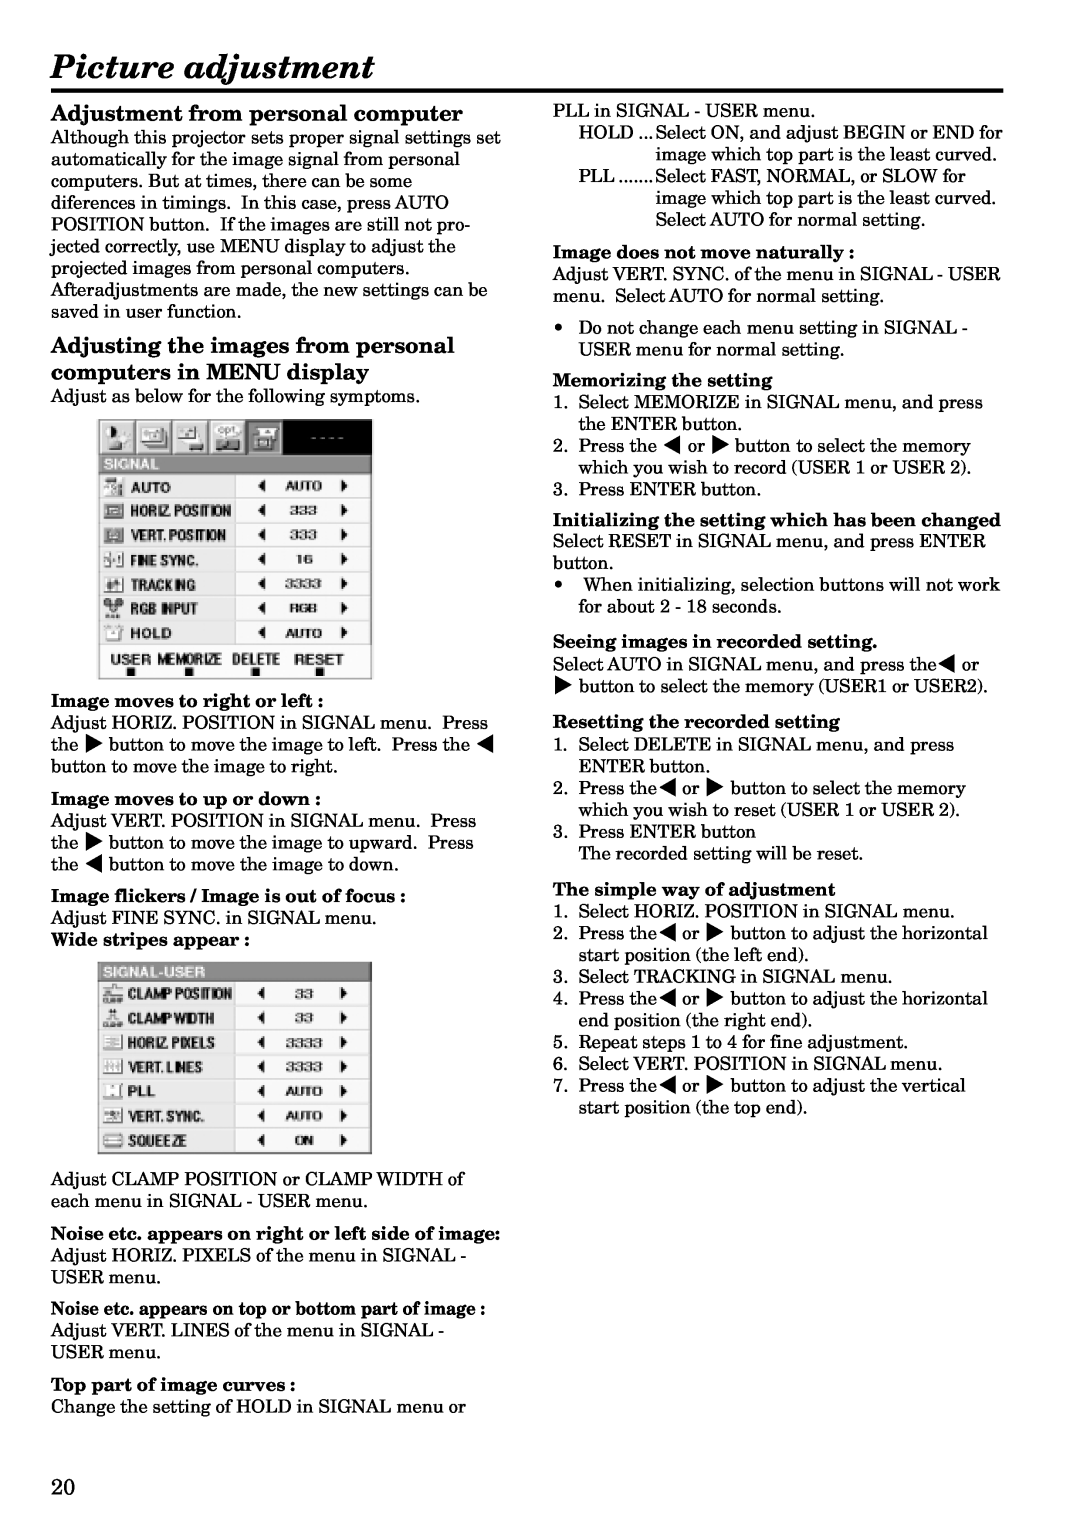
Basic operation
Setting range is different according
to the type of the signal
Menu setting continue
3 INSTALLATION
1 PICTURE
2 PRESENTATION
5 SIGNAL
Picture adjustment
Adjustment from personal computer
Adjusting the images from personal computers in MENU display
Memorizing the setting
Specification of RGB signals in each computer mode of the projector
Advanced feature for presentation
Expand
Still
Setting the Expand mode
PC-CARD
Using the PC-CARD
Setting up the PC-CARD
During PC-CARD playback, the sound is switched off
PC-CARD Continue
Advanced feature with PC
Installation of software
PCV PC Card Viewer
Environment
Command reference For Windows
Advanced feature with PC Continue
Starting up PCV For Windows
Recording the image For Windows
Editing the presentation For Windows
Delete the image
Sequencing A. Exchange images
Preview an image
Command reference
Starting up PCV For Macintosh
Recording the image For Macintosh
Editing the presentation For Macintosh
Mouse remote control
Connection
Operation
Projector + IBM PC or IBM PC compatibles
Replacement of a light source lamp
The life of the lamp
How to reset the operation time meter
Maintenance
Cleaning the air-filter
Cleaning the projector and the ventilation slots
Cleaning the lens
Troubleshooting
PROBLEMS
POSSIBLE SOLUTIONS
CAUSE
ENTER
Indicators
SOURCE MENU
Accessories
Specifications
Replacement parts list
APPENDIX
Control this projector by using a personal computer
Connection Projector + IBM PC or IBM PC compatibles
3 Control sequence
2 Control command diagram
1 Interface
5 Remote commands
Control this projector by using a personal computer Continue
4 Operation commands
6 Warning commands
7 Reading command diagram
8 Picture adjustment commands
MITSUBISHI ELECTRONICS AMERICA, INC
5665 Plaza Drive Cypress, CA
871D269B1
Printed in Japan
Top
Page
Image
Contents