Replacing the lamp (continued)

To replace the lamp:

(b)1. Unplug the power cord.

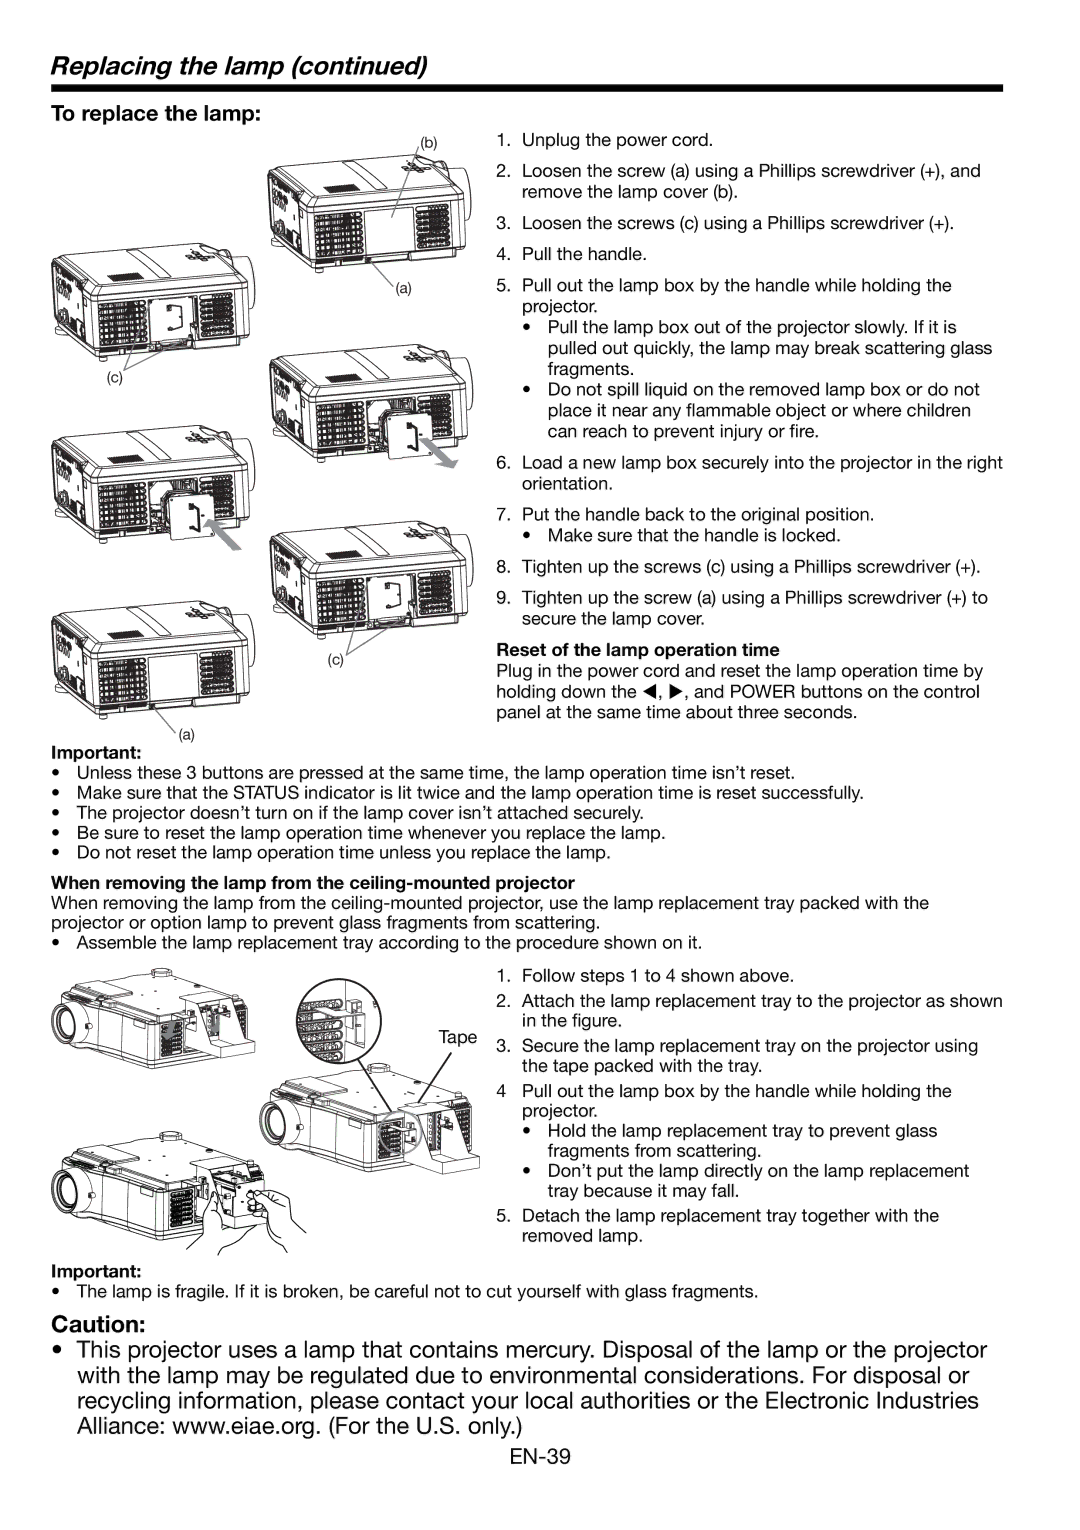
2.Loosen the screw (a) using a Phillips screwdriver (+), and remove the lamp cover (b).

3.Loosen the screws (c) using a Phillips screwdriver (+).

4.Pull the handle.

(a)

5. Pull out the lamp box by the handle while holding the


projector.


• Pull the lamp box out of the projector slowly. If it is


pulled out quickly, the lamp may break scattering glass

(c)

fragments.

• Do not spill liquid on the removed lamp box or do not


place it near any flammable object or where children


can reach to prevent injury or fire.

(c)

(a)

Important:

6.Load a new lamp box securely into the projector in the right orientation.

7.Put the handle back to the original position.

• Make sure that the handle is locked.

8.Tighten up the screws (c) using a Phillips screwdriver (+).

9.Tighten up the screw (a) using a Phillips screwdriver (+) to secure the lamp cover.

Reset of the lamp operation time

Plug in the power cord and reset the lamp operation time by holding down the W, X, and POWER buttons on the control panel at the same time about three seconds.

Unless these 3 buttons are pressed at the same time, the lamp operation time isn’t reset.

Make sure that the STATUS indicator is lit twice and the lamp operation time is reset successfully.

The projector doesn’t turn on if the lamp cover isn’t attached securely.

Be sure to reset the lamp operation time whenever you replace the lamp.

Do not reset the lamp operation time unless you replace the lamp.

When removing the lamp from the ceiling-mounted projector

When removing the lamp from the ceiling-mounted projector, use the lamp replacement tray packed with the projector or option lamp to prevent glass fragments from scattering.

Assemble the lamp replacement tray according to the procedure shown on it.

1.Follow steps 1 to 4 shown above.

2.Attach the lamp replacement tray to the projector as shown

Tape


in the figure.

3.

Secure the lamp replacement tray on the projector using


the tape packed with the tray.


4

Pull out the lamp box by the handle while holding the


projector.


• Hold the lamp replacement tray to prevent glass


fragments from scattering.


• Don’t put the lamp directly on the lamp replacement


tray because it may fall.


5.

Detach the lamp replacement tray together with the


removed lamp.

Important:

• The lamp is fragile. If it is broken, be careful not to cut yourself with glass fragments.

Caution:

This projector uses a lamp that contains mercury. Disposal of the lamp or the projector with the lamp may be regulated due to environmental considerations. For disposal or recycling information, please contact your local authorities or the Electronic Industries Alliance: www.eiae.org. (For the U.S. only.)

EN-39

Page 39
Image 39
Mitsubishi Electronics MH2850U user manual Replacing the lamp, To replace the lamp, Reset of the lamp operation time

MH2850, MH2850U specifications

The Mitsubishi Electronics MH2850U is a standout model in the projector market, designed to cater to both professional and educational environments. Its impressive set of features and advanced technologies make it a versatile tool for presentations, lectures, and even home entertainment. This projector is known for its high performance and reliability, making it a preferred choice among users.

One of the key features of the MH2850U is its native WUXGA resolution (1920 x 1200 pixels), which provides exceptional clarity and sharpness. This resolution is particularly beneficial for displaying detailed visuals, graphs, and charts, making it ideal for business presentations and educational purposes. The projector's brightness level, rated at 2,850 lumens, ensures that images remain vibrant even in well-lit environments. Users can expect sharp and vivid visuals, regardless of lighting conditions.

The MH2850U also employs advanced DLP (Digital Light Processing) technology, which enhances color accuracy and image quality. DLP projectors are known for their reliability and low maintenance needs, which adds to the MH2850U's appeal. Coupled with a high contrast ratio, the projector delivers deeper blacks and brighter whites, elevating the viewing experience significantly.

Connectivity options are another strong point of the MH2850U. It includes multiple HDMI ports, allowing users to connect various devices such as laptops, Blu-ray players, and streaming devices easily. Additionally, it features USB and VGA ports, providing flexibility for different multimedia applications.

The projector also supports a range of image adjustment features, including keystone correction and lens shift capabilities. These features ensure that users can effortlessly set up their presentations without the hassle of complicated adjustments. Furthermore, the auto power-off function contributes to energy efficiency, turning the projector off when it's not in use.

In terms of portability, the MH2850U is designed with user convenience in mind. Its lightweight and compact design make it easy to transport, making it an excellent choice for on-the-go professionals or educators who frequently travel between locations.

Overall, the Mitsubishi Electronics MH2850U stands out due to its combination of high resolution, brightness, connectivity, and versatility. Whether used in a classroom, conference room, or at home, this projector delivers excellent performance, making it a worthy investment for anyone in need of high-quality projection solutions.