1 Ceiling
2 Suspending bolt
3 Washer
4 Washer (Local procurement)
5 Double nuts

3. Installing the indoor unit


A


C


Fig. 3-4


Fig. 3-5


2


2


/

4


0

3

0

3


/

5


5


(inch)


2

1

-25/32


25/64


5

3


Fig. 3-6


1/4-15/32


Fig. 3-7

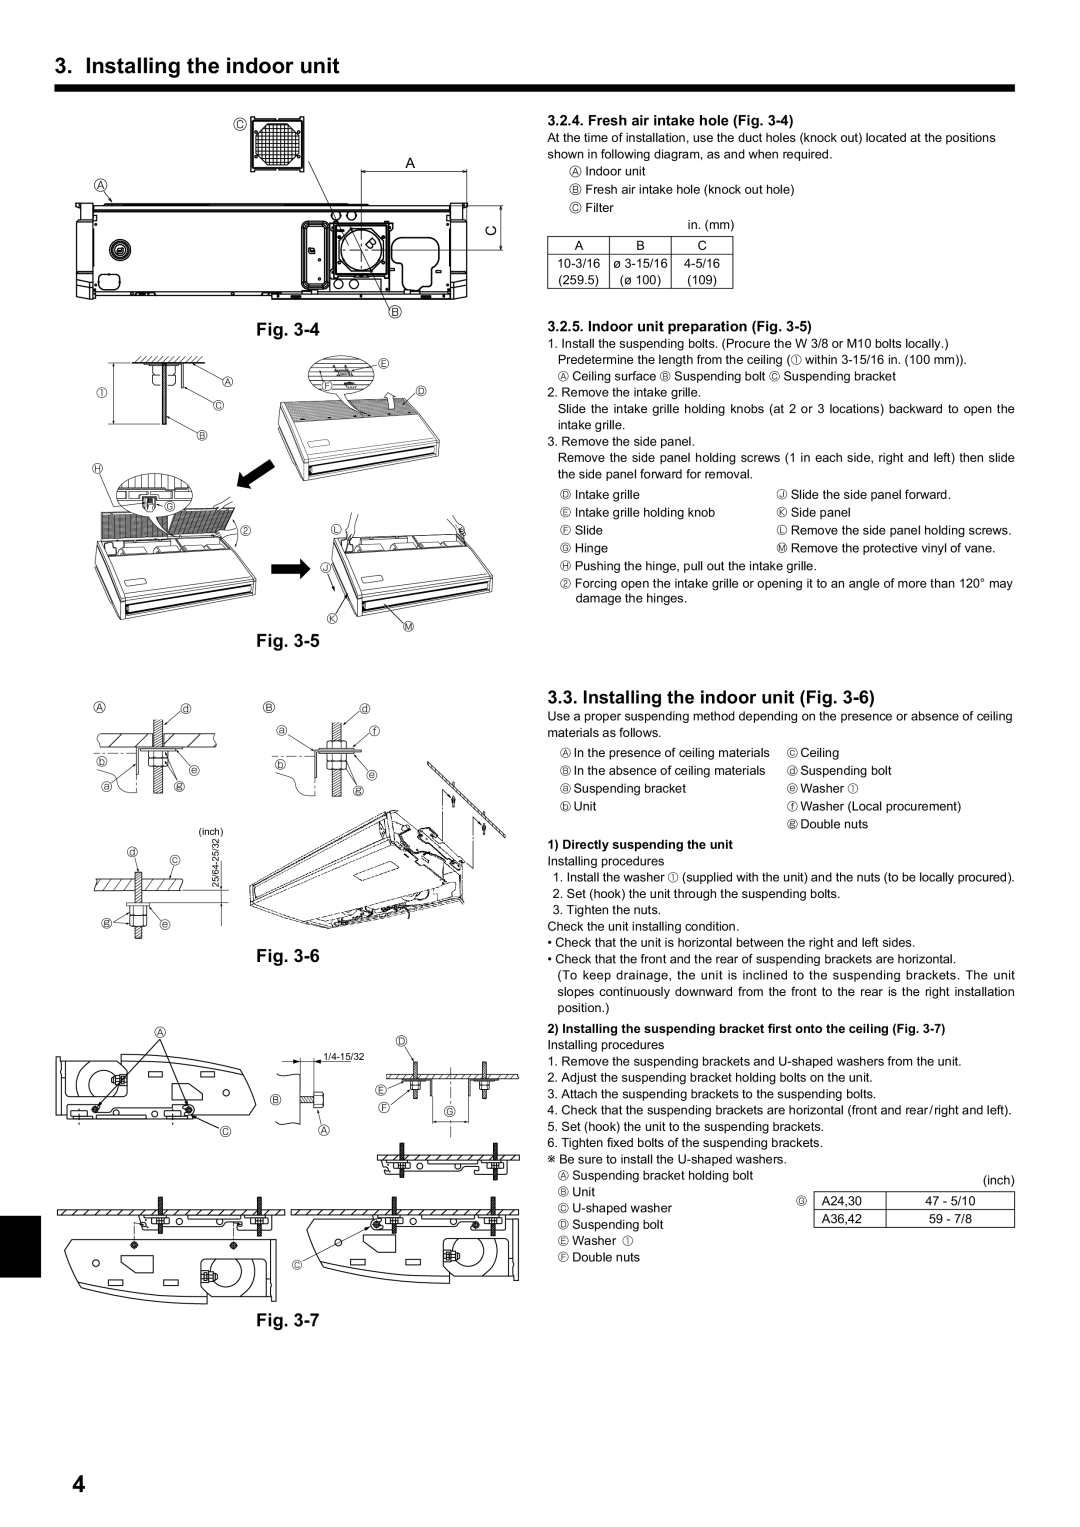
3.2.4. Fresh air intake hole (Fig. 3-4)

At the time of installation, use the duct holes (knock out) located at the positions shown in following diagram, as and when required.

Indoor unit

Fresh air intake hole (knock out hole)  Filter


in. (mm)

A

B

C

10-3/16

ø 3-15/16

4-5/16

(259.5)

(ø 100)

(109)

3.2.5. Indoor unit preparation (Fig. 3-5)

1. Install the suspending bolts. (Procure the W 3/8 or M10 bolts locally.) Predetermine the length from the ceiling ( within 3-15/16 in. (100 mm)).

Ceiling surface  Suspending bolt  Suspending bracket

2.Remove the intake grille.

Slide the intake grille holding knobs (at 2 or 3 locations) backward to open the intake grille.

3. Remove the side panel.

Remove the side panel holding screws (1 in each side, right and left) then slide the side panel forward for removal.

 Intake grille

 Slide the side panel forward.

 Intake grille holding knob

 Side panel

 Slide

 Remove the side panel holding screws.

 Hinge

Remove the protective vinyl of vane.

Pushing the hinge, pull out the intake grille.

Forcing open the intake grille or opening it to an angle of more than 120° may damage the hinges.

3.3. Installing the indoor unit (Fig. 3-6)

Use a proper suspending method depending on the presence or absence of ceiling materials as follows.

 In the presence of ceiling materials  In the absence of ceiling materials / Suspending bracket

0 Unit

1)Directly suspending the unit Installing procedures

1. Install the washer (supplied with the unit) and the nuts (to be locally procured).

2.Set (hook) the unit through the suspending bolts.

3.Tighten the nuts.

Check the unit installing condition.

Check that the unit is horizontal between the right and left sides.

Check that the front and the rear of suspending brackets are horizontal.

(To keep drainage, the unit is inclined to the suspending brackets. The unit slopes continuously downward from the front to the rear is the right installation position.)

2)Installing the suspending bracket first onto the ceiling (Fig. 3-7) Installing procedures

1. Remove the suspending brackets and U-shaped washers from the unit.

2. Adjust the suspending bracket holding bolts on the unit.

3. Attach the suspending brackets to the suspending bolts.

4. Check that the suspending brackets are horizontal (front and rear/right and left).

5. Set (hook) the unit to the suspending brackets.

6. Tighten fixed bolts of the suspending brackets. + Be sure to install the U-shaped washers.

 Suspending bracket holding bolt


(inch)

 Unit


A24,30

47 - 5/10

 U-shaped washer


A36,42

59 - 7/8

 Suspending bolt


 Washer


 Double nuts


4

Page 4
Image 4
Mitsubishi Electronics PCA-A.KA4 Installing the indoor unit Fig, Fresh air intake hole Fig, Indoor unit preparation Fig

PCA-A.KA4 specifications

The Mitsubishi Electronics PCA-A.KA4 is an advanced air conditioning unit designed to deliver exceptional comfort and efficiency in various settings. Known for its innovative technology and user-friendly design, this model is a preferred choice for both residential and commercial applications.

One of the main features of the PCA-A.KA4 is its advanced inverter technology. This system allows for variable speed operation, which means that the compressor can adjust its output based on the current cooling demand. As a result, the unit operates more efficiently, consuming less energy compared to traditional fixed-speed air conditioners. This not only reduces energy bills but also lessens the environmental impact, making the PCA-A.KA4 an eco-friendly option.

The PCA-A.KA4 also boasts a high seasonal energy efficiency ratio (SEER) rating, which indicates its effectiveness in converting electricity into cooling power over an entire season. This high efficiency is a significant advantage, particularly in regions with hot climates, where air conditioning usage is prevalent.

Another notable characteristic is the use of cutting-edge air purification technology. The PCA-A.KA4 is equipped with a multi-stage filtration system that captures dust, allergens, and other airborne particles. This feature enhances indoor air quality, ensuring that occupants breathe cleaner and healthier air, which is particularly beneficial for those with respiratory issues or allergies.

In terms of user convenience, the PCA-A.KA4 is designed with an intuitive remote control that provides easy operation from anywhere in the room. Additionally, the unit can be integrated with smart home systems, allowing for remote access and control via smartphones or tablets. This flexibility enables users to adjust settings even when they are away from home, ensuring optimal comfort at all times.

The PCA-A.KA4 also includes a quiet operation mode, minimizing noise levels to promote a peaceful environment. This feature is especially valuable in bedrooms or offices where concentration and relaxation are key.

Overall, the Mitsubishi Electronics PCA-A.KA4 represents a harmonious blend of comfort, efficiency, and smart technology. With its advanced features and user-friendly design, it stands out as a reliable air conditioning solution capable of meeting modern demands for both performance and sustainability. Whether for home or business use, the PCA-A.KA4 delivers a superior cooling experience that enhances overall well-being.