Picture Settings Menu

Storing picture settings

This function allows you to store in memory the current input signal and PICTURE menu settings and to recall these settings when necessary.

There are six picture memory locations available, and notes of up to 15 characters can be added to each.

Example: Storing picture settings at MEMORY1

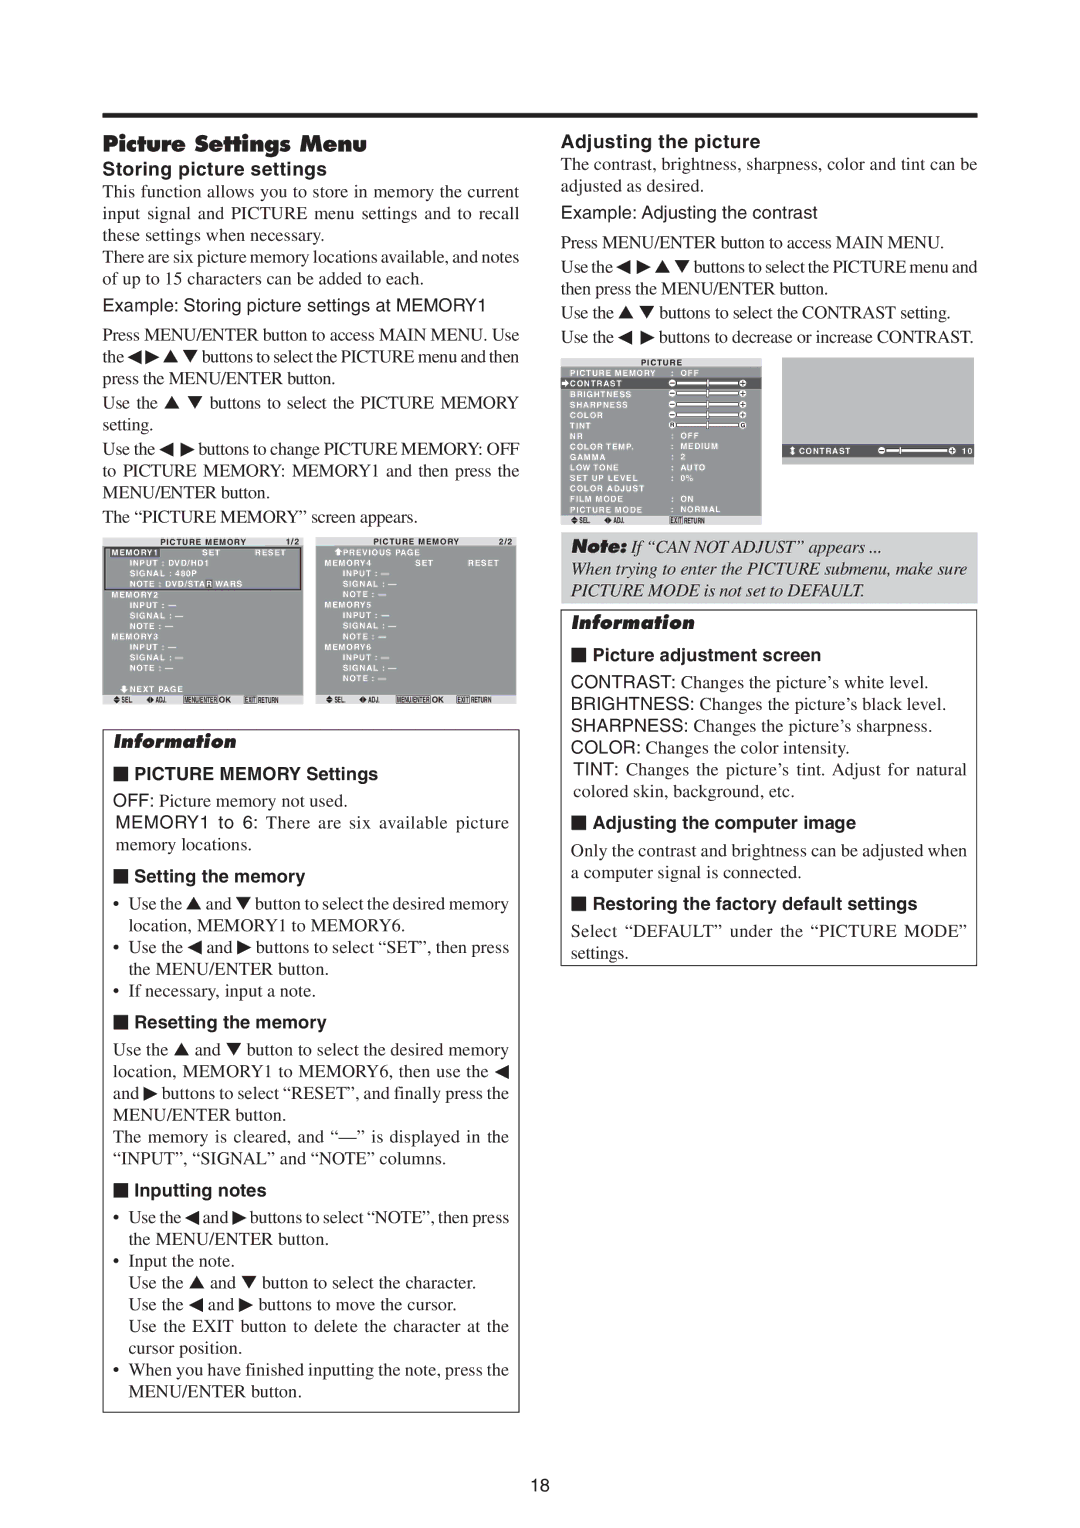
Press MENU/ENTER button to access MAIN MENU. Use the   ▲ ▼ buttons to select the PICTURE menu and then press the MENU/ENTER button.

Use the ▲ ▼ buttons to select the PICTURE MEMORY setting.

Use the   buttons to change PICTURE MEMORY: OFF

to PICTURE MEMORY: MEMORY1 and then press the MENU/ENTER button.

The “PICTURE MEMORY” screen appears.

Adjusting the picture

The contrast, brightness, sharpness, color and tint can be adjusted as desired.

Example: Adjusting the contrast

Press MENU/ENTER button to access MAIN MENU. Use the   ▲ ▼ buttons to select the PICTURE menu and then press the MENU/ENTER button.

Use the ▲ ▼ buttons to select the CONTRAST setting. Use the   buttons to decrease or increase CONTRAST.


PICTURE


PICTURE MEMORY

: OFF


CONTRAST


BRIGHTNESS


SHARPNESS


COLOR


TINT


R


G


NR


: OFF


COLOR TEMP.

: MEDIUM


CONTRAST


10

GAMMA


:

2


LOW TONE

: AUTO


SET UP LEVEL

:

0%


COLOR ADJUST


FILM MODE

: ON


PICTURE MODE

: NORMAL


SEL.

ADJ.

EXIT RETURN


PICTURE MEMORY

1/2


MEMORY1


SET

RESET


INPUT : DVD/HD1


SIGNAL : 480P


NOTE : DVD/STA

R

WARS


MEMORY2


INPUT : —


SIGNAL : —


NOTE : —


MEMORY3


INPUT : —


SIGNAL : —


NOTE : —


NEXT PAGE


SEL.

ADJ.

MENU/ENTER

OK EXIT RETURN


PICTURE MEMORY

2/2

PREVIOUS PAGE


MEMORY4

SET

RESET


INPUT : —


SIGNAL : —


NOTE : —


MEMORY5


INPUT : —


SIGNAL : —


NOTE : —


MEMORY6


INPUT : —


SIGNAL : —


NOTE : —


SEL.

ADJ.


OK

EXIT RETURN


MENU/ENTER


Note: If “CAN NOT ADJUST” appears ...

When trying to enter the PICTURE submenu, make sure PICTURE MODE is not set to DEFAULT.

Information

Picture adjustment screen

CONTRAST: Changes the picture’s white level.

BRIGHTNESS: Changes the picture’s black level.

SHARPNESS: Changes the picture’s sharpness.

Information

PICTURE MEMORY Settings

OFF: Picture memory not used.

MEMORY1 to 6: There are six available picture memory locations.

Setting the memory

Use the and button to select the desired memory location, MEMORY1 to MEMORY6.

Use the  and  buttons to select “SET”, then press the MENU/ENTER button.

If necessary, input a note.

Resetting the memory

Use the and button to select the desired memory location, MEMORY1 to MEMORY6, then use the  and  buttons to select “RESET”, and finally press the MENU/ENTER button.

The memory is cleared, and “—” is displayed in the “INPUT”, “SIGNAL” and “NOTE” columns.

Inputting notes

Use the  and  buttons to select “NOTE”, then press the MENU/ENTER button.

Input the note.

Use the and button to select the character. Use the  and  buttons to move the cursor.

Use the EXIT button to delete the character at the cursor position.

When you have finished inputting the note, press the MENU/ENTER button.

COLOR: Changes the color intensity.

TINT: Changes the picture’s tint. Adjust for natural colored skin, background, etc.

Adjusting the computer image

Only the contrast and brightness can be adjusted when a computer signal is connected.

Restoring the factory default settings

Select “DEFAULT” under the “PICTURE MODE” settings.

18

Page 27
Image 27
Mitsubishi Electronics PD-4265, PD-5065 manual Picture Settings Menu, Storing picture settings, Adjusting the picture

PD-4265, PD-5065 specifications

The Mitsubishi Electronics PD-5065 and PD-4265 are plasma display screens that have garnered attention for their exceptional picture quality, robust design, and advanced technologies. These models are popular choices for both home theater setups and professional environments, combining aesthetics with functionality.

The PD-5065 features a 50-inch display, while the PD-4265 comes with a slightly smaller 42-inch screen. One of the standout characteristics of these models is their impressive resolution. The high-definition capability provides crisp and clear images, making them ideal for watching movies, playing video games, or viewing stunning graphics in a presentation scenario. Both models support a resolution of 1366 x 768 pixels, ensuring detailed visuals that maintain clarity even during fast-paced action scenes.

A defining technology in both models is Mitsubishi's proprietary Real Color Processing, which enhances the color fidelity of the displayed images. This system ensures that colors appear more vibrant and true-to-life, providing users with an enhanced viewing experience. Additionally, the plasma screens utilize anti-reflective coatings, which minimize glare and reflections, making them suitable for various lighting conditions.

The PD-5065 and PD-4265 also incorporate high brightness levels, allowing them to perform well even in brightly lit rooms. This brightness allows for an engaging viewing experience without compromising visibility. Furthermore, the contrast ratio of 4000:1 on these displays further enhances the depth and richness of colors, providing a more immersive experience.

Another notable feature of these displays is their connectivity options. Both models come equipped with multiple input options, including HDMI, VGA, and component video, enabling compatibility with a wide range of devices. This aspect makes it easy to connect gaming consoles, Blu-ray players, and set-top boxes, further enhancing their versatility for various applications.

Energy efficiency is another characteristic that Mitsubishi prioritized in these models. The use of advanced plasma technologies helps to reduce power consumption, which is an essential consideration for environmentally conscious consumers.

Overall, the Mitsubishi Electronics PD-5065 and PD-4265 plasma displays offer a compelling combination of performance, design, and technology. Their high-quality visuals, robust features, and versatile connectivity options make them an excellent choice for both entertainment and professional use. Whether in a home theater or a corporate setting, these models deliver a premium viewing experience.