3. Installing the indoor unit


C


(inch)


K

L


120°

M

A

B

A


°


120


-7/32


N


6


O


E

D


F

3-17/32 3-15/16 3-15/16 3-17/32

G


3-15/16

5-1/8


70°


3/32

9/16


6- 6-


J

13-25/32

H


I


Fig. 3-4


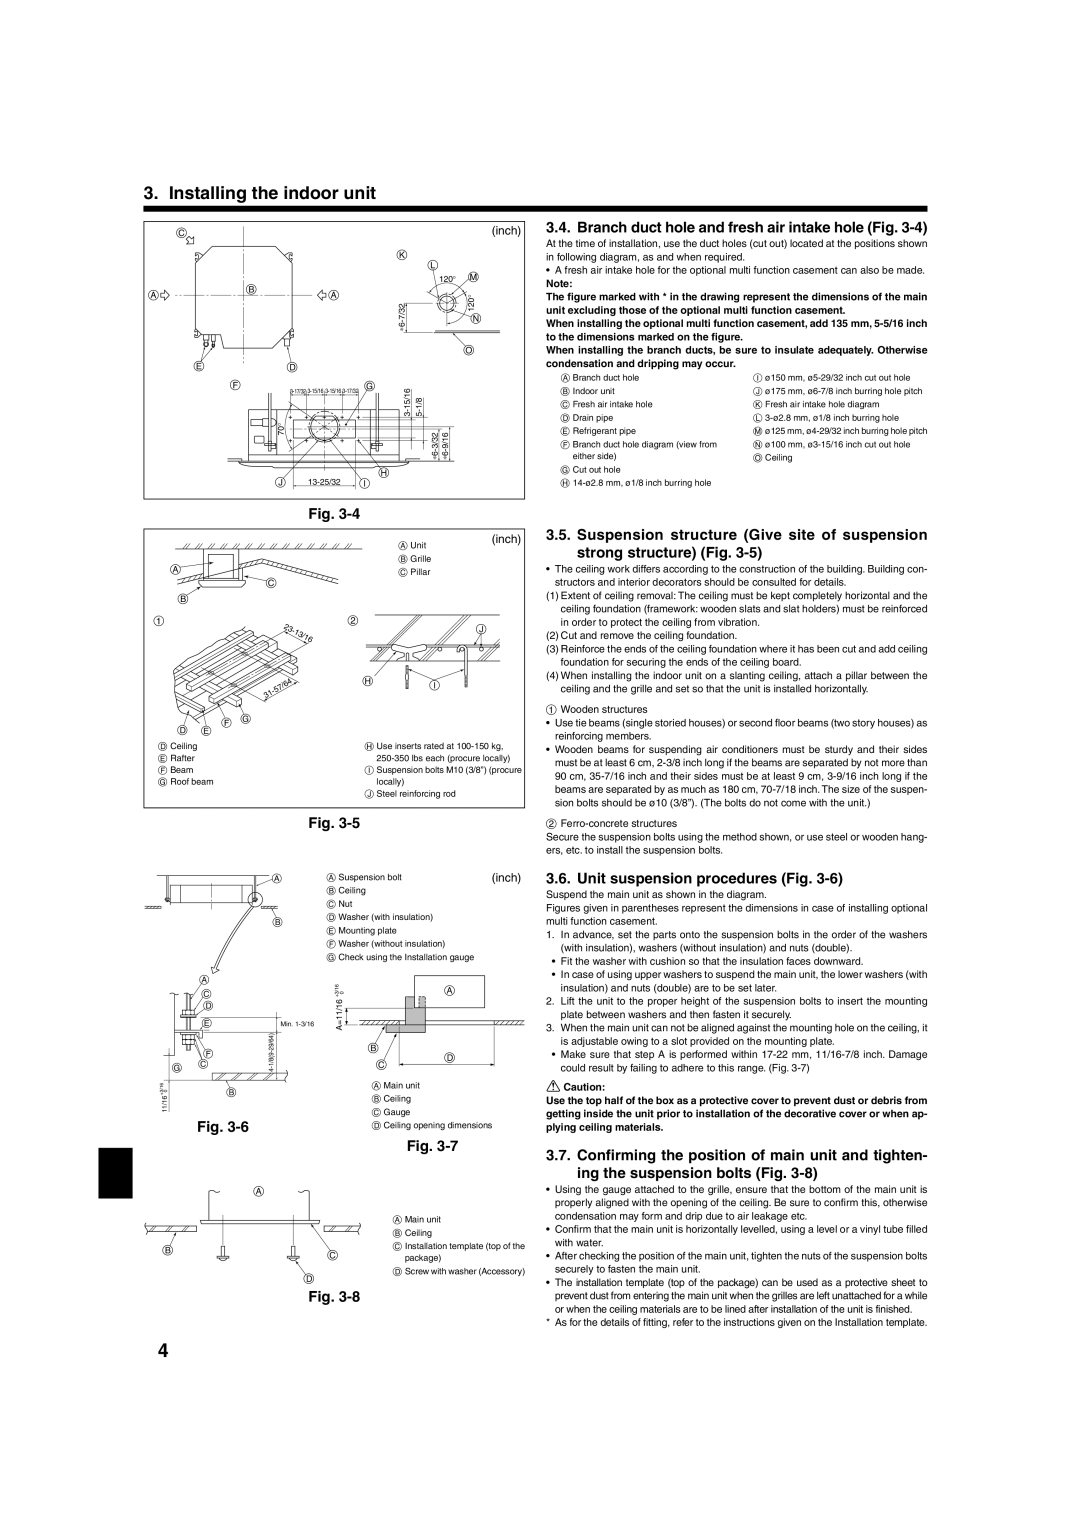
3.4. Branch duct hole and fresh air intake hole (Fig. 3-4)

At the time of installation, use the duct holes (cut out) located at the positions shown in following diagram, as and when required.

A fresh air intake hole for the optional multi function casement can also be made.

Note:

The figure marked with * in the drawing represent the dimensions of the main unit excluding those of the optional multi function casement.

When installing the optional multi function casement, add 135 mm, 5-5/16 inch to the dimensions marked on the figure.

When installing the branch ducts, be sure to insulate adequately. Otherwise condensation and dripping may occur.

A Branch duct hole

I ø150 mm, ø5-29/32 inch cut out hole

B Indoor unit

J ø175 mm, ø6-7/8 inch burring hole pitch

C Fresh air intake hole

K Fresh air intake hole diagram

D Drain pipe

L 3-ø2.8 mm, ø1/8 inch burring hole

E Refrigerant pipe

M ø125 mm, ø4-29/32 inch burring hole pitch

F Branch duct hole diagram (view from

N ø100 mm, ø3-15/16 inch cut out hole

either side)

O Ceiling

G Cut out hole


H 14-ø2.8 mm, ø1/8 inch burring hole


A Unit

(inch)

3.5. Suspension structure (Give site of suspension strong structure) (Fig. 3-5)

A

C

B

1

23-


13/16


-57/64


31

D

F G

E

DCeiling E Rafter F Beam

G Roof beam

BGrille

CPillar

2

J

H I

HUse inserts rated at 100-150 kg,

250-350 lbs each (procure locally)

ISuspension bolts M10 (3/8”) (procure

locally)

JSteel reinforcing rod

The ceiling work differs according to the construction of the building. Building con- structors and interior decorators should be consulted for details.

(1)Extent of ceiling removal: The ceiling must be kept completely horizontal and the

ceiling foundation (framework: wooden slats and slat holders) must be reinforced in order to protect the ceiling from vibration.

(2)Cut and remove the ceiling foundation.

(3)Reinforce the ends of the ceiling foundation where it has been cut and add ceiling foundation for securing the ends of the ceiling board.

(4)When installing the indoor unit on a slanting ceiling, attach a pillar between the ceiling and the grille and set so that the unit is installed horizontally.

1Wooden structures

Use tie beams (single storied houses) or second floor beams (two story houses) as reinforcing members.

Wooden beams for suspending air conditioners must be sturdy and their sides must be at least 6 cm, 2-3/8 inch long if the beams are separated by not more than 90 cm, 35-7/16 inch and their sides must be at least 9 cm, 3-9/16 inch long if the beams are separated by as much as 180 cm, 70-7/18 inch. The size of the suspen- sion bolts should be ø10 (3/8”). (The bolts do not come with the unit.)

Fig. 3-5


A

A Suspension bolt

(inch)


B Ceiling


C Nut


BD Washer (with insulation) E Mounting plate

F Washer (without insulation)

G Check using the Installation gauge

2Ferro-concrete structures

Secure the suspension bolts using the method shown, or use steel or wooden hang- ers, etc. to install the suspension bolts.

3.6. Unit suspension procedures (Fig. 3-6)

Suspend the main unit as shown in the diagram.

Figures given in parentheses represent the dimensions in case of installing optional multi function casement.

1.

In advance, set the parts onto the suspension bolts in the order of the washers


(with insulation), washers (without insulation) and nuts (double).

Fit the washer with cushion so that the insulation faces downward.

In case of using upper washers to suspend the main unit, the lower washers (with

A

C

D

E

Min. 1-3/16

+3/16

0

A=11/16

A


insulation) and nuts (double) are to be set later.

2.

Lift the unit to the proper height of the suspension bolts to insert the mounting


plate between washers and then fasten it securely.

3.

When the main unit can not be aligned against the mounting hole on the ceiling, it


F

-29/64)


4-1/8(9

G

C

B

C

D

is adjustable owing to a slot provided on the mounting plate.

• Make sure that step A is performed within 17-22 mm, 11/16-7/8 inch. Damage

could result by failing to adhere to this range. (Fig. 3-7)

+3/16 0

B

11/16


Fig. 3-6

A

B

D

C

AMain unit

BCeiling

CGauge

DCeiling opening dimensions

Fig. 3-7

AMain unit

BCeiling

CInstallation template (top of the package)

DScrew with washer (Accessory)

Caution:

Use the top half of the box as a protective cover to prevent dust or debris from getting inside the unit prior to installation of the decorative cover or when ap- plying ceiling materials.

3.7. Confirming the position of main unit and tighten- ing the suspension bolts (Fig. 3-8)

Using the gauge attached to the grille, ensure that the bottom of the main unit is


properly aligned with the opening of the ceiling. Be sure to confirm this, otherwise


condensation may form and drip due to air leakage etc.

Confirm that the main unit is horizontally levelled, using a level or a vinyl tube filled


with water.

After checking the position of the main unit, tighten the nuts of the suspension bolts


securely to fasten the main unit.

The installation template (top of the package) can be used as a protective sheet to

Fig. 3-8

prevent dust from entering the main unit when the grilles are left unattached for a while

or when the ceiling materials are to be lined after installation of the unit is finished.

* As for the details of fitting, refer to the instructions given on the Installation template.

4

Page 4
Image 4
Mitsubishi Electronics PLA-A-AA Branch duct hole and fresh air intake hole Fig, Unit suspension procedures Fig, 13/16

PLA-A-AA specifications

The Mitsubishi Electronics PLA-A-AA series is a cutting-edge range of air conditioning units designed to provide efficient cooling and heating solutions for various applications, from residential to commercial environments. This series stands out due to its innovative technology and user-friendly features.

One of the main highlights of the PLA-A-AA series is its use of advanced inverter technology. This technology allows the units to dynamically adjust their power output based on the current temperature conditions, ensuring that the desired climate is maintained efficiently. By minimizing energy consumption during operation, these systems can lead to significant savings on utility bills.

Additionally, the PLA-A-AA series is equipped with a built-in AI-driven control system that enhances user experience. This smart feature learns the user’s preferences and adjusts the operation accordingly, optimizing comfort while ensuring energy efficiency. The integration of smart technology also allows for remote control capabilities through mobile applications, enabling users to adjust settings from anywhere.

A notable characteristic of the PLA-A-AA units is their quiet operation. Designed with noise-reduction technology, these units operate at low decibel levels, making them ideal for settings where noise can be a concern, such as bedrooms and offices. This attention to sound design ensures that users can enjoy a peaceful environment without disruption.

The PLA-A-AA series also emphasizes sustainability and environmental responsibility. With a focus on using eco-friendly refrigerants, these systems have minimal impact on the environment. Mitsubishi Electronics continues to prioritize green technologies, consistently striving to reduce their carbon footprint through innovative engineering and efficiency programs.

Moreover, the units in this series are known for their durability and reliability. Constructed with high-quality materials and designed to withstand various climatic conditions, the PLA-A-AA series promises long-lasting performance. Regular maintenance is also simplified due to easily accessible components, helping to prolong the life of the unit.

In conclusion, the Mitsubishi Electronics PLA-A-AA series exemplifies the perfect blend of advanced technology, energy efficiency, and user-friendly features. With its inverter technology, smart control options, quiet operation, and commitment to sustainability, this range is an ideal choice for anyone seeking a dependable air conditioning solution.