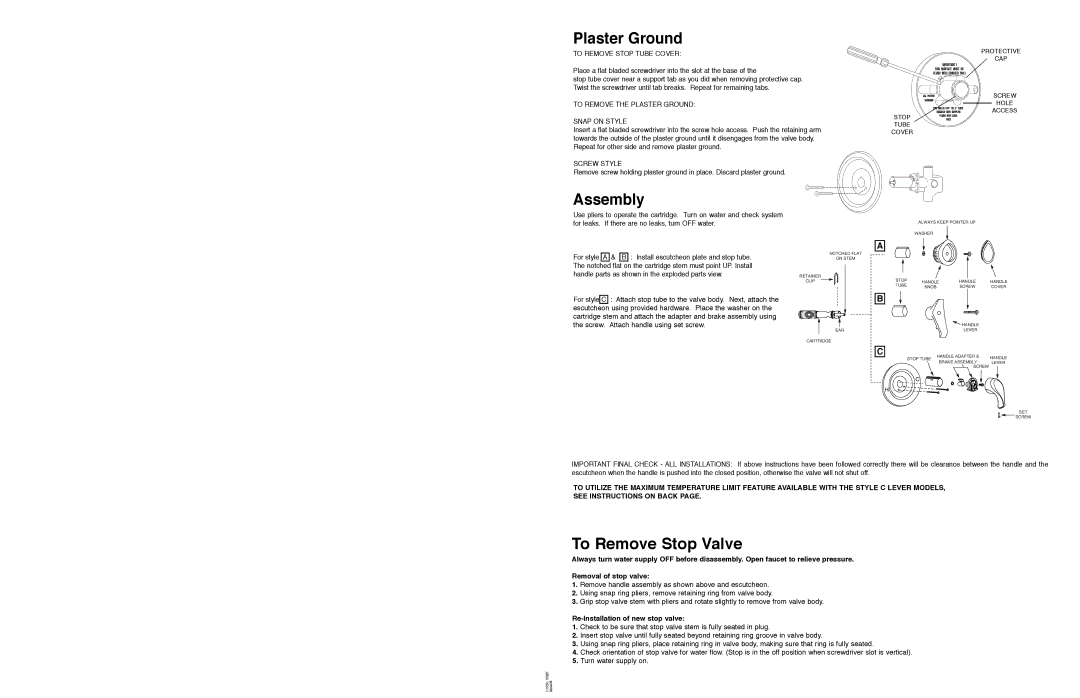
Plaster Ground

TO REMOVE STOP TUBE COVER:

Place a flat bladed screwdriver into the slot at the base of the

stop tube cover near a support tab as you did when removing protective cap. Twist the screwdriver until tab breaks. Repeat for remaining tabs.

TO REMOVE THE PLASTER GROUND:

SNAP ON STYLE

Insert a flat bladed screwdriver into the screw hole access. Push the retaining arm towards the outside of the plaster ground until it disengages from the valve body. Repeat for other side and remove plaster ground.

SCREW STYLE

Remove screw holding plaster ground in place. Discard plaster ground.

PROTECTIVE

CAP

SCREW

HOLE

ACCESS

STOP

TUBE

COVER

Assembly

Use pliers to operate the cartridge. Turn on water and check system for leaks. If there are no leaks, turn OFF water.

For style A & B : Install escutcheon plate and stop tube.

The notched flat on the cartridge stem must point UP. Install handle parts as shown in the exploded parts view.

For style C : Attach stop tube to the valve body. Next, attach the escutcheon using provided hardware. Place the washer on the cartridge stem and attach the adapter and brake assembly using the screw. Attach handle using set screw.

NOTCHED FLAT

ON STEM

RETAINER

CLIP

EAR

ALWAYS KEEP POINTER UP

WASHER

A

STOP

HANDLE

HANDLE

HANDLE

TUBE

KNOB

SCREW

COVER


B

HANDLE

LEVER

CARTRIDGE

C

STOP TUBE

HANDLE ADAPTER &

HANDLE

BRAKE ASSEMBLY


LEVER

SCREW

C

H

SET

SCREW

IMPORTANT FINAL CHECK - ALL INSTALLATIONS: If above instructions have been followed correctly there will be clearance between the handle and the escutcheon when the handle is pushed into the closed position, otherwise the valve will not shut off.

TO UTILIZE THE MAXIMUM TEMPERATURE LIMIT FEATURE AVAILABLE WITH THE STYLE C LEVER MODELS, SEE INSTRUCTIONS ON BACK PAGE.

To Remove Stop Valve

Always turn water supply OFF before disassembly. Open faucet to relieve pressure.

Removal of stop valve:

1.Remove handle assembly as shown above and escutcheon.

2.Using snap ring pliers, remove retaining ring from valve body.

3.Grip stop valve stem with pliers and rotate slightly to remove from valve body.

Re-Installation of new stop valve:

1.Check to be sure that stop valve stem is fully seated in plug.

2.Insert stop valve until fully seated beyond retaining ring groove in valve body.

3.Using snap ring pliers, place retaining ring in valve body, making sure that ring is fully seated.

4.Check orientation of stop valve for water flow. (Stop is in the off position when screwdriver slot is vertical).

5.Turn water supply on.

Page 3
Image 3
Moen T666, MT662C, T555, T473, T777, T888, 72700, 72615, 62700, 5401, 62600, TL470 Plaster Ground, Assembly, To Remove Stop Valve

MT662C, 72615, T555, 72700, T888 specifications

Moen is renowned for its innovative and high-quality plumbing products, and their faucet models—Moen 2291, 5401, 2290, T473, and 2700—are prime examples of this commitment to excellence. Each model features unique characteristics and cutting-edge technologies that enhance functionality and aesthetics in contemporary kitchens and bathrooms.

The Moen 2291 is a stylish and practical kitchen faucet characterized by its sleek, high-arc design. It features Moen's Duralast cartridge, which ensures smooth operation and longevity, minimizing the need for repairs. The faucet includes a pull-down sprayer with a powerful spray mode and a pause function, allowing for easy rinsing and cleaning. This model also comes with Spot Resist stainless finish, reducing water spots and fingerprints, ensuring that it remains attractive with minimal maintenance.

The Moen 5401 is a premier choice for those who value both style and performance in a kitchen faucet. Its unique design includes a side spray that complements the primary faucet, providing versatility in washing dishes and cleaning the sink. The 5401 is equipped with Moen's Reflex System, allowing for easy pull-down and retract functions, enhancing the user experience. The chrome finish of this model adds a touch of elegance, making it a perfect addition to any kitchen décor.

For those seeking a minimalist design, the Moen 2290 is an excellent option. This two-handle faucet combines vintage charm with modern functionality. Its high-quality construction and durable materials ensure resilience over time. The 2290 incorporates the innovative Posi-Temp pressure-balancing control, which maintains water temperature, preventing sudden changes that can be uncomfortable during use.

The Moen T473 showcases the brand's commitment to style and ease of use with its sleek design and advanced features. This model includes Moen's powerful Power Clean technology, providing 50% more spray power than most pull-down and pull-out faucets. This means quicker and more effective cleaning, all while maintaining a steady water flow.

Lastly, the Moen 2700 is designed specifically for bathrooms, offering a traditional and elegant touch. Its single-handle operation allows for easy temperature and flow control. The Eco-Performance feature of the 2700 reduces water consumption without sacrificing performance, making it an eco-friendly choice for water-conscious consumers.

Collectively, these Moen models offer a range of designs suited for various preferences while incorporating groundbreaking technologies and thoughtful features that elevate the overall user experience in any setting.