1.
2.
3.
4.
5.
6.
7.
8.

SAFETY TIPS

WARNING: TO REDUCE THE RISK OF FIRE, ELECTRIC SHOCK, OR INJURY TO PERSONS,

OBSERVE THE FOLLOWING: READ AND SAVE THESE INSTRUCTIONS

Installation work and electrical wiring must be done by qualified person(s) in accordance with applicable codes and standards (ANSI/NFPA 70- 1999), including fire-rated construction.

Use this unit only in the manner intended by the manufacurer. If you have any questions contact the manufacturer.

After making the wire connections, the wires should be spread apart with the grounded conductor and the equipment-grounding conductor on one side of the outlet box and ungrounded conductor on the other side of the outlet box.

Before you begin installing the fan, Switch power off at Service panel and lock service disconnecting means to prevent power from being switched on accidentally. When the service disconnecting means cannot be locked, securely fasten a prominent warning device, such as a tag, to the service panel.

Be cautious! read all instructions and safety information before installing your new fan. Review the accompanying assembly diagrams. When cutting or drilling into wall or ceiling, do not damage electrical wiring and other hidden utilities.

Make sure the installation site you choose allows the fan blades to rotate without any obstructions. Allow a minimum clearance of 7 feet from the floor to the trailing edge of the blade.

WARNING – Risk of fire, electric shock, or personal injury, The fan in this box may be either directly supported from a structural framing mem- ber of a building and/or may be mounted to an outlet box marked acceptable for fan support of 31.8 kg. (70 lbs.) or less. Most outlet boxes commonly used for the support of luminaires may not be acceptable for fan support and may need to be replaced. Consult a qualified electrician

9. if in doubt.

10. Do not bend blade holders during installation to motor, balancing or during cleaning. Do not insert foreign object between rotating blades.

11. Attach the mounting bracket using only the hardware supplied with the outlet box.

12. To reduce the risk of fire or electric shock, do not use this fan with any solid state fan speed control device, or variable speed control.

13. If this unit is to be installed over a tub or shower, it must be marked as appropriate for the application.

14. NEVER place a switch where it can be reached from a tub or shower.

The combustion airflow needed for safe operation of fuel-burning equipment may be affected by this unit’s operation. Follow the heating equip- ment manufacturer’s guideline safety standards such as those published by the National Fire Protection Association (NFPA), and the American

15. Society for Heating, Refrigeration and Air Conditioning Engineers (ASHRAE) and the local code authorities.

Before servicing or cleaning unit, Switch power off at Service panel and lock service disconnecting means to prevent power from being switched on accidentally. When the service disconnecting means cannot be locked, securely fasten a prominent warning device, such as a tag, to the service panel.

Phillips Screwdriver

Wire Cutters

Pliers

1

2

OUTLET BOX METHOD


Warning-Risk of


fire, electric shock, or person-


al injury. The fan in this box may be either


Before you begin installing the fan, Switch


directly supported from a structural framing


power off at Service panel and lock service dis-


member of a building and/or may be mounted


connecting means to prevent power from being


to an outlet box marked acceptable for fan sup-


switched on accidentally. When the service dis-


port of of 31.8 kg (70 lbs) or less. Most outlet


connecting means cannot be locked, securely


boxes commonly used for the support of lummi-


fasten a prominent warning device, such as a


naires may not be acceptable for fan support


tag, to the service panel.


and may need to be replaced. Consult a quali-


fied electrician if in doubt.


4


5


BUILDING STRUCTURE METHOD


Mounting


Outlet box


Plate


Wood


Screws


Secure mounting plate directly to a joist from


the buliding structure via the two knock out


Remove the 4 screws attaching the Mounting


holes on the outlet box. Use only the appropri-


neck the mounting plate. Retain the 4 screws


ate wood screws and washers included with


for re-assembly.


your fan. Caution: Wood screws must go


through into the building joist.


Step Ladder

3

Remove Safety bar from mounting bracket by loosing screws, sliding bar to side, and lifting it off the 2 screws.

6 FAN BRACE AND BOX METHOD

Install the mounting Plate to approved fan brace and box combination use only the hard- ware provided with the fan brace and box.

Page 2
Image 2
Monte Carlo Fan Company 5MQ60XX owner manual Phillips Screwdriver Wire Cutters Pliers

5MQ60XX specifications

The Monte Carlo Fan Company 5MQ60XX is an exemplary ceiling fan that blends innovative technology with stylish design, perfect for any modern living space. Renowned for its durability and performance, this fan is designed with features that prioritize user comfort and efficiency.

One of the standout characteristics of the 5MQ60XX is its powerful motor, which ensures optimal airflow while operating quietly. The fan boasts a unique 60-inch blade span, making it ideal for larger rooms where effective circulation is crucial. The aerodynamic blades are crafted from high-quality materials, offering both stability and durability while also enhancing the overall aesthetics of the fan.

The 5MQ60XX comes with multiple speed settings, allowing users to customize airflow according to their preferences and needs. With a user-friendly remote control, adjusting the fan's settings becomes effortless, giving you the convenience to change speeds without leaving your seat.

In terms of technology, the Monte Carlo Fan Company incorporates energy-efficient LED lights in the 5MQ60XX model, providing not only effective illumination but also contributing to energy savings. This feature not only increases the overall functionality of the fan but also aligns with eco-friendly practices that a growing number of consumers appreciate.

The fan's sleek, contemporary design is another notable aspect. Available in various finishes, including brushed nickel and matte black, the 5MQ60XX can complement diverse decor styles, from modern to traditional. Its streamlined silhouette and elegant design make it more than just a source of airflow; it serves as a statement piece in any room.

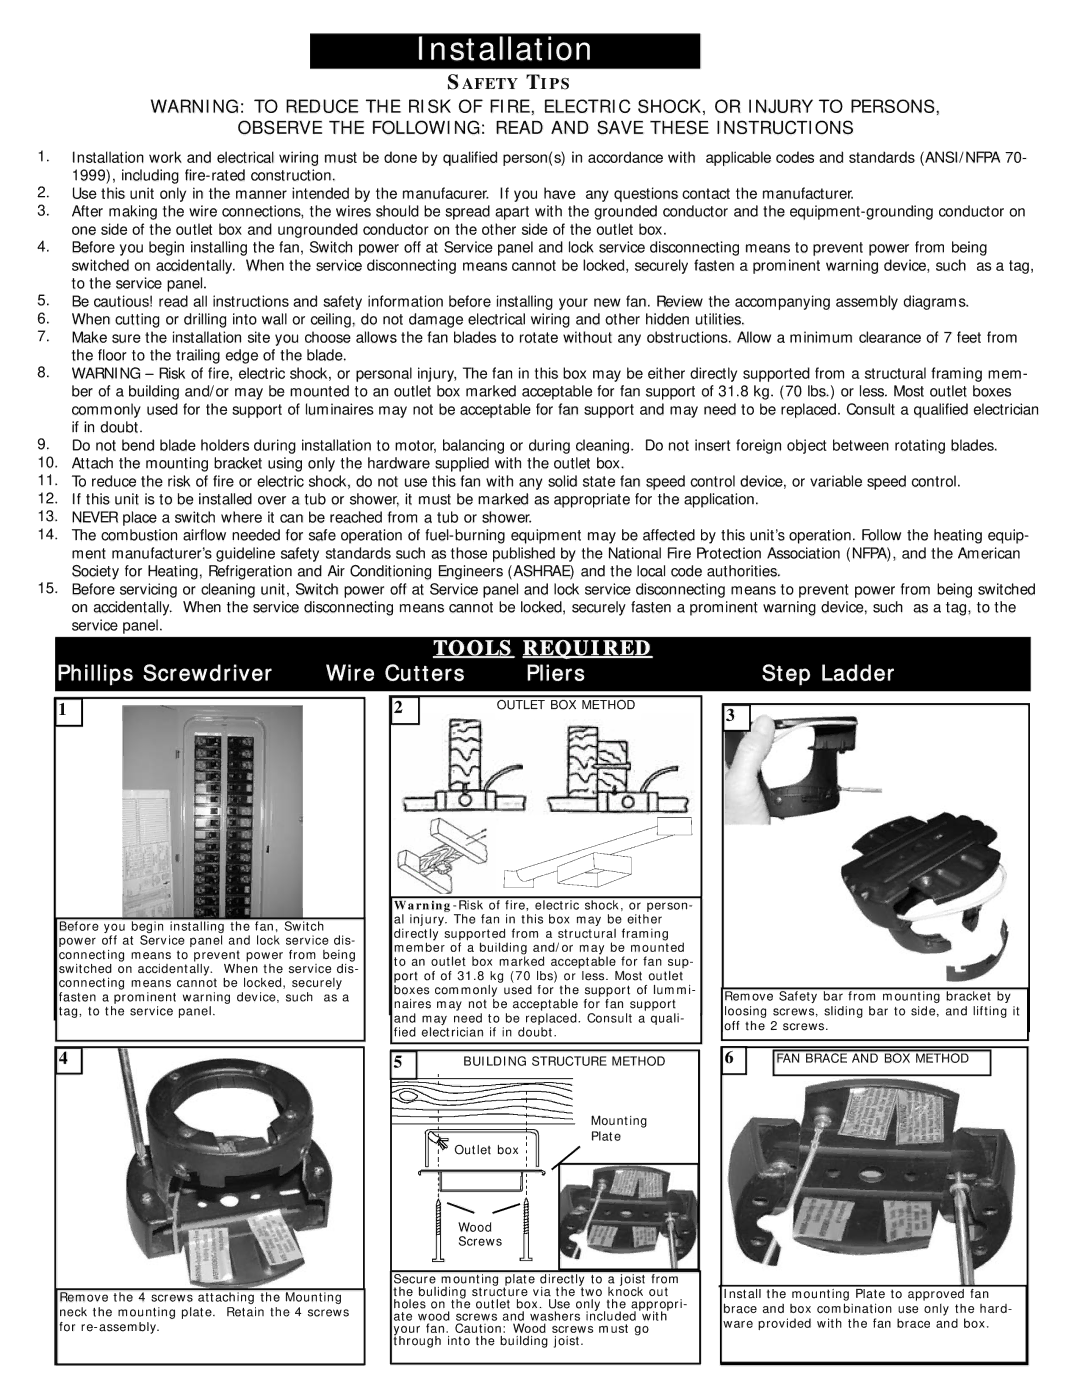
Installation of the Monte Carlo Fan 5MQ60XX is straightforward, thanks to its intuitive mounting system. Whether you choose to install it on a flat ceiling or a sloped surface, the fan adapts with ease, ensuring both reliability and performance.

In summary, the Monte Carlo Fan Company 5MQ60XX exemplifies the perfect blend of efficiency, technology, and style. With features like a powerful motor, customizable speed settings, integrated LED lighting, and attractive design options, this fan is an ideal choice for anyone looking to enhance their indoor environment with comfort and sophistication.