with 4 suitable fasteners through the predrilled holes in vent flange.

B.Prepare to install the heater wall mounting bracket as follows:

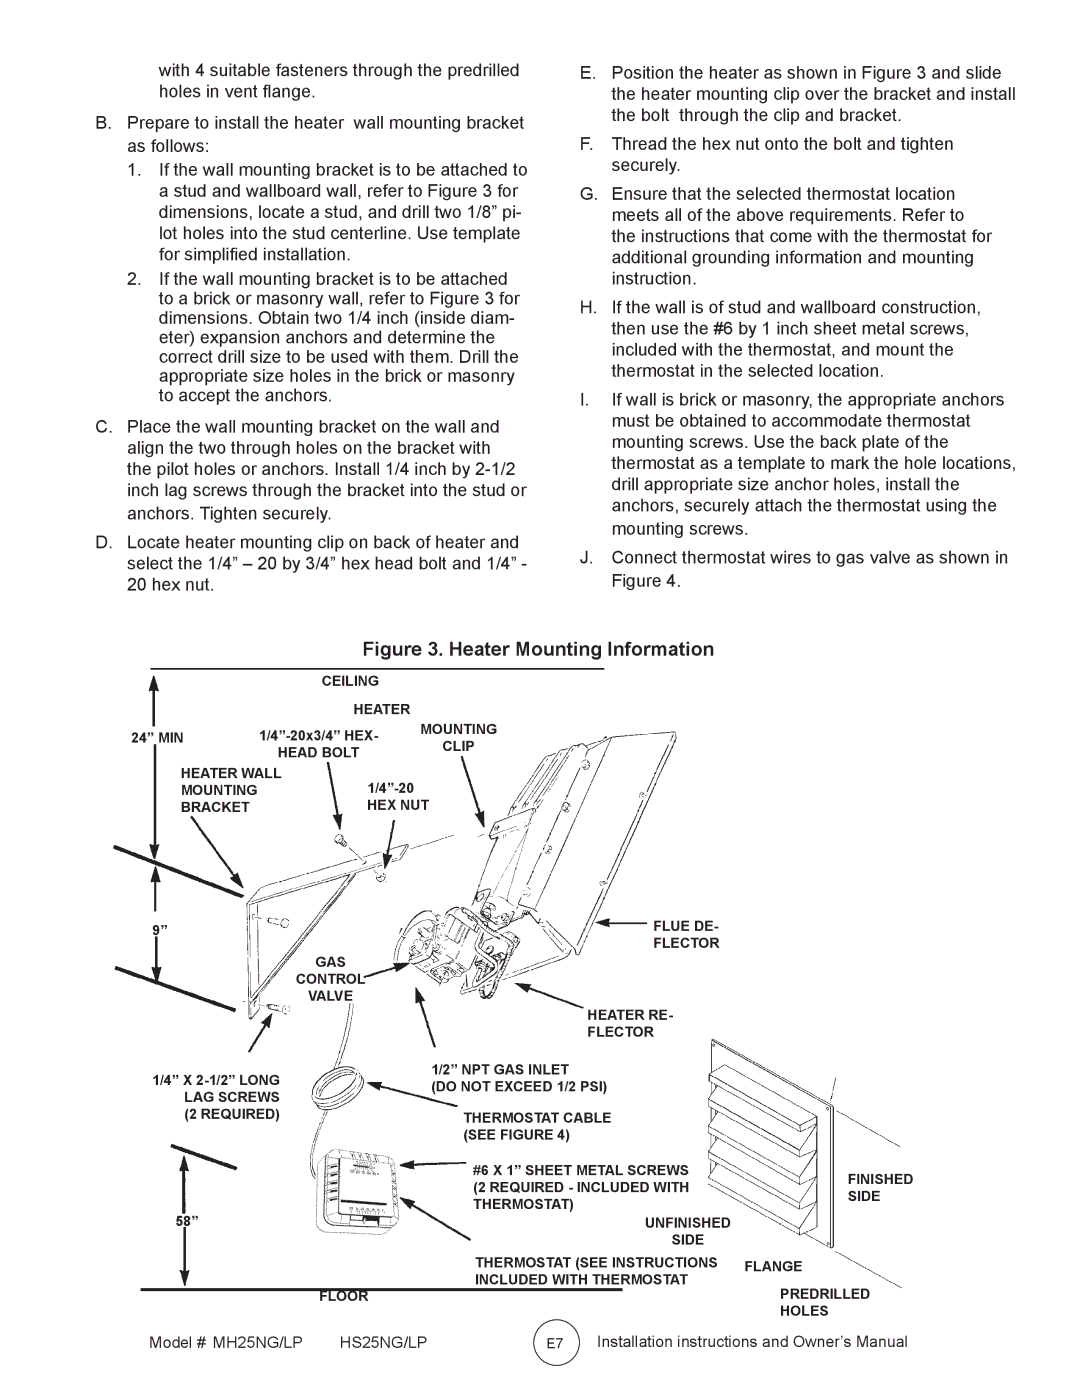
1.If the wall mounting bracket is to be attached to a stud and wallboard wall, refer to Figure 3 for dimensions, locate a stud, and drill two 1/8” pi- lot holes into the stud centerline. Use template for simplified installation.

2.If the wall mounting bracket is to be attached to a brick or masonry wall, refer to Figure 3 for dimensions. Obtain two 1/4 inch (inside diam- eter) expansion anchors and determine the correct drill size to be used with them. Drill the appropriate size holes in the brick or masonry to accept the anchors.

C.Place the wall mounting bracket on the wall and align the two through holes on the bracket with the pilot holes or anchors. Install 1/4 inch by 2-1/2 inch lag screws through the bracket into the stud or anchors. Tighten securely.

D.Locate heater mounting clip on back of heater and select the 1/4” – 20 by 3/4” hex head bolt and 1/4” -

20hex nut.

E.Position the heater as shown in Figure 3 and slide the heater mounting clip over the bracket and install the bolt through the clip and bracket.

F.Thread the hex nut onto the bolt and tighten securely.

G.Ensure that the selected thermostat location meets all of the above requirements. Refer to the instructions that come with the thermostat for additional grounding information and mounting instruction.

H.If the wall is of stud and wallboard construction, then use the #6 by 1 inch sheet metal screws, included with the thermostat, and mount the thermostat in the selected location.

I.If wall is brick or masonry, the appropriate anchors must be obtained to accommodate thermostat mounting screws. Use the back plate of the thermostat as a template to mark the hole locations, drill appropriate size anchor holes, install the anchors, securely attach the thermostat using the mounting screws.

J.Connect thermostat wires to gas valve as shown in Figure 4.

Figure 3. Heater Mounting Information


CEILING


HEATER


24” MIN

1/4”-20x3/4” HEX-

MOUNTING

CLIP


HEAD BOLT


HEATER WALL


MOUNTING

1/4”-20


BRACKET

HEX NUT

9”

FLUE DE-


FLECTOR

GAS

CONTROL

VALVE

HEATER RE-

FLECTOR

1/4” X 2-1/2” LONG LAG SCREWS (2 REQUIRED)

58”

1/2” NPT GAS INLET

(DO NOT EXCEED 1/2 PSI)

THERMOSTAT CABLE (SEE FIGURE 4)

#6 X 1” SHEET METAL SCREWS

(2 REQUIRED - INCLUDED WITH THERMOSTAT)

UNFINISHED

SIDE

THERMOSTAT (SEE INSTRUCTIONS INCLUDED WITH THERMOSTAT

FLOOR

FINISHED

SIDE

FLANGE

PREDRILLED

HOLES

Model # MH25NG/LP

HS25NG/LP

E7

Installation instructions and Owner’s Manual

Page 7
Image 7
Mr. Heater HS25NG/LP, MH25NG/LP owner manual Heater Mounting Information

HS25NG/LP, MH25NG/LP specifications

The Mr. Heater HS25NG/LP and MH25NG/LP are reliable and efficient heating solutions designed for both residential and commercial spaces. These powerful units deliver warmth and comfort, making them ideal for garages, workshops, and outdoor settings.

One of the standout features of the HS25NG and MH25NG is their versatility in fuel options. The HS25NG is designed to use natural gas, while the MH25NG operates on propane, providing flexibility based on user needs and availability. This adaptability allows users to select the most convenient and cost-effective energy source for their heating requirements.

Both models are equipped with a robust heat output, with the capability to deliver 25,000 BTUs per hour. This level of performance ensures quick heating even in larger spaces, establishing a comfortable environment in minimal time. The units also feature a wide heating area that can efficiently cover spaces up to 600 square feet, making them suited for various applications.

User safety and efficiency are paramount in the design of these heaters. The HS25NG and MH25NG come with an automatic shutoff system that activates if the unit tips over or detects any obstruction to airflow. Additionally, they are equipped with a built-in piezo ignition system, enabling easy and reliable lighting without the need for matches or an external ignition source.

The heaters also incorporate advanced technology to optimize performance. Their infrared heating design allows for direct and efficient warmth, minimizing energy loss and ensuring that heat is directed where it's needed most. This not only enhances efficiency but can also lead to reduced energy costs over time.

Both models are designed with portability in mind, featuring a lightweight construction and convenient carry handle, making it simple to move the unit from one location to another as needed. The durable construction ensures that they can withstand the rigors of frequent use, whether it be in a workshop or an outdoor gathering.

In summary, the Mr. Heater HS25NG/LP and MH25NG/LP are powerful, versatile, and reliable heating solutions that combine advanced technology with user-friendly features. With their strong heat output, safety features, and option for both natural gas and propane, these heaters are an excellent choice for those looking for efficient heating in any environment.